1955 Johnson QD-16 Restoration

pckeen

Commander
Joined
Jun 20, 2012
Messages
2,067
So success! I pulled off some good spark plug wires off another old outboard - and I now have a motor running on two cylinders, with enough power to get me in a 14' lone star up on plane. The bad news - the spark plug wires are just long enough to stretch, but too short to sit comfortably in the motor - so I'll still need to order some more (new) wire. Second problem - the motor at first was still running poorly, at full throttle, until I dialed the high speed (bottom) needle all the way in. At that point, the engine ran much better, but it would sputter somewhat. I dialed it about 1/3 of a turn out, and it ran best there. However, the needle won't stay still - it turns CCW by itself (which is the same as the knob dropping due to gravity). I assume I don't have the carburetor bottom needle set up properly, but I'm not sure what to do. So two questions: 1) I gather I need 7mm solid core wire - can I use braided wire? I see there are several kinds of solid core wire out there. 2) What do I do about the bottom carb. By the way - I'm running 50:1 gas at the moment.
 

Crosbyman

Vice Admiral
Joined
Nov 5, 2006
Messages
5,512
1- imho... braided bends better

2- turn the collar nut on the bottom needle to hold it in solid

3- DO NOTT RUN 50/1 go to 24/1 minumum with TCW3 or better yet a synthetic o?l less poluting .... expensive but XD_1000 is bio degradable :)
 

HighTrim

Supreme Mariner
Joined
Jun 21, 2007
Messages
10,486
As stated, double that oil up! 24:1 for that motor, no matter what Bob or Harry down the street tell ya!

You likely need an extra packing washer or two. Then re tighten down the packing nut with a 7/16" wrench to keep it from turning.
 

pckeen

Commander
Joined
Jun 20, 2012
Messages
2,067
Well, I managed to find a local supplier for spark plug wire - but he had to dig to find it - not much call for it any more. New wires are on, but now the stator plate is jamming on something when I turn the throttle. :mad-new: With fading light tonight, I gave up. Back out there in the morning (I'm on vacation this week).
 

pckeen

Commander
Joined
Jun 20, 2012
Messages
2,067
1-
2- turn the collar nut on the bottom needle to hold it in solid

3- DO NOTT RUN 50/1 go to 24/1 minumum with TCW3 or better yet a synthetic o?l less poluting .... expensive but XD_1000 is bio degradable :)

As stated, double that oil up! 24:1 for that motor, no matter what Bob or Harry down the street tell ya!

You likely need an extra packing washer or two. Then re tighten down the packing nut with a 7/16" wrench to keep it from turning.

2) That worked. Didn't need the packing washer - but the 7/16" wrench worked fine.

3) Oil mix changed to 24/1.

As for the electrical issues - 2 hours of work got the stator plate freed up - it turned out to be a missing washer on one of the four stator plate mounting screws - I guess the screw protruded just far enough (about 1/32 of an inch) to jam on something.

So, that problem sorted, new spark plug wires installed (Belden High Temperature 7mm Metallic Cable 14). They are long enough to allow the stator plate to turn freely.....

So I tried to fire it up....and I tried.....and I tried.....(keep repeating this until you are exhausted......).

And the motor ran.......

Again running only on the top cylinder. :frusty:

So I'll reinspect again tomorrow, and try to check for a poor connection in the spark plug wires. I had tested both wires, once assembled, with an ohm meter - there was very little resistance in either wire, which I expected, given that this was a simple wire-core connection. If it isn't a connection issue, I'll replace the points and coils (I had figured it wasn't points or coils, after the motor ran properly with the too-short spark plug wires). i'm reluctant to do this only because if condensers had been a problem, switching the condensors should have switched the spark plug wire which had bad spark.

Any advice is welcome, and at this point, even the 'Hey Nucklebeak, I told you....." variety. :facepalm:
 
Last edited:

putback

Petty Officer 3rd Class
Joined
Jan 29, 2015
Messages
88
A surprising number of these old timers still trolling for lakers in my area. Great motors, very reliable, but they're very old now with age related problems. A couple things to consider for a troublesome cylinder assuming the compression is good. A leaking crankshaft seal. The one that gave me fits, reeds that wouldn't seal properly.
 

HighTrim

Supreme Mariner
Joined
Jun 21, 2007
Messages
10,486
Well, you asked for it!

Clean them points!

You honestly would not believe how many of these posts we see on here, and we say polish the points, but they never do, they just look at em and think they are clean. They aren't, lol

IF those points have been sitting a while, they need to be polished. Im not saying they are junk, they are not, they are much better than the new ones you will buy nowadays, but they will have oxidation and such on them that needs to be polished off, then cleaned after setting at 020.

I like to take them off, and hit them against the wire wheel on my bench grinder. But you can also wrap wet/dry around a hacksaw blade, or use a points file if you have one. Get them shiny! Then clean with parts/brake cleaner, and blow dry with compressed air, then install.

Now set them. When the rubbing block is aligned with the high point on the cam, usually the flywheel key, you should be able to snugly fit an 020 feeler gauge through, but not be able to get an 022 through, and an 018 should slide through with ease.

When setting them, you don't need to loosen the hold down screw. Keep it tight, then make minor adjustments.

After you are happy with your work, dip paper stock in acetone, and run that through. You will see black streaks along the paper, oil residue from the feeler gauges and your fingers. When you stop seeing black streaks, blow off with compressed air and you're done.

Now check that spark! You need an inline, adjustable tester for this, set it to 1/4"

I have had at least 6 guys bring their motor over, from this site alone, that said their points were clean, but after I went through them, proved them wrong.

If you are not certain about the condensors, mail them to me and ill test them for you if you are not able to.
 

Crosbyman

Vice Admiral
Joined
Nov 5, 2006
Messages
5,512
if you tested the plug wires... "installed" you should not have read low resistance since the grounded referrence side of the coils includes the secondary winding ​

you shoud measure 7-8K ohms or something in that range in fact you should measure your coils alone...connect the plug wires and remeasure at the end of the plug wires... the readings should be the same 7-8Kohms proving that the coil to wire connections are good..
 
Last edited:

pckeen

Commander
Joined
Jun 20, 2012
Messages
2,067
Hmmmmm.

Before I head out to clean the points for the third time....

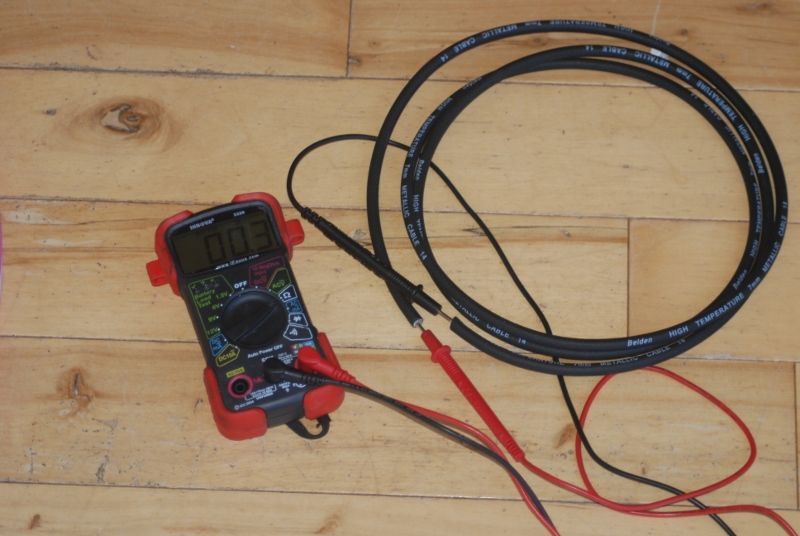
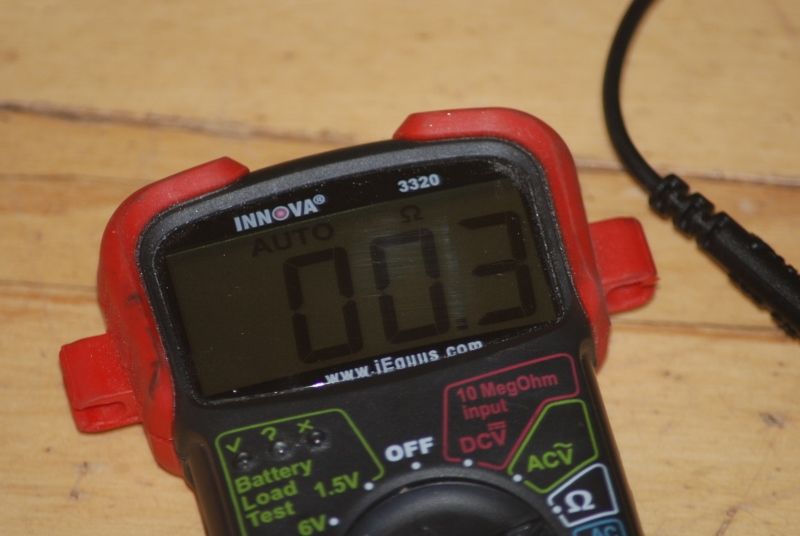
Don't know if I've messed this up or not. Here's some images of the wire (same piece of wire that I used for the cables - I bought extra - there is about 3 feet here) being tested using a mulitmeter....what do these readings tell you? The multimeter is an Innova 3320.


HighTrim

Supreme Mariner
Joined
Jun 21, 2007
Messages
10,486
How are you cleaning them exactly? Im not being smart, but just spraying contact cleaner or something on them doesn't cut it. Everyones definition of how to do a particular task varies wildly!

If you touch your meter leads together, does it show 0 ohms resistance?
 

interalian

Commander
Joined
Jul 23, 2009
Messages
2,105
No DMM will show 0.00 ohms with the leads touching. Compare the reading you get across the wire with a reading with the probes shorted to each other. If it's the same reading, that's 0.
 

oldboat1

Fleet Admiral
Joined
Apr 3, 2002
Messages
9,612
With the meter set to Rx1K, try for a reading on the known good side -- connector in the boot to the magneto plate. Then do the same check on the problem side. If you get identical readings on each side, it's likely the ignition problem is elsewhere -- at least not likely the wiring or connections. Testing resistance in the new wire probably won't point to a solution, IMO.

I've been fooling around with an old magneto, and you should get a reading of some kind (no reading would indicate no connection -- think continuity). Identical readings should indicate that there are other issues on the bad side -- could still be a coil problem, but IMO likely points or condensers as discussed above.
 

Crosbyman

Vice Admiral
Joined
Nov 5, 2006
Messages
5,512
your pictures shows a resistance measurement inside the spark plug wire wire. Beng metallic you should read what you see...--> 0 ohms basically a short

with the plug wire hooked up to coil's pin ( high voltage output) and then reading between the wire (plug end) and frame ground ( engine block) this will allow you to measure the internal resistance of the coil's secondary winding​

you should read about 7-​8 Kohms (8,000)

each plug wire should give you the same values 7-8Kohms
 

HighTrim

Supreme Mariner
Joined
Jun 21, 2007
Messages
10,486
Actually crosbyman, some coils secondary winding are lower, depends on the manufacturer. You will find the resistance of the secondary anywhere from 3 to 8k ohms.
 

tomhath

Master Chief Petty Officer
Joined
Dec 5, 2007
Messages
814
The difference is resistor (automotive) versus non-resistor (solid copper) wires. The solid copper lets more current flow through, which is helpful with a low power magneto/points setup; the problem is that with a high energy electronic ignition system it also generates a lot of radio interference (which can also mess with sensors and computers). Resistor wires suppress the RF interference, but you don't need that on an old outboard.
 

Crosbyman

Vice Admiral
Joined
Nov 5, 2006
Messages
5,512
high Trim ... ."Actually crosbyman, some coils secondary winding are lower, depends on the manufacturer. You will find the resistance of the secondary anywhere

from 3 to 8k ohms". .


very true although I have personnaly never seen any around 3-6 K mind you I have only swapped just a dozen of these


the main issue here being "measuring the coil ohms value at the boot itself" and 3K would be fine as you stated.


points are likely in need of a cleaning


p.s. looking for a "reasonnable " cyl head for a 7524 ...;)
 
Top