comp test not so good options?

DudeAbides

Seaman
Joined
Jun 20, 2015
Messages
54
1989 85HP Force new to me

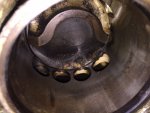
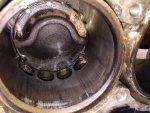
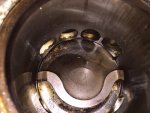
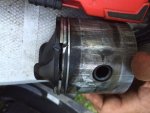
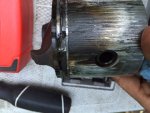
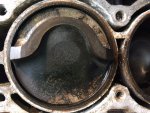
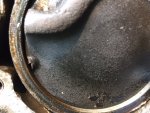
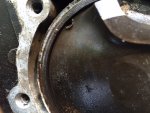
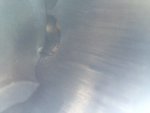
Did a compression test 120 115 100

Seloc manual said 15 psi max diff. so I pulled the head cover and found this.

It sure looks like what people have described here before. rings getting caught on exhaust port.

The #3 cylinder has a decent scratch , I am actually surprised I am even getting 100psi.

So I am wondering what my options might be. Is there any chance I could take it easy on this engine and get the rest of this season? or should it be rebuilt pronto?
 

Attachments

  • photo224051.JPG
    photo224051.JPG
    154.9 KB · Views: 0
  • photo224052.JPG
    photo224052.JPG
    138.5 KB · Views: 0
  • photo224053.JPG
    photo224053.JPG
    128.6 KB · Views: 0
  • photo224054.JPG
    photo224054.JPG
    75 KB · Views: 0

DudeAbides

Seaman
Joined
Jun 20, 2015
Messages
54
I think I should add that besides just doing routine maintenance and trying to determine the state of this engine that is new to me, I was led here by chasing down a rough idle and hard cold start.

Surprisingly the engine runs pretty good at WOT

Thanks,
Jason
 

Jiggz

Captain
Joined
Oct 23, 2009
Messages
3,817
If you plan on just dumping the engine after the season or until it dies, you can go ahead and continue to use it. I doubt it will last another 2~3 outings though. Otherwise, if you plan on keeping the motor still then now is the time to disassemble it and replace all pistons and rings with Wiseco piston kits. Each piston kit comes with the rings already installed and wrist pin. You just need to get their wrist bearing kits which is I believe is another $15. For an experienced guy with all parts on hand, this is no more than a day's work and maybe three days work for the inexperienced. This is with the assumption the cylinders only require de-glazing which based on the compression numbers should be the case.
 

DudeAbides

Seaman
Joined
Jun 20, 2015
Messages
54
That's actually not that discouraging. Thanks Jiggz. It seems that I can disconnect the rods without splitting the powerhead?

I guess the big question is how much of a problem the scrape inside cylinder 3 is.

It seems to be deepest right at the exhaust port and taper down to almost nothing at TDC, I am assuming thats why my compression is 100 psi and not 10 psi.

If I assume that I can just deglaze the cylinders would order the standard Wiseco set?
 

Jiggz

Captain
Joined
Oct 23, 2009
Messages
3,817
Don't order yet. You need to dismount the pistons first and diagnose each cylinders. Also you will need a 1/4"-12 point socket set with extension to unbolt the conn rod caps. Basically this is the general steps to remove the pistons: First place rag under the carbs to catch falling screws or bearings or other small parts into the lower cowling.

1. Remove air covers from carbs
1A. Disconnect fuel hoses, choke system, throttle linkages from the carbs
2. Dismount carbs try to save gaskets as much as possible
3. Dismount intake adapters
4. Dismount reed blocks
5 Rotate flywheel so the caps are closer to the intake openings and then remove cap bolts. Make sure you account for all the roller bearings. Sometimes the bearings will roll down and fall into the cowling so make sure you put something like a rag to catch them. If bearings gets stuck inside the crankcase, use thick grease to pick them up DO NOT USE MAGNET.
6. Push piston out through the head.

You will need to take a lot of pics while disassembling so you can have a reference when putting it back. The old conn rods you will reuse so make sure you note their orientations.

Pistons have markings to indicate if they have been overbored or not. From the pics I can see #1 stamped meaning these are still the standard bore which is 3.312 or 3 5/16". This is the same as the 125HP pistons which I used last time. Here's the pic of the box on the next post.
 
Last edited:

Jiggz

Captain
Joined
Oct 23, 2009
Messages
3,817
No Title

Here's the kit I ordered before.
 

Attachments

  • photo224066.jpg
    photo224066.jpg
    162.9 KB · Views: 1

DudeAbides

Seaman
Joined
Jun 20, 2015
Messages
54
Thanks for all the info and advice Jiggz.

Did you have the same problem with the old rings?

I see you have the standard size piston. There was no reason to oversize?
 

Jiggz

Captain
Joined
Oct 23, 2009
Messages
3,817
Highly recommended doing all 3. Although you can also just do the two broken ones but then that still leaves one cylinder with the old keystone rings which tend to catch on the ports. When you are all done, you need to verify your air-fuel mixture screw settings to be at least 1 1/8~ 1 1/4 turn out from slightly seated. Sometimes the idle is smoother with settings less than 1 turn out but this is a bad setting as it compromise the lubrication of the pistons.
 

jerryjerry05

Supreme Mariner
Joined
May 7, 2008
Messages
17,926
Post some pics of the cylinders when the pistons are at the bottom.
2 of the pistons are scrap.
The 3rd might be reusable?
You need to dismantle and check for skirt damage.

Also try to figure out why it went?


Jiggz. If you can rebuild this in 1 day you are my new HERO!!! :)

It takes me a day just to clean the block and do the thread chase.
 

DudeAbides

Seaman
Joined
Jun 20, 2015
Messages
54
Thanks Guys. I will be sure post plenty of pics as I proceed with this project.

Preparing the block for the new pistons has me a little nervous.

My thinking (please tell me if its wrong) is that the cylinder walls can't be too bad if I am still getting 100psi ?

I guess the worst case scenario is that the block needs to be split and sent to a machine shop.

That wouldn't be the end of the world, but I sure would love to avoid that if possible
 

DudeAbides

Seaman
Joined
Jun 20, 2015
Messages
54
any tips on how to de glaze or clean the block without allowing any bits of metal to fall below the cylinder walls.

should I chamfer the edge of the exhaust port?

Jerry I will be trying to find whatever info I can on why this happened, from reading through these forums, it seems that this is simply a flaw in the make up of the ring. Do you disagree with that?

I know generally a problem like this would be due to under lubrication, maybe in this case its both?

My thought is that if I am pulling the third piston to examine the skirt, then I am also replacing it seems worth the $150
 

Jiggz

Captain
Joined
Oct 23, 2009
Messages
3,817
De-glaze using honing stones which you can buy for less than $30 at HF. Stuff the very bottom of the cylinder with rags to catch all debris just make sure you clear the entire bottom of the cylinder too. And yes, with all parts on hand and the right tools you can do this in one day, i.e. dismounting carbs, conn rod caps, old pistons, pushing out the old wrist pins, installing the new wrists and conn rods, de-glazing and installing new pistons.

This is with the assumption you will not split the block nor will you break any head bolts (which so far has not happened yet) and that de-glazing is all you need to do to install the new pistons (required even if the cylinder is immaculate). Obviously, in your case just waiting for the parts to come will already take more than 3 days. So while waiting for parts you can prep the cylinders and the conn rods, and as soon as all parts arrive you can easily complete the remaining job way less than 3 days.

Chamfering the ports is optional but recommended. You chamfer before de-glazing.
 

DudeAbides

Seaman
Joined
Jun 20, 2015
Messages
54
No Title

Here are mycylinders bottomed out
 

Attachments

  • photo224221.JPG
    photo224221.JPG
    108.7 KB · Views: 0
  • photo224222.JPG
    photo224222.JPG
    133.5 KB · Views: 0
  • photo224223.JPG
    photo224223.JPG
    109 KB · Views: 0

DudeAbides

Seaman
Joined
Jun 20, 2015
Messages
54
No Title

Here are the pistons out of the head

I really cant believe that a few days ago I was cruising around the lake on these.

I think they might be the cause of my rough idle:cool:
 

Attachments

  • photo224224.JPG
    photo224224.JPG
    117 KB · Views: 0
  • photo224225.JPG
    photo224225.JPG
    109.2 KB · Views: 0
  • photo224226.JPG
    photo224226.JPG
    112.2 KB · Views: 0

Jiggz

Captain
Joined
Oct 23, 2009
Messages
3,817
Now is the time to diagnose the cylinders if it will require more than just de-glazing. #2 seems to be the roughest but then of course, #3 pic is not showing the entirety of the cylinder.
 

DudeAbides

Seaman
Joined
Jun 20, 2015
Messages
54
Well, None of the 3 are perfect that's for sure. They all broke on the same exhaust port, the intake side of the cylinders are in good shape, so I tried to get pics of the damaged side of the cylinder.

Is there anyway I could get to .020 over STD with honing stones?

1/50th of an inch. It might take a while but I am sure it would help
 
Last edited:

DudeAbides

Seaman
Joined
Jun 20, 2015
Messages
54
how about a sturdier hone? like a sunnen hone or maybe a lisle 1500?

Has anyone used one like this to remove .020 ?
 
Last edited:

Jiggz

Captain
Joined
Oct 23, 2009
Messages
3,817
I've never tried it. But I guess if you already have those tools it wouldn't hurt to try. Or even better had it assessed by a machine shop.
 
Top