Force 125 hp rebuild or options

slx12001

Petty Officer 2nd Class
Joined
May 4, 2013
Messages
136
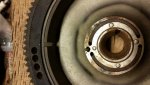
So after a hard weekend the old 1989 force 125 hp finally lost some power and had a slight knock at idle. It would not rev past 4500K and speed was down a couple. It would not idle well. I started with a compression check. It has been from top down 138 138 142 140 since I have owned it. Today it was 88psi in top. I pulled the top transfer port cover and noticed that half of the top ring was missing. (Yikes) I then pulled the exhaust port cover. The piston has some marks and the top of the piston has some deep marks where the part of the ring must have crushed on the ex port before blowing through. No other damage that I can see. How do you pull the piston without splitting the case? I cant reach the conn rod form either side cover clearance. I have found sierra pistons and rings. I have also found wiseco and oem. Not sure about wiseco in an old outboard due to being forged. No I did some research and found that the chrysler 140 hp from 1978 - 1984 is the same stroke @ 2.876. The 125 has a bore of 3.313 amd the 140 hp bore is 3-3/8. If I decide to do a full rebuild any one know if the 140 hp pistons will work after I bore to fit or if it would even be worth it? I was thinking I would simply drop the new piston/ring all call it good unless good gains from 140 pistons. Thanks for any info.
 

Jiggz

Captain
Joined
Oct 23, 2009
Messages
3,817
Remove the head and do further inspection. Additionally, since you already know the piston got caught on one of the ports, dismount the top carb and remove the intake adapter. Remove the reed assembly and from there you can access the con rod caps. You will need a 12 point 1/4 socket with an extension. Make sure you have something to catch the roller bearings. Remove piston through the head and make further assessment of the damage. If it's fixable, you can order Wiseco piston assembly kit and also a piston wrist bearing. The kit comes with the rings and also with a piston wrist but you will have to purchase the wrist bearing kit. You will need to reuse the conn rod, the caps and the bearings. You will also need to find out if the existing piston is still the standard size or if it has been rebored to an oversize. Usually, there is a stamped on the piston crown to indicate if it is standard or oversize, i.e. "1" means it is still standard size.
 

Frank Acampora

Supreme Mariner
Joined
Jan 19, 2007
Messages
12,004
The 140 has a different diameter Cylinder LINER than the 125.. You can NOT bore the 3.3125 cylinder to fit standard 3.375 pistons. A ,0625 overbore just won't work. The Chrysler 125 was the exact same engine as your 125 with a 2.875 stroke and a 3.3125 bore.. Pistons from the Chrysler 70,75, 85, 90, 105, and 120 are all 3.3125 and will fit. Just don't get pistons out of an engine earlier than the 1970s because they used two caged needle bearings in the piston carrying the wrist pin, rather than one set of needles on the small end of the con-rod
 

slx12001

Petty Officer 2nd Class
Joined
May 4, 2013
Messages
136
Thanks for the replies. All came apart easily except for 1 broken exhaust cover bolt breaking off. Already drilled and tapped. Conn rod came right out all rollers there. Don't think reassembly will be so smooth as it's a very tight fit and rollers well roll all over. I found a complete piston with conn rod on ebay in good condition for 70.00 shipped so only 1 side to deal with. It came from a 1989 125 same model as mine. I was able to lightly hone the cylinder. It looked good. I got very lucky. Any tricks for putting the rollers back in the cages in the tight space would be appreciated.
 

Frank Acampora

Supreme Mariner
Joined
Jan 19, 2007
Messages
12,004
You don't put the rollers in the cages and then insert the cages. You push the piston and rod into the cylinder until the rod bottoms against the crank pin. This may be difficult because the clearance between the rod and crank cheeks is very small If the piston is cocked or the rod is to one side of the piston, it will not go in.

Once the piston and rod is in position insert the cage halves rocking the crank to provide clearance. Careful--the cage halves will want to ride over each other.

Now, one at a time insert the 16 rollers using a very long and fine needle nose pliers. Coat each needle with assembly lube or grease to hold it in place.

Once all the rollers are in place attach the end cap and torque the bolts to 180 inch pounds. Be certain you have the cap oriented correctly I only goes on one way. CHECH BEFORE INSERTIN THE PISTON and mark the rod and cap.

After attaching the cap and before torqueing the bolts run something sharp over the ground flats in the cap and rod. It should glide over the crack smoothly. If not, re-align the cap.

Lastly, check your work by turning the flywheel a couple of times to assure that everything is free.

Note: I have done this many times on 3 and 4 cylinder engines. Sometimes it goes well and quickly without any trouble and sometimes I get disgusted, curse and throw tools, then come back the next day.
 
Last edited:

slx12001

Petty Officer 2nd Class
Joined
May 4, 2013
Messages
136
Thanks for the replies. The crank bearing went in ok. Nice and smooth with 138psi. I think it may get a little higher when I can run the engine and it seats. That's the next issue. I don't have any spark on any cylinder. I never had any ignition issues before. I never took any wires off to do any work except for the head temp sensor and that went right back to orange where it came from. I spent more time trying to figure out why there is no spark then the piston change. I checked every wire per my service manual diagram. Nothing unplugged no breaks all wires to stator look great. Strange all 4 have no spark. Any ideas where to start would be great. Thanks for any help.
 

jerryjerry05

Supreme Mariner
Joined
May 7, 2008
Messages
17,926
Outboard ignition . com
Look up under the flywheel and see if the magnet is turning with the flywheel or has broken loose?

I'd start another thread.
 

Jiggz

Captain
Joined
Oct 23, 2009
Messages
3,817
If you do not have spark on any of the four plugs here's a list to check for: (make sure you test the engine for each step completed)
1. Kill switch or lanyard, make sure it is not activated.
2. Disconnect the CDM's kill wire from the engine terminal board (these are the white wires coming off the cdm's)
3. Check the stator power circuit, there should be at least 180VAC peak-peak (or about 100~110 VAC rms) from any of the blue and yellow pair wires off the stator while cranking over.
4. Check the resistance on any pair of trigger wires and it should be around 48~52 ohms.

Post again which step gave you back your sparks and we can troubleshoot from there.
 

slx12001

Petty Officer 2nd Class
Joined
May 4, 2013
Messages
136
So I was checking for spark after a no fire after a cylinder was replaced. I tried the surface plugs and standard plugs. I was using a good ground with no noticeable spark. (I was looking for spark like a normal engine would have nice bright blue spark) I had already done all of the tests mentioned in the last post. I checked every wire from the key back. Here is the kicker. It started to pour rain when I had the engine all apart and water was getting into the cylinders. By the time I got the cover back on the engine it had about 3 minutes of pouring rain. I shot a heave dose of PB blaster in each cylinder to displace water and prevent any rust as I did not know how long it would be apart. PB blaster must repel gas or something. The engine would not fire not even 1 time. This with no noticeable spark led me on the wild ignition goose chase. Thinking all ignition checks out there is no reason that ignition is the issue. (but why no spark)? So I sprayed a bunch of starting fluid in each cylinder then turned the engine over for a bit then sprayed a little more in the cylinders and put the plugs back in. (ya I know) It fired right up! I ran it for about 25 minutes shutting off and restarting several times. The no spark thing still burning on my mind I checked for spark again. Still no spark on any cylinder! Put plugs back in and ran for another 25 minutes with several restarts. (side note the used piston and ring compression rose to 140psi) I called a local outboard guy that knows some about Chrysler.force and was told that cranking spark can be weak. (I wish that I knew this when I started) Thoughts or comments welcome. Thanks again for all of the replies.
 
Last edited:

Jiggz

Captain
Joined
Oct 23, 2009
Messages
3,817
With these boats, when checking for spark it is always recommended to use the in-line spark testers. And yes, cranking sparks can be low compare to running sparks. On a different note, with the new piston you are still required to do the correct break in procedure like you have a new engine, i.e. 25:1 fuel oil ratio mix and standard speed runs.
 

slx12001

Petty Officer 2nd Class
Joined
May 4, 2013
Messages
136
GERRR... So I took her out for a run today after running in the driveway for about 1.5 hours total with many restarts shaking and checking everything for shorts. Ran about 32/1 mix. Idled in no wake zone for about 5 minutes then Went up the river about 20 minutes varying speed. Stopped for a few minutes started right back up. Ran for about 20 more minutes then shut down to fish for a while. 30 minutes later it would not start. No spark. Tested all on the water all good. Could not do a DVa test though but all ohms from trigger and stator great. Kill circuit disconnected. I'm at a loss. Pull hair..... If 1 cd module goes does spark generally completely die as well? It seem as 2 cd modules are separate systems powering 2 coils each. If 1 was bad I don't understand why all 4 coils would loose fire. Any help appreciated.
 

Jiggz

Captain
Joined
Oct 23, 2009
Messages
3,817
Does kill circuit disconnected means both white wires from the cd modules disconnected from the engine terminal board. If yes and you have good resistance readings on both stator and trigger, the next move is to read voltage output from the stator blue and yellow pair of wires. You should at least get 180V peak or about 110 RMS while cranking. If you are getting this on both pairs of blue and yellow wires then you should be getting output from the CDM's.

And yes, depending on the problem of one CDM this could also affect the other remaining CDM. To isolate each one, just disconnect the pair of blue and yellow wires from the stator. The engine will not run or idle but will give an indication of firing (coughing) with just two cylinders firing. Again, this is not all final as the trigger may not be sending in a signal which can only be checked with a DVA meter.
 

slx12001

Petty Officer 2nd Class
Joined
May 4, 2013
Messages
136
Thanks for the replies. I found the problem. I pulled the flywheel and the magnet stayed on the stator. I found an Evinrude magnet re glue kit but I believe it's an epoxy. What is the best glue for this procedure? I found the marks in the flywheel where the magnet was so lining up should not be a problem. Thanks for any help.
 

slx12001

Petty Officer 2nd Class
Joined
May 4, 2013
Messages
136
Question, The other magnets that I see installed are butted up in the flywheel. My magnet strip when in the flywheel has a 4~5mm gap when installed. Is this ok?
 

slx12001

Petty Officer 2nd Class
Joined
May 4, 2013
Messages
136
No Title

Here is the gap
 

Attachments

  • photo221888.jpg
    photo221888.jpg
    39.2 KB · Views: 4

Frank Acampora

Supreme Mariner
Joined
Jan 19, 2007
Messages
12,004
That won't bother anything. The rim magnetic strip is actually a series of magnets generated on a flexible ferrous strip. As these magnets pass the poles on the stator they generate a voltage. The magnet and stator are completely separate from ignition, therefore any gap will not affect timing. The stator has two separate windings: one to charge the battery and one to charge the capacitors inside the CD boxes.
 
Top