Finally pulled my head..top cylinder ate a ring

scout-j-m

Chief Petty Officer
Joined
Jul 31, 2009
Messages
636
Back for a tiny update...

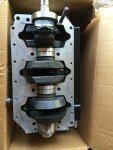
Of course nothing goes as planned. It took me a few weeks to have the time to take the block to the shop. A month later, and they finally have it ready I just have to leave work early tomorrow to go pick it up. So I'm hoping I am able to begin rebuilding it this weekend.

I have a couple of questions I'd like to go ahead and throw out there. First, does anyone have a break-in procedure to follow? I know not to hold it at one constant RPM setting for too long and try to vary RPM's but I'd like even more detail. Like "drive at 3k rpm's for 5 min then drop RPM's to 1500 for 5 min for first 2 hours of break-in...then increase to 4k RPMS for next 2 hours" and so on. And me second question is what do you lube the new upper crankshaft bearing with? I would of course drench it 2-stroke oil but I didn't know if it needed anything else packed into it.
 

Jiggz

Captain
Joined
Oct 23, 2009
Messages
3,817
No Title

Here's one I used before: Just make sure the fuel oil mix is 25:1 throughout the break in period.

photo226645.jpg
 

Attachments

  • attach10000832.jpg
    attach10000832.jpg
    67.3 KB · Views: 0

scout-j-m

Chief Petty Officer
Joined
Jul 31, 2009
Messages
636
Thanks Jiggz. Judging by the fact that even some manufacturers have vague break in procedures I think I will be fine as long as I use 25:1 fuel/oil and gradually work up the RPMs over 6-10 hours and not sit on constant RPMs for more than a few minutes at a time.

Also, I finally now have everything I need to re-assemble. I am finishing up washing some of the parts this morning and am going to start assembling the powerhead this afternoon with the help of my dad. Any last minute tips? I have the factory service manual which lays it all out pretty well. The only things I am a little unsure of at this point is if I need to and how to lube up the upper main bearing before assembly and what exact path the spaghetti seal is suppose to follow on the crankcase half. I was unsure of the best way to install the pistons/rings without the ring compressor tool but I found some helpful videos online. I'll check back in later to see if anyone has any last minute advice and with any more questions.
 

scout-j-m

Chief Petty Officer
Joined
Jul 31, 2009
Messages
636
I didn't get to assembly as the final cleaning took more time than I had planned on. I was wondering though... I have a some flash rust on a few small places on the bore and on the crankshaft. Does that need to be cleaned up or will it be ok? I tried to clean it yesterday but didn't have much luck.
 

pnwboat

Rear Admiral
Joined
Oct 8, 2007
Messages
4,251
As long as it has not pitted the surface, you're probably OK. I would be a little bit concerned if the rust on the crankshaft was on the bearing journals. You might try to polish it off gently with some 2000 grit emery cloth. The rust on the bore will go away when the ring rides over it as long as the rust is not excessive. You don't to do anything that may alter the cross hatch pattern on the cylinder bores created by the honing process.
 

scout-j-m

Chief Petty Officer
Joined
Jul 31, 2009
Messages
636
Thanks pnwboat. I just used a little alcohol on a cloth on the faint flash rust on the little bit in the bore. It didn't do much but helped and I figured the rings plus heat would take care of it. The journals were all still pristine. The rust on the crankshaft was contained to the iron flanges holding the journals, the outer bearing races on the the 2 crankshaft bearings, and the upper end of the crankshaft above the upper main bearing. It all was pretty faint though I was more worried about propagation.

As far as my progress yesterday, I got all 3 pistons/rings installed, the crankshaft seated, and the connecting rods attached to the journals and torqued down to 170 in*lb. I'm now ready to seal the crankcase back up and begin installation of the fuel recirculation and exhaust systems. I'm hoping all of that is as easy as it sounds. I learned that the installation of the pistons, crank, and rods are as tedious as everyone has said lol.

BTW, does anyone know the allen wrench size of the bolts that go through the intake manifold part of the crankcase half? I used a regular allen wrench to remove them but I need to buy an allen head socket for installation so I can torque them accordingly. I'd like to pick one up on my way home. From the parts diagram it appears as if it is 3/8".
 

pnwboat

Rear Admiral
Joined
Oct 8, 2007
Messages
4,251
You should be good to go as far as the rust is concerned. You can coat the crank, bearings and bores with some 2-stoke oil if you want to help prevent any rust.

Yeah, installing the crankshaft takes some patience. Getting the main bearing race dowel pin holes lined up, and not breaking any of the crankshaft sealing rings.

I looked at the crankcase bolts on a old 1988 125HP motor in my shop. It has 5/16" allen head bolts that hold the crankcase halves together. The bolt itself may be a 3/8" diameter bolt, but the head uses a 5/16" allen wrench.
 

scout-j-m

Chief Petty Officer
Joined
Jul 31, 2009
Messages
636
Thanks. I picked up a 6 piece hex head socket set at Harbor Freight over lunch that includes both the 3/8 and 5/16 so I should be good to go there. When I was looking at the in the store the 3/8 did seem too big and the 5/16 just right.

Also funny you should mention the crankcase ring seals breaking...I broke one and was super disappointed as that would mean waiting a while to get a new one in by mail or trying out the local Mercury dealers. But then I luckily found one of the old ones which was in great shape. Hopefully it is still good...I don't see how it can't be as long as I can get the crankcase assembled with it intact. It is in and the opening rotated down as of now so I think I am almost in the clear.
 

scout-j-m

Chief Petty Officer
Joined
Jul 31, 2009
Messages
636
I was about to work on the sealing up the crankcase last night but I got cold feet as I was trying to figure out how I was going to get the parting line seal on correctly. Is there any real trick to this or does it have to be exact? My crankcase halves don't have a defined groove or place for it so all I had to go off of was one picture in the service manual. Is it as simple as just running it from bearing to bearing on each side of the half holding the crank and using a little gasket sealer to hold it in place? If so then just apply a thin bead of locktite gasket maker on each side of the seal and around the inner bolt holes? I know this may be a silly thing to be hung up on but I figure better safe than sorry since I am this far along. I also think what really threw me off is that the factory service manual says to use the parting line seal but the Clymer manual doesn't mention it....just says to use sealer. I was wondering how necessary it is due to this and knowing that the crankcase isn't under huge pressure.
 

pnwboat

Rear Admiral
Joined
Oct 8, 2007
Messages
4,251
If your crankcase does not have the groove for the spaghetti seal, then it does not use it. Just use some good quality high temp. RTV silicone sealer. Spread a thin coat on the mating surfaces on each half of the crank case. The mating surfaces of the crank case halves are precision machined so it doesn't take much.
 

scout-j-m

Chief Petty Officer
Joined
Jul 31, 2009
Messages
636
Thanks. I forgot to include this picture I took this morning of piston side face.

2884CB1C-BB52-4CA3-ABA3-0CAE46F72F93_zpsglejl3fx.jpg
 

Attachments

  • 2884CB1C-BB52-4CA3-ABA3-0CAE46F72F93_zpsglejl3fx.jpg
    2884CB1C-BB52-4CA3-ABA3-0CAE46F72F93_zpsglejl3fx.jpg
    339.7 KB · Views: 0
  • 2884CB1C-BB52-4CA3-ABA3-0CAE46F72F93_zpsglejl3fx.jpg
    2884CB1C-BB52-4CA3-ABA3-0CAE46F72F93_zpsglejl3fx.jpg
    339.7 KB · Views: 1
  • 2884CB1C-BB52-4CA3-ABA3-0CAE46F72F93_zpsglejl3fx.jpg
    2884CB1C-BB52-4CA3-ABA3-0CAE46F72F93_zpsglejl3fx.jpg
    339.7 KB · Views: 1

scout-j-m

Chief Petty Officer
Joined
Jul 31, 2009
Messages
636
And will this Loctite 518 Gasket Maker suffice for dressing the surface? It's what came with my rebuild kit (along with the spaghetti seal I don't need). A little research seems to tell me it is the right stuff. And would it need to be applied to both halves?

s-l1000.jpg
 
Last edited:

pnwboat

Rear Admiral
Joined
Oct 8, 2007
Messages
4,251
Nice clean looking block!

The Loctite 518 will work just fine. Make sure the mating surfaces are clean and free of any oil. Use some carburetor cleaner or Acetone applied to a clean rag and wipe down the surfaces. You can lay a bead on the one half of the crank case and you'll be fine.

Jiggz has a break in procedure somewhere that has some good information.
 

scout-j-m

Chief Petty Officer
Joined
Jul 31, 2009
Messages
636
Thanks!

I was able to get the crankcase assembled this evening. I torqued the main bearing bolts to 270 in*lb and the outer bolts to 70 in*lb per the manual. I also put some of the 518 on each of the bolts before installing them. I was able to turn the crankshaft by hand and everything felt smooth and sounded good. Then I slathered the upper main bearing in 2 stroke oil and installed the bearing cage using the 518 again on the mating surface and the bolts themselves.

Tomorrow I am going to install the fuel ports and recirculation assembly, the exhaust covers, ignition system studs, and head. Then hopefully get it back on the leg and running over the weekend.
 

UtahBoating

Petty Officer 2nd Class
Joined
Dec 8, 2008
Messages
102
This had been a great thread to follow. Looking forward to your results when all finished.
 

jerryjerry05

Supreme Mariner
Joined
May 7, 2008
Messages
17,926
After you install the other half.Just make sure the crank turns with little or no resistance.
Sometimes the locating pins and the hole on the bearings can pop out and cause a bind.
Sillycone under the bearings too.
Locktite the connecting rob screws.
 

scout-j-m

Chief Petty Officer
Joined
Jul 31, 2009
Messages
636
After you install the other half.Just make sure the crank turns with little or no resistance.
Sometimes the locating pins and the hole on the bearings can pop out and cause a bind.
Sillycone under the bearings too.
Locktite the connecting rob screws.

I did all that. I hope my definition of turning easily is the correct one too lol. I just grabbed the top of the crankshaft above the upper bearing by hand and spun it easy enough. If it had the flywheel on for me to grab a hold of or the nut with a wrench on it it would have been effortless I would imagine. I guess I need to pop on the nut and give it a try with a wrench just to be safe.
 

scout-j-m

Chief Petty Officer
Joined
Jul 31, 2009
Messages
636
We had off and on rain and storms over the weekend so I didn't make too much progress. However, I did manage to install the fuel recirculation assembly, fuel port covers, towershaft, exhaust cover, and head. I would have gotten the spacer plate and exhaust tube on as well but the spacer plate was going to take some chemicals and good elbow grease to get off some left over gasket material and gunk so I soaked it in some degreaser and am going to clean it the rest of the way up tonight.

The forecast isn't too great for the next few days so I'm not in any big hurry at this point. As long as it is ready for a lake test this weekend I will be satisfied. Maybe my next update it will be fully assembled and ready for the first start.
 

scout-j-m

Chief Petty Officer
Joined
Jul 31, 2009
Messages
636
Since the weather is holding me back and it will likely be this weekend before I can get to the point of firing her up I think I am going to order a timing light of of Amazon. Since I am a Prime member I will have it on Friday. Any recommendations? Is getting one with a built in tach or timing advance really worth the extra money? The basic Innova and Actron models are both $35 which seems like a good deal.
 
Top