Force 125 clutch dog repair

xjrockrawler

Seaman Apprentice
Joined
Oct 6, 2012
Messages
37
Can anyone point me in the direction of a link that shows how to remove the gear assembly out of 125 lower unit.. model # 1258X6B 1986 i believe. A write or directions would be helpful.... clutch gear is bad i believe because it jumps at high speed. Thank you for any assistance!!!!!!
 

Frank Acampora

Supreme Mariner
Joined
Jan 19, 2007
Messages
12,004
Jeez--There should be a thread on this. BUT: Simply put you drop the lower unit and remove the prop. You remove the anode under the prop. There will be four bolts holding in the prop shaft bearing carrier. Remove those bolts and pull out the carrier. NOW, tap down on the aluminum reverse gear bearing carrier and remove the two retaining circlips. Pull out the prop shaft/ reverse gear/ drive clutch assembly.. The drive clutch can be reversed since the reverse gear side gets less use and is usually in better condition. This may get you an extra season of use but eventually you will need to dress the dogs. You can dress the dogs to square again with a Dremel and straight carbide bit.

If you need to dress the dogs on the forward gear It becomes a little more complicated. In order to remove the forward gear you must remove the pinion and drive shaft. You need a stout wrench for the pinion nut and some cloths to pad the inside of the lower unit casting. Then you need a way to turn the drive shaft and loosen the nut. After removing the nut., you must use some sort of wedge on the drive shaft because the pinion is on a locking taper and difficult to press off. When reassembling tighten the pinion nut to 95 foot pounds---manual recommends a new nut.

If you don't have a bunch of different tools and are not comfortable adapting them, then either send the lower unit out or buy a good used one.
 

SkiDad

Lieutenant Commander
Joined
Jul 18, 2010
Messages
1,518
I can testify to getting a used one. Did mine last year by buying a whole 85 hp engine with controls for 200 bucks Took the lower off and sold the engine/controls for 180 bucks. Sold my broken lower for 50. This past winter I picked up another lower unit for 100 buck just to have on hand. There are a couple on craigslist in my area last time I checked for 200 ish.
 

xjrockrawler

Seaman Apprentice
Joined
Oct 6, 2012
Messages
37
I think i will take it apart and access it from there. May go ahead and dress the dogs and flip the gear..... Thank you Frank for the clear instructions.. just needed a little insight before i go messing around on it. And i will be looking out for a good used unit.... i heard the 85hp would work also but prop needed to be pitched different. On a last note.... wheres a good place to get a used or new prop... meaning talking to someone who knows the force stuff. I actually lost mine 10 miles off shore when i got the boat.... i assume the jumping at speed is what help loosen the prop nut. Before you tell me... WTH. it started while i was offshore... never would of went knowing what was going on. I'm in WILMINGTON NC.... oddly enough their aren't many old used force engines that i can seem to find.
 

Frank Acampora

Supreme Mariner
Joined
Jan 19, 2007
Messages
12,004
If you want a new prop you can get one right here on iboats. A better choice would be a good used prop. You can find them on ebay. Search Chrysler force propellers. You can also use Mercury Props from the Small gear case (4 inch diameter) Mercury 90. They are all 15 spline.

If you accidentally get a Mercury prop for the big gear case and if it is aluminum, You can simply cut off the rear flange as your lower unit does not have thru-hub exhaust.

BTW: You can use almost any lower unit from about 1979 to 1993 They all have the same bolt pattern. The later lower units are 1.95 ratio and have a better water pump. The drive shaft is two piece so be certain that the upper shaft and coupler is included. Also be certain that the shaft length is 20 inch, not 25.
 

xjrockrawler

Seaman Apprentice
Joined
Oct 6, 2012
Messages
37
Got it all apart.... no issues there. I may just go ahead and buy a new clutch... unless you'll think it could be fixed with a dremel..... TRYING TO UPLOAD PICS NOW
 

xjrockrawler

Seaman Apprentice
Joined
Oct 6, 2012
Messages
37
can't get my pics to load. Is there any photos of a bad clutch anywhere... not sure where i need to grind on it at?
 

SkiDad

Lieutenant Commander
Joined
Jul 18, 2010
Messages
1,518
Wow, you are braver than me - seems daunting to me... but then again the folks on this site talked me into rebuilding my trim pump valves and I would try it again.
 

Frank Acampora

Supreme Mariner
Joined
Jan 19, 2007
Messages
12,004
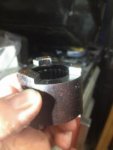
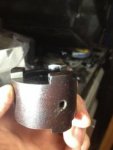
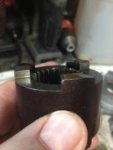
looking down at the face of the dog clutch you will see three "dogs. These mate with three dogs on the forward (and reverse) gear, depending upon which gear you select. The face, that is, mating surfaces, of the dogs will be vertical and when new there will be a sharp right angle. The drive dogs are tapered on the rear to ease engagement and that lower surface is NOT the mating face. When worn, the face will be rounded.

Since the faces of the dogs wear evenly, you simply need to hold the Dremel vertical to it and slowly, with a steady hand, grind back until you have a vertical face with a sharp 90 degree angle. NOW: Since the drive dogs on the gears will also wear, it is almost useless to grind the dog clutch faces without also grinding the mating dogs on the gear.
 

xjrockrawler

Seaman Apprentice
Joined
Oct 6, 2012
Messages
37
Ok .... got it! any tips on what to use to hold and turn drive shaft or a part number for the correct socket it uses? going to just face it all while it's apart!
 

Frank Acampora

Supreme Mariner
Joined
Jan 19, 2007
Messages
12,004
I forget the exact size socket but it will be around 3/4 to 13/16. Use six point socket with a 1/2 inch breaker bar and pad the bar against the casting. Wedge something between the socket and casing to prevent the socket from slipping off while breaking free the nut. I used a tool I made from old propeller inserts to grab the splines and then used a BIG pipe wrench to turn the drive shaft. Remember, I also clamped the lower unit into a big railroad vise.

After the nut is removed, I used several thick chunks of aluminum wedged between the casting and the drive shaft and drove a wedge between them.
 

xjrockrawler

Seaman Apprentice
Joined
Oct 6, 2012
Messages
37
Putting it all back together now. refaced all gears and clutch dog..... by far removing the drive shaft was the hardest thing!!!!!!! WOW Feel pretty good about it all..... last thing. Since i lost the prop on last run , i ordered new prop and nut.. and so forth. Got the Sierra # 18-3700 nut and it slips right over my treads? That seems to be the part it calls for.... anyone run into this or now the part number for like the next size smaller prop nut. It's and 1986 125 force it has the # 4 on the lower unit so it is a 125 lower! Any help would save me trips to local shops.....i'm not near any. thanks!!
 

Frank Acampora

Supreme Mariner
Joined
Jan 19, 2007
Messages
12,004
The correct prop nut for that year engine, assuming the lower unit has not been changed, is a 15/16 nut and the threads are (I think ) 9 /16 fine thread. You can use a stainless steel nylock nut but if you can find one, a bronze nylock nut is better as stainless on stainless will possibly gall while bronze on stainless will not gall. In any case, it is MANDATORY that you use a nylock nut because that year had no other safety lock for the nut.
 

Superjoe104

Recruit
Joined
Sep 10, 2015
Messages
1
I wish I was a member when you were doing this repair , I had the exact same issue with the clutch dog with the exact motor and year , Me being a Machinist , I have made a tool to remove the shaft. I bought the replacement gears on Ebay with main bearing pack for 200 Bucks , If you ever need it I can mail it to you or post a picture ....
 

xjrockrawler

Seaman Apprentice
Joined
Oct 6, 2012
Messages
37
6 months later and still working great. resurfaced both gears with my dremel !! I wish i could figure out how to post pics here. it says mine are too large.
 

xjrockrawler

Seaman Apprentice
Joined
Oct 6, 2012
Messages
37
No Title

I think i just figured pics out :0 you can see the clutch dog.....eww!
 

Attachments

  • photo232624.jpg
    photo232624.jpg
    31.1 KB · Views: 2
  • photo232625.jpg
    photo232625.jpg
    8.1 KB · Views: 3
  • photo232626.jpg
    photo232626.jpg
    6.9 KB · Views: 3
  • photo232627.jpg
    photo232627.jpg
    7.3 KB · Views: 3
  • photo232628.jpg
    photo232628.jpg
    6.2 KB · Views: 2

pnwboat

Rear Admiral
Joined
Oct 8, 2007
Messages
4,251
Great job! Thanks for letting everyone know the final outcome. Fairly simple repair. Taking it apart and putting it back together was probably the hardest part.
 
Top