1998 Force 120- Exhaust Plate, Head & Reeds (PICTURES)

Status
Not open for further replies.

oscarjm

Cadet
Joined
Sep 4, 2014
Messages
13
Serial # OE335002

I previously posted about this motor. The short version is that after a 2 hour cruise, I could no longer get the motor to idle, and it died A LOT trying to get it into gear.

After spraying a can of carb cleaner in the intake and making some carb adjustments, I gave up and took it to a mechanic. He found a defective trigger assembly. He replaced it, started the engine, it ran well, then started idling rough. He pulled the head, and found water in Cylinders 1-3. I told him to stop work on the motor and took it home (with encouragement from this forum's members).

Here are the results of his compression test, which are close to the numbers I got when I bought the boat 2 years ago (and also match a previous test in some maintenance paperwork I got with the boat):

#1-160
#2- 165
#3- 170
#4- 160

The head was already pulled when I picked the boat back up, and the water in the cylinders was obvious (but more so in Cylinder #2).

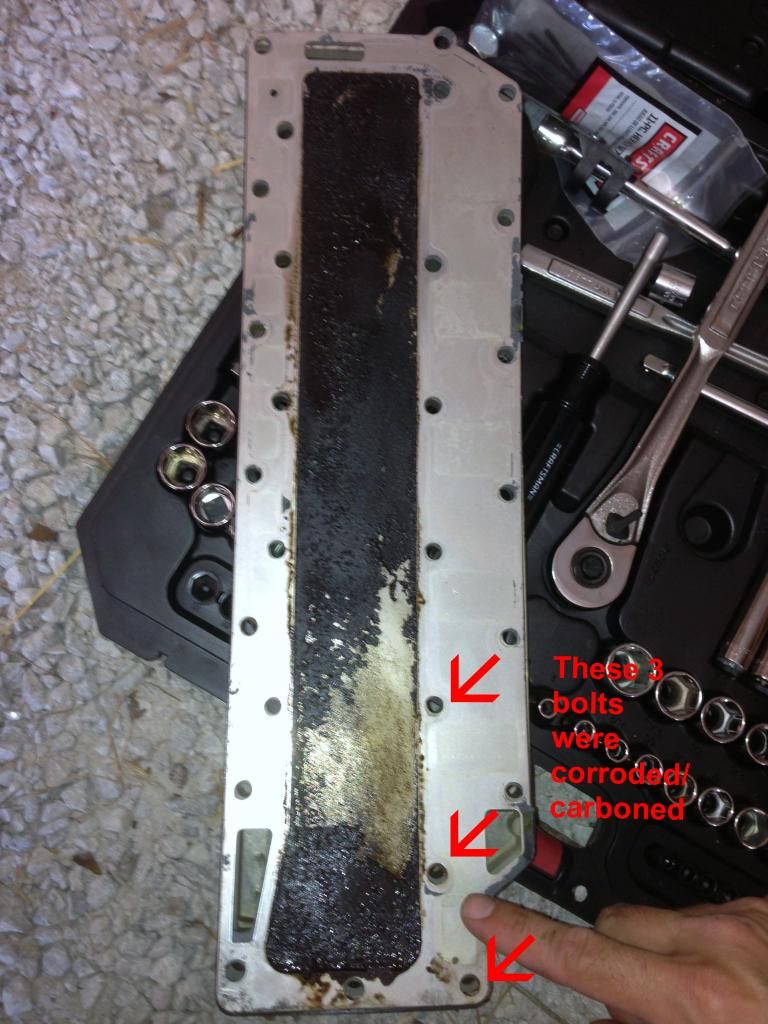
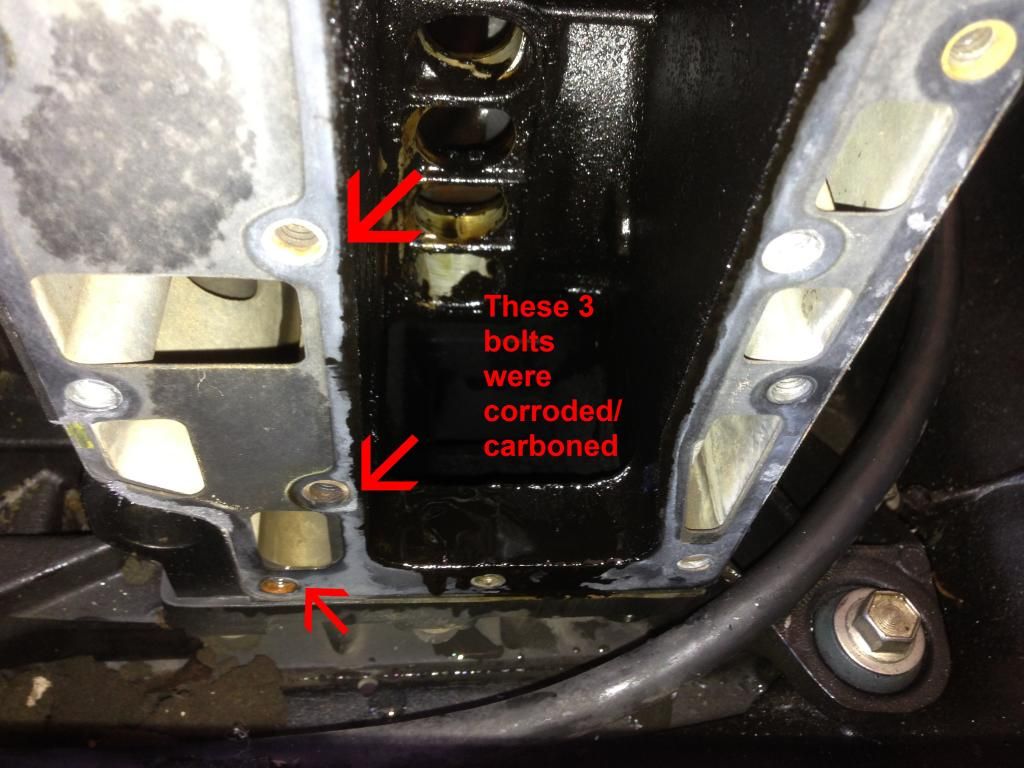
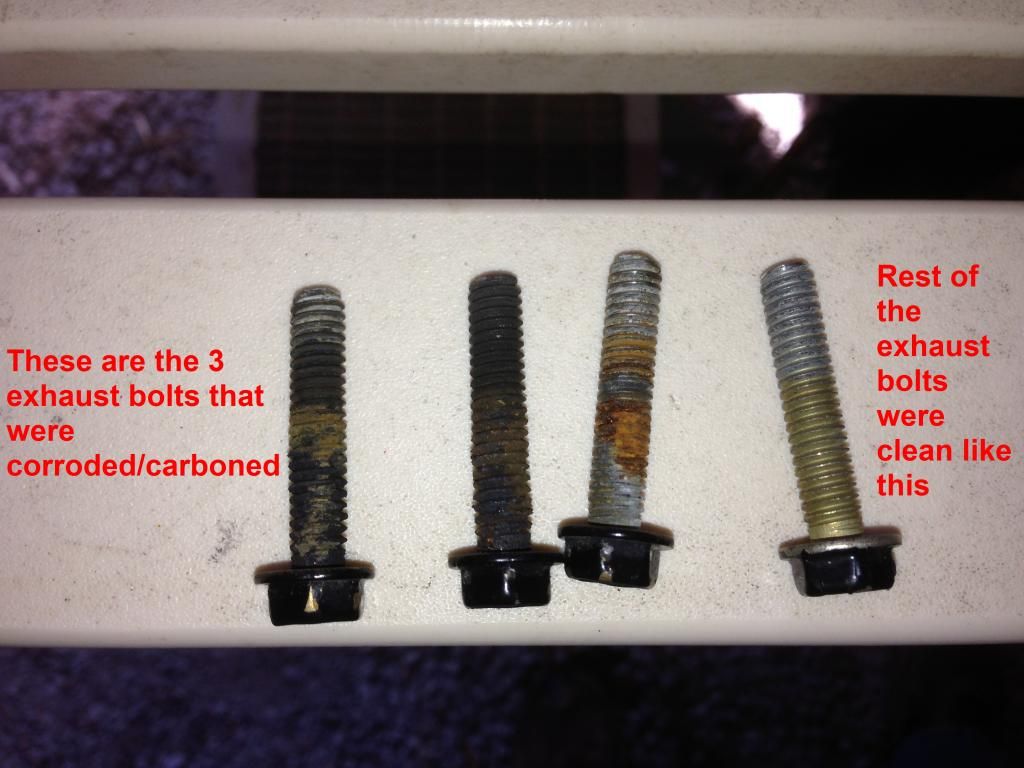
So, I pulled the exhaust cover and plate to check for obvious leakage. I couldn't find any obvious cracks in the exhaust plate, and all bolts were very clean and easy to get out, but three had rust and carbon on them. I'm wondering if my leak was somewhere in this area- but the gaskets didn't look bad. See pics related to those bolts:

Exhaust Plate


Exhaust Chamber


Exhaust Bolts


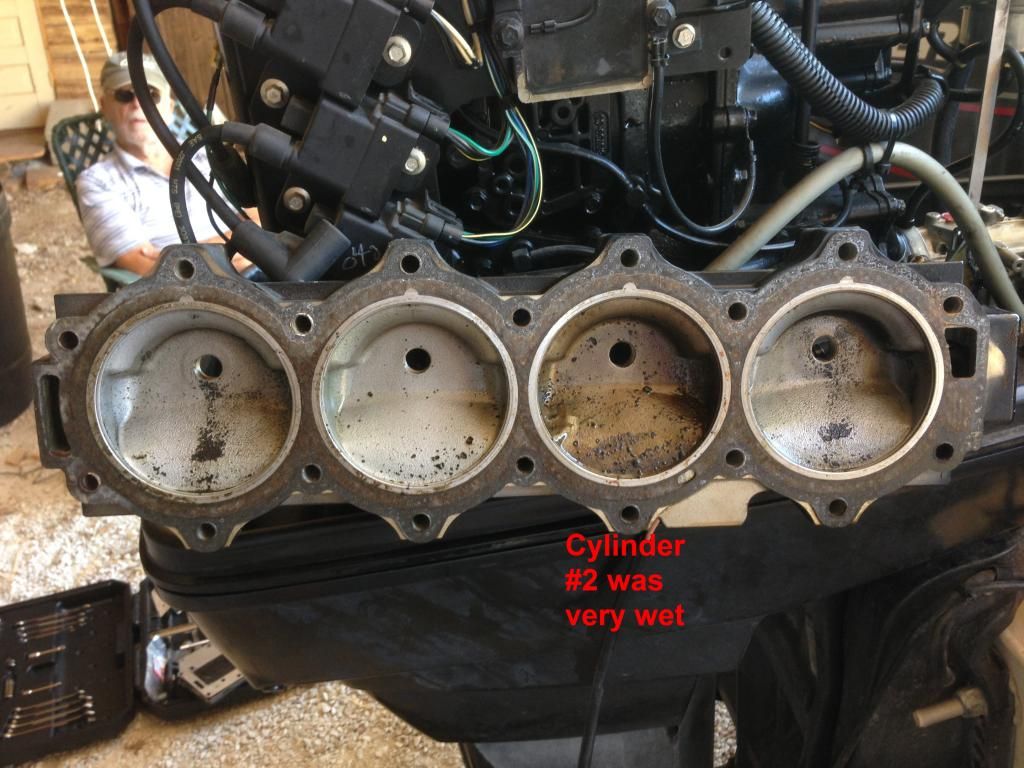
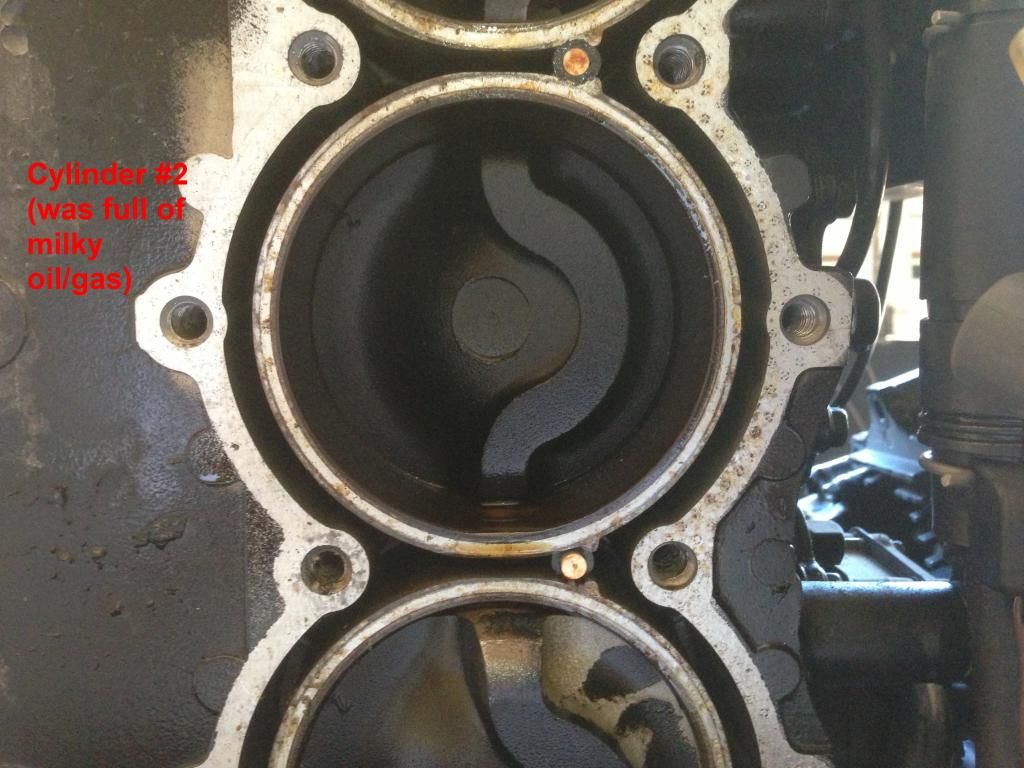
Here is a picture of the cylinder head. Cylinder #2 had a milkshake mixture of gas/oil and water. Mechanic said cylinders 1, 2, and 3 were getting water, but it was the most obvious in Cylinder #2.


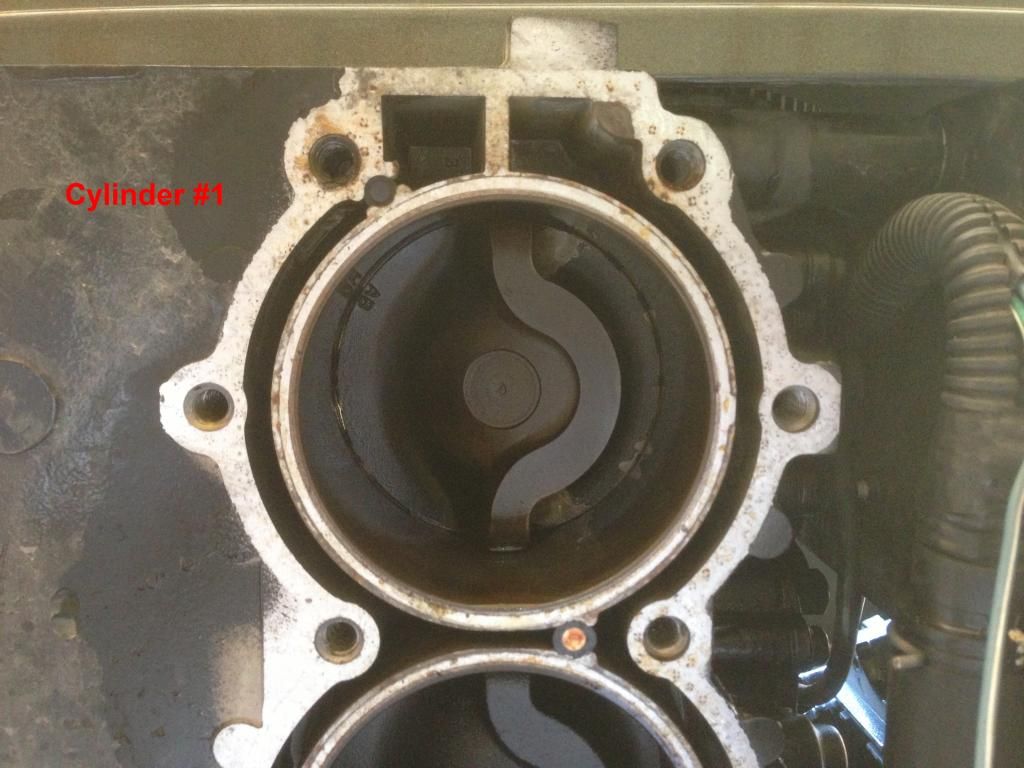
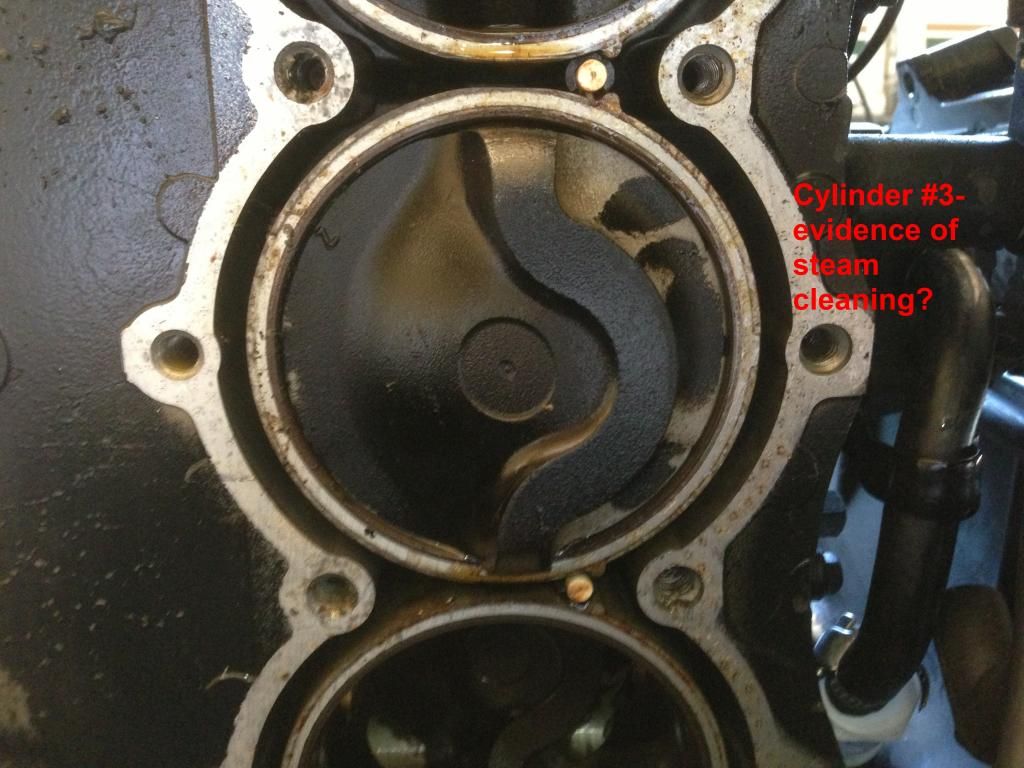
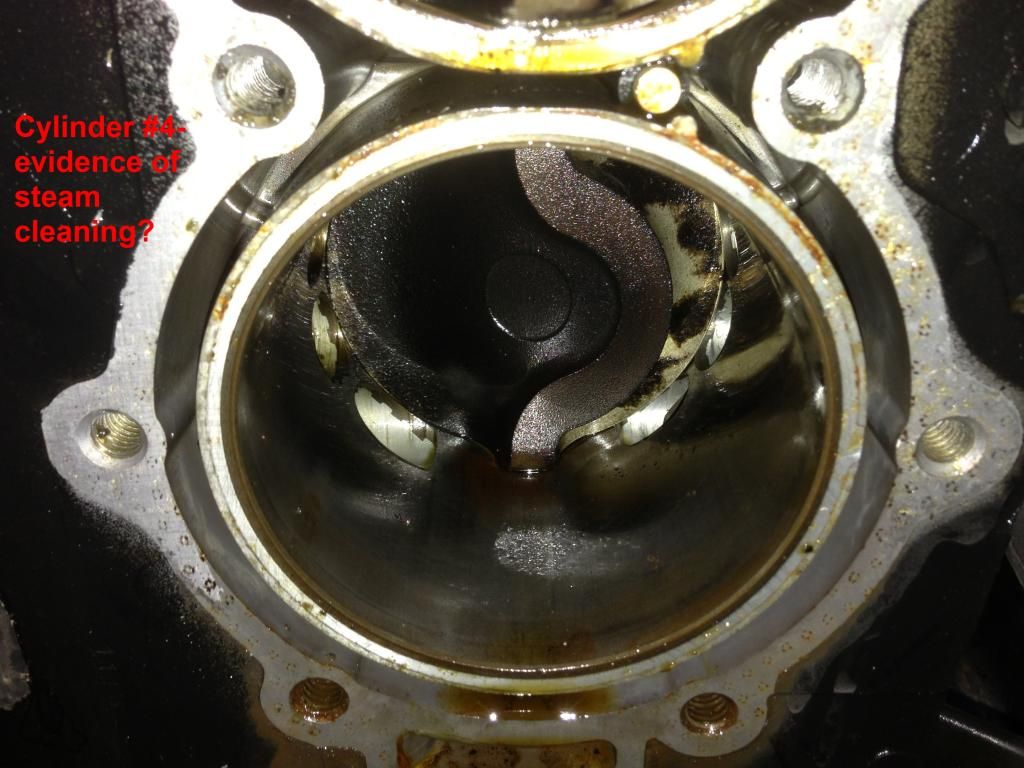
Here are pictures of each cylinder. I think I see evidence of steam cleaning.


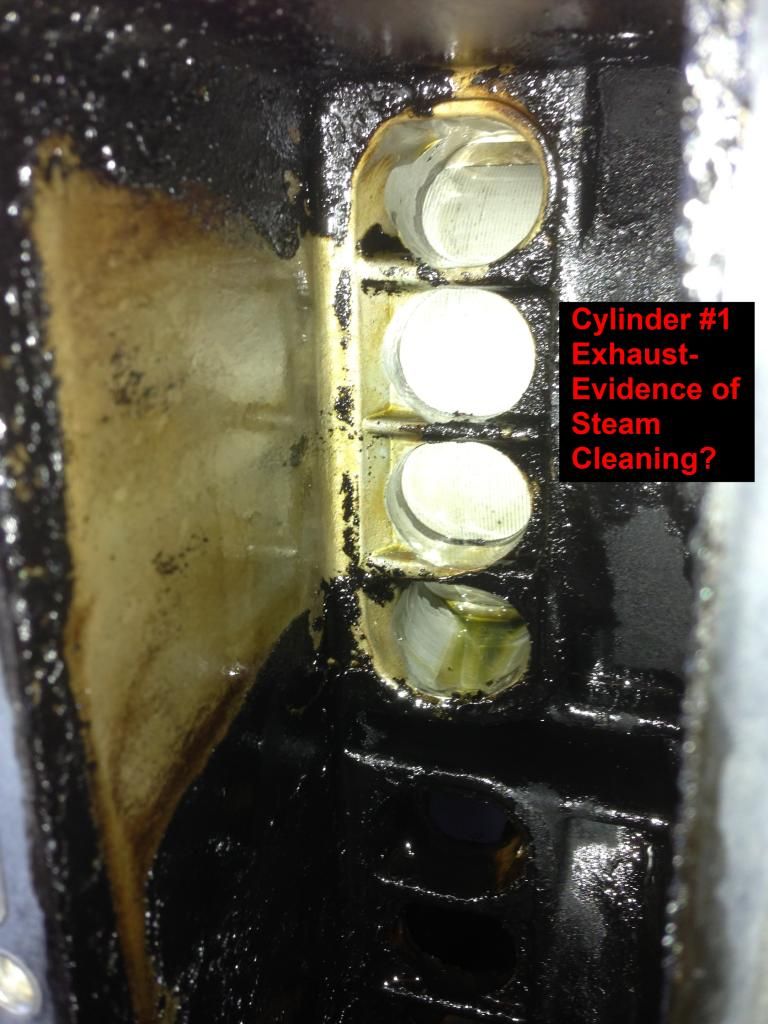
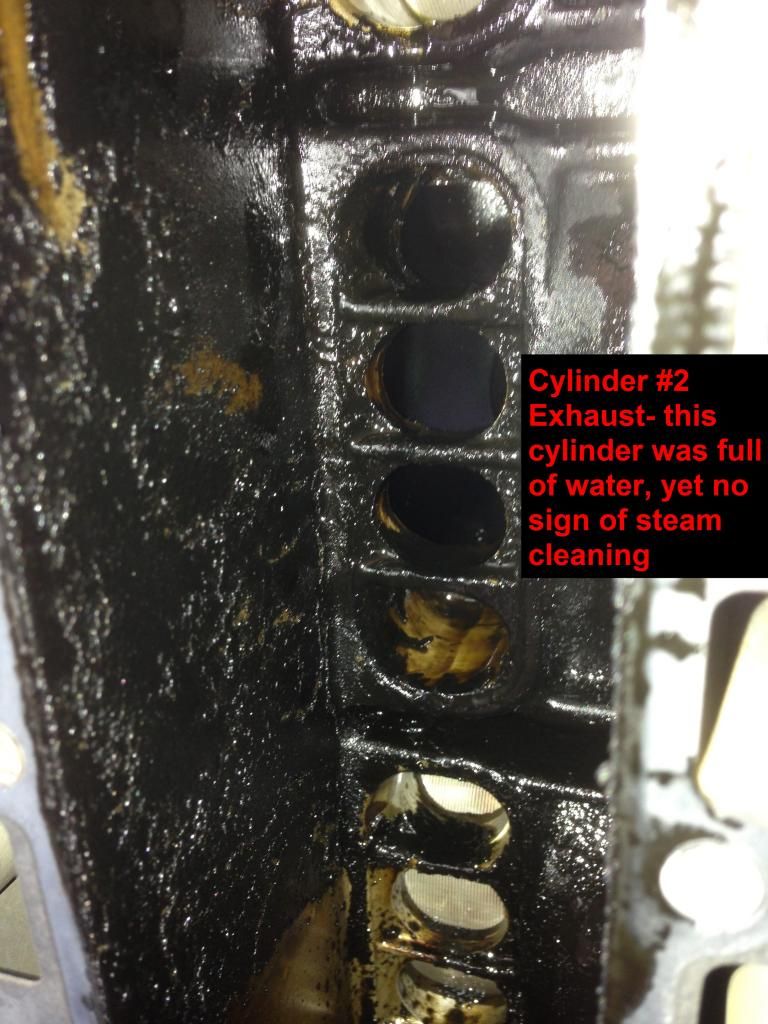
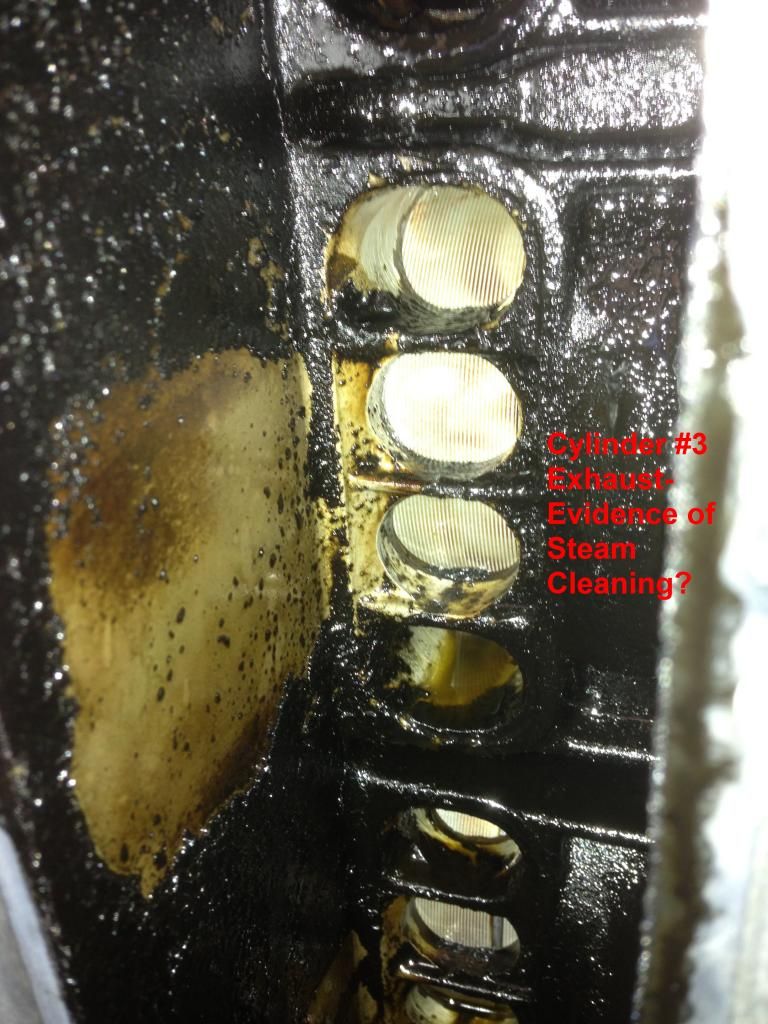
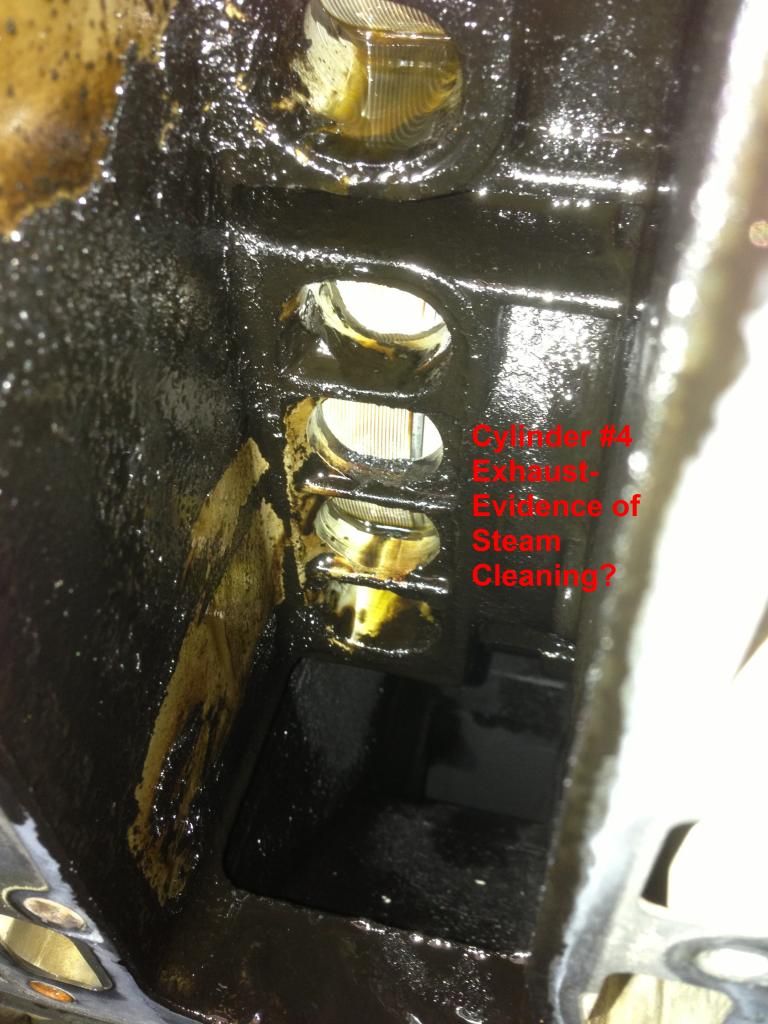
Here are pictures of the exhaust side. Note the absence of carbon on the wall of the exhaust chamber for some of the cylinders. Either this is the result of steam cleaning, or that can of carburetor cleaner I used:


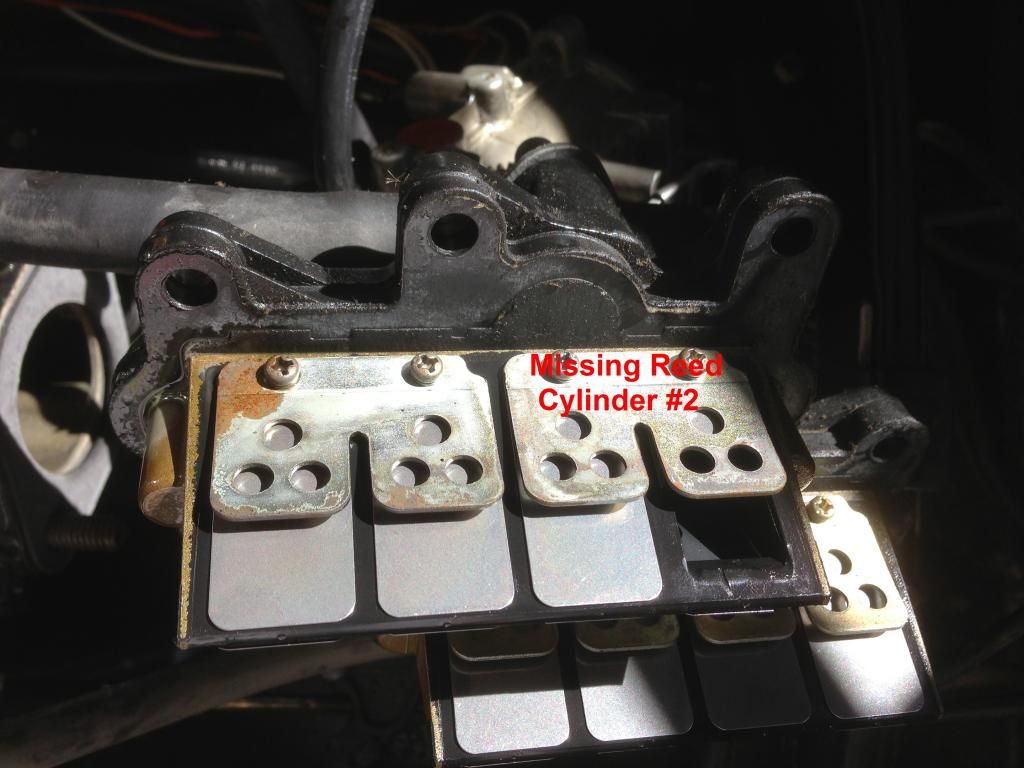
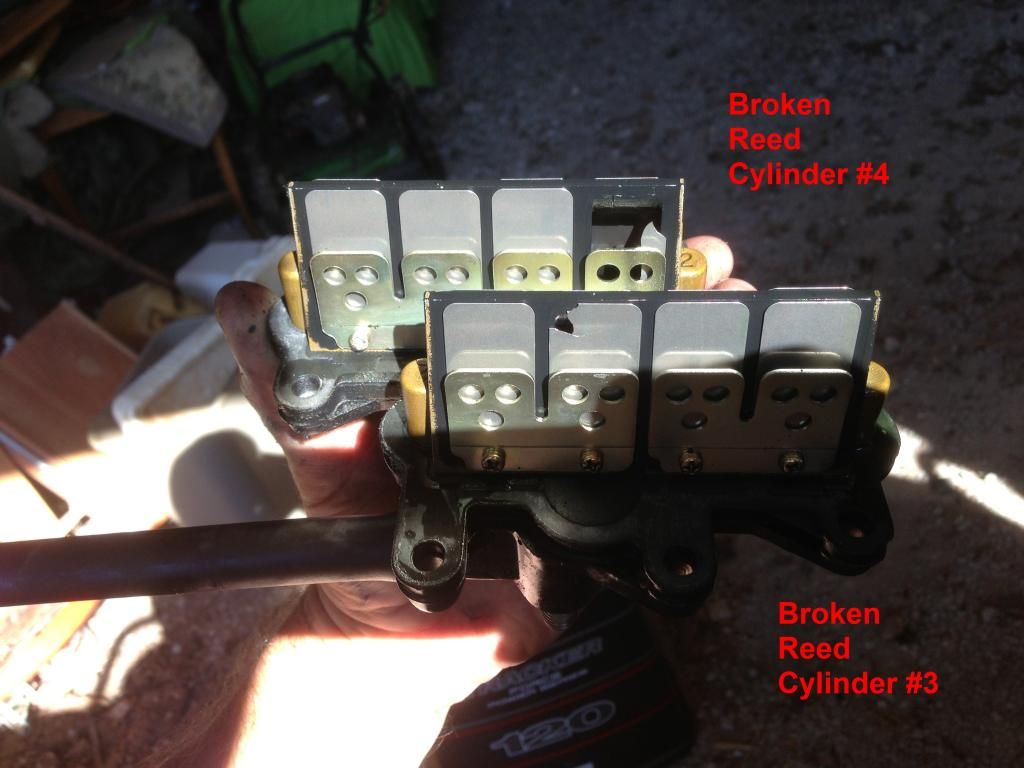
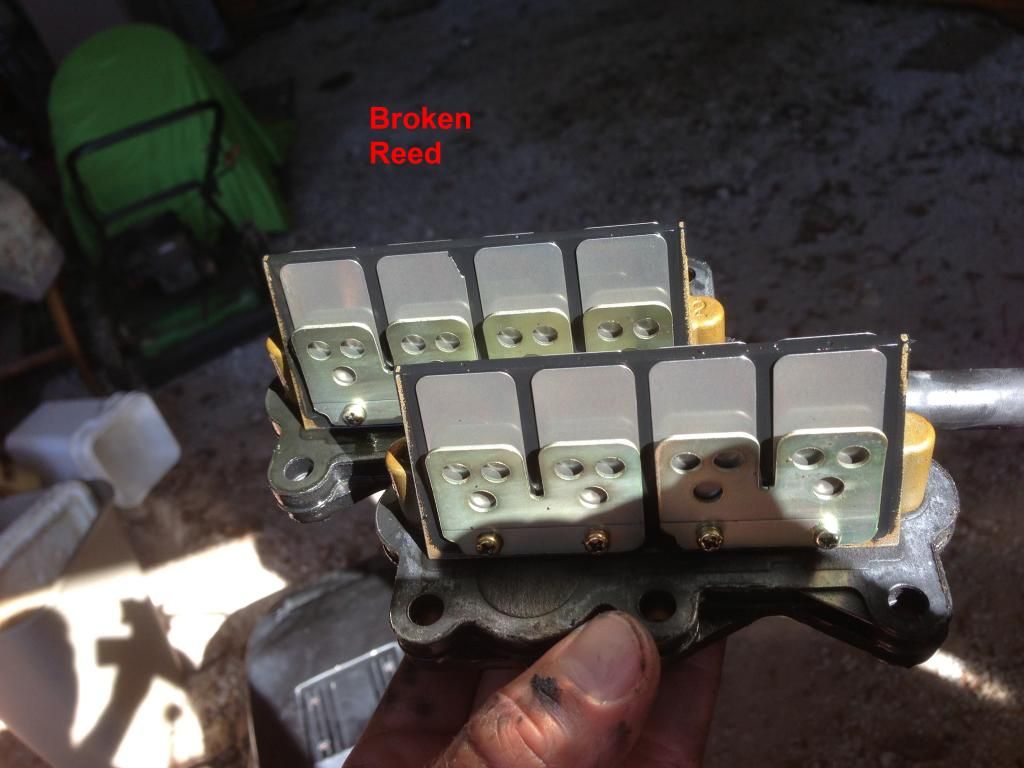
The mechanic noted that it looked like a fuel line had degraded from the inside and there were rubber pieces in the carbs. I squirted some gas from the fuel line from the tank into a jar, and found rubber pieces in the gas. I think my primer bulb is bad and will replace and check again. I opened the throttle plate on the carbs to look at the reeds, and noticed one missing, so I pulled the carbs and the reed blocks.

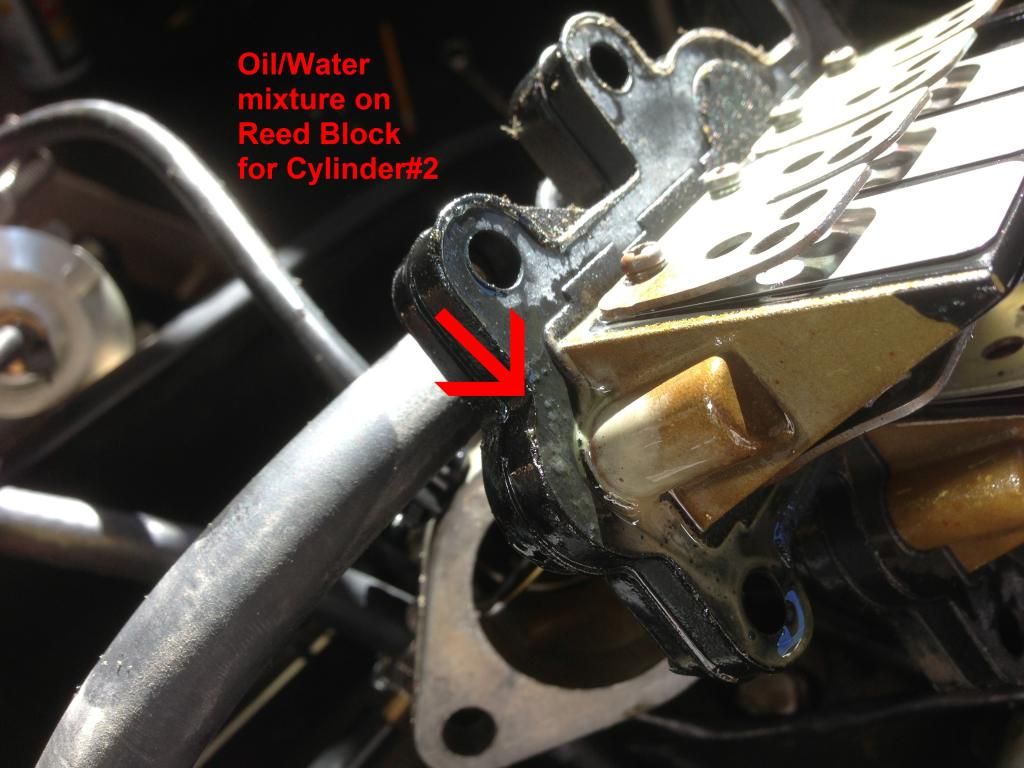
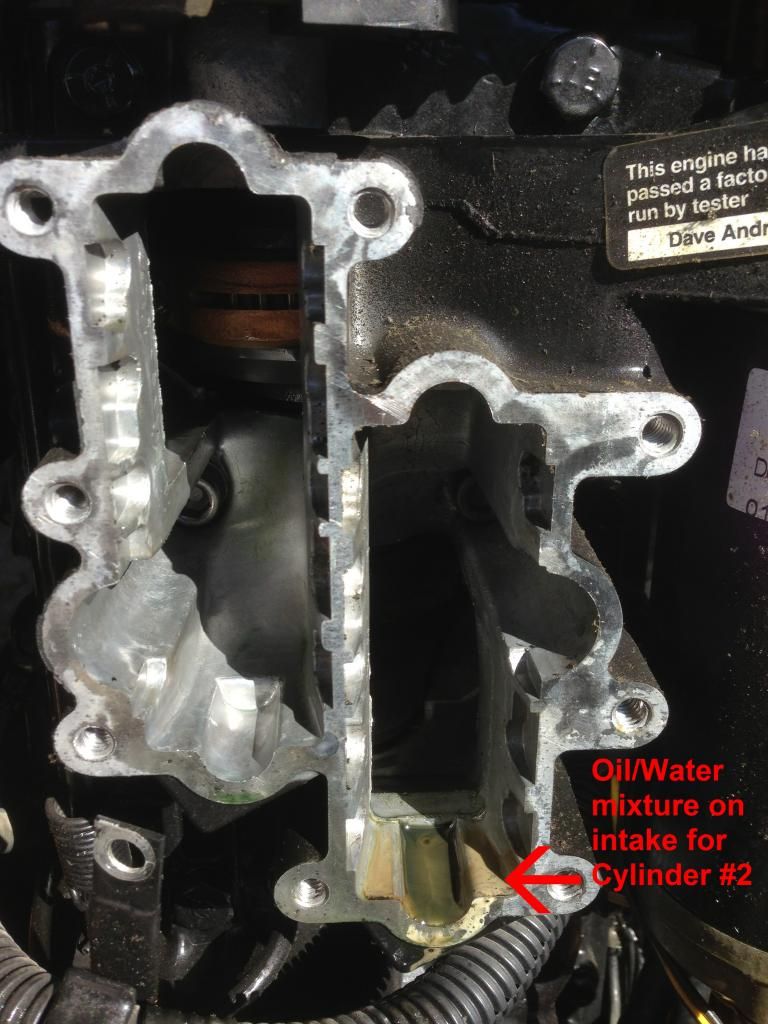
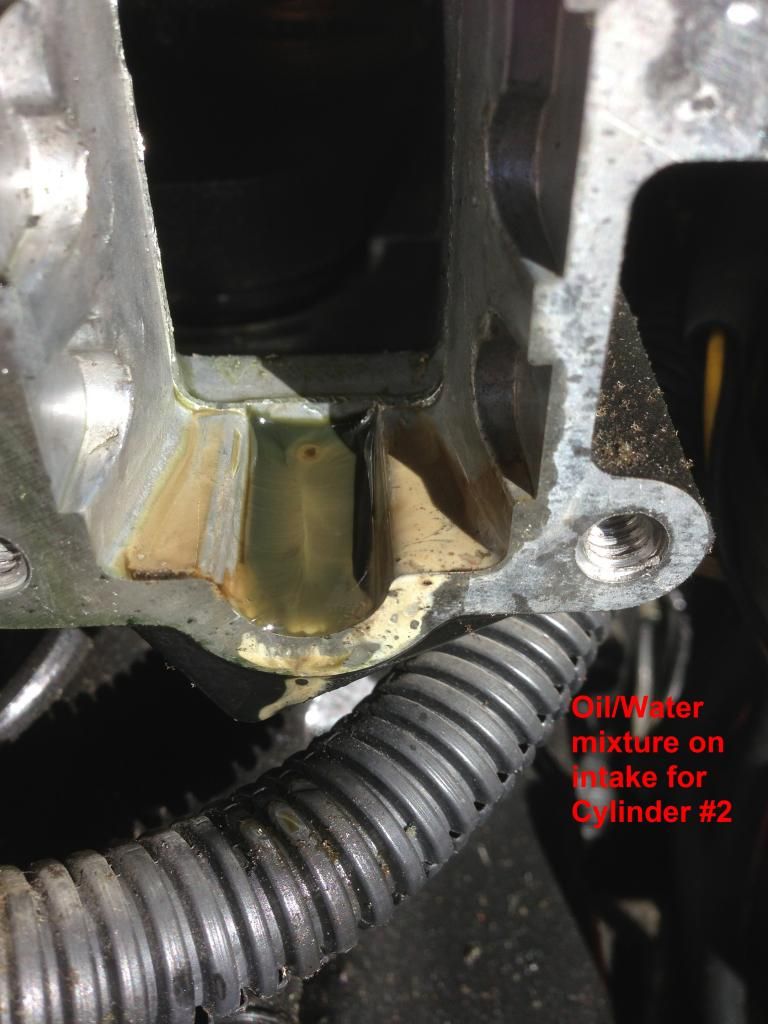
Here is what they look like- note that I found oil/water on the reed block and intake for Cylinder #2.


So, I will order new exhaust gaskets and a new head gasket (looked fine, but just in case). Any opinions on if I should try to find a new exhaust plate?

I've also found 2 used reed blocks with intact plates for $10.00 on eBay. Snatched those up, and will replace the reeds that are broken or aren't seating well.

Please let me know if you see anything in the pics that I've missed, and let me know if I should do anything else at this point. The motor is 2 hours away, so I can't take additional pictures, but do have a few closeups of where the gasket seals on the exhaust chamber and some closeups of the head gasket. If you want to see those too, I'll post. Thanks!
 

oscarjm

Cadet
Joined
Sep 4, 2014
Messages
13
Here is a link to Photobucket where you can get closeups of these pics, along with other pics I didn't include (closeups of head gasket and exhaust chamber surface).
 

Jiggz

Captain
Joined
Oct 23, 2009
Messages
3,817
Now I understand why you decided to take it apart prior to do your own diagnosing and it is because the head was already taken off when you picked it up from the mechanic. As suspected, the reed petals on two cylinders are the main cause of the idling and starting problem. Although, it seems there is water intrusion on #2, I do not believe this is the case. I believe the reason there is milky liquid in #2 is because of the missing reed petal which probably has been missing even before you first took the motor to the mechanic. And it collected moisture while in storage during off season.

As for the missing carbon build up in the exhaust ports, that is not even close to steam cleaning. Instead, it looks more like scaling off, meaning due to heavy build up, it started scaling off. The obvious indicator is the sharp edges of the carbon left. For steam cleaning that would have to be smooth edges meaning from bare metal color it slowly transforms in light gray, dark gray and finally black carbon.

Now for the corrective strategy. First the shopping list
1. Identify all the gaskets you will need, i.e. exhaust plate cover (there are two gaskets for this), head gasket, carb gasket (if they are broken) and intake adapter gasket.

2. Reed petals set. If you can, any of the reed units having a broken petal needs to be replace in its entirety, e.g, new set for #2, #3 and #4 reeds. If not, you can save all those perfectly working petals to assemble one unit and just order set to make up the rest. Try not to mix and match the old petals with the new ones as much as possible. The reason for this is to minimize having multiple broken reeds in multiple cylinders. And make sure you take note which cylinders you installed the re-assembled old petals for future reference.

Corrective actions:
1. Clean the mating surfaces on both the head and the cylinder. Try not to use steel wire brush instead just use brass or nylon. You can use 400g sandpaper for really stubborn dirt, minimally.
2. Clean the mating surfaces on both the exhaust cover & plate. While it is off, clean the exhaust ports with small wire brush
3. Re-assemble the exhaust covers and plate. Make sure you use anti-seize on each bolt, torque'd and in proper sequence
4. Re-assemble the reed units and carburetors. Make sure you use threadlocks on the screws on the reed petals
5. Re-assemble the head and make sure you torque properly in sequence and at least using 2 step torque process. For example for 120 inch-lb, you will first torque to 90 and then start over again to 120. In your case, I believe you do the torque and turn, i.e. torque to 120 in-lbs and then finally a quarter turn (90 degree) on all bolts for the final torque. Note, since the cylinder is in vertical position, there is always a tendency for the gasket to slide down and becoming off centered. Make sure you center the gasket with all the holes and water jackets.

This should get you busy for awhile. Repost when you are ready for the next step.
 
Last edited:

oscarjm

Cadet
Joined
Sep 4, 2014
Messages
13
Thanks Jiggz! Excellent and thorough advice that I will follow, and I particularly appreciate the advice about noting which reed plates I replace and not mixing old with new. These reeds have been bad for a while... I noticed gas/oil pooling up in the carburetor shields/covers, but thought it drained into those when I tilted the engine up. Now I know better.

About this:

As suspected, the reed petals on two cylinders are the main cause of the idling and starting problem. Although, it seems there is water intrusion on #2, I do not believe this is the case. I believe the reason there is milky liquid in #2 is because of the missing reed petal which probably has been missing even before you first took the motor to the mechanic. And it collected moisture while in storage during off season.

The oil/water mixture in the intake concerns me. If it wasn't caused by the missing reed petal, what are the other possibilities? Could a leaking head gasket or leaking exhaust gasket cause moisture to get sucked (or blown back) into the intake, and the missing reed petal caused most of the moisture to blow back into the intake for #2? Trying to understand the mechanics of this and ease my concern I have a cracked block.

Also- would cracks causing a leak on the exhaust plate be obvious?
 
Last edited:

Jiggz

Captain
Joined
Oct 23, 2009
Messages
3,817
A cracked block will indicate an obvious water trace depending where it is located. But if you do not see any hairline crack within the cylinders especially with the mating surfaces with the head, there is most likely no crack in the block. Unfortunately, I did not see the gasket so make an assessment if it was just a torn gasket, which is most likely a source of the water. But if the compression numbers are good (relying from you mech's diagnosis) then it means to say the gasket was fully intact. However, we cannot rely on your mech's diagnosis for I do not believe he is impartial.

If you happen to have the gasket, please do an in-depth analysis of its integrity. But if you or your mech do not have it, it is most likely you will never get it for impartial reasons. The only way water will get into the intake is through the reed unit. Unless, the exhaust plate cover or the head gasket is "raining" or flooding with water, which I seriously doubt since this will hydrolock the cylinder in question.

Remember, with broken reed petal, if water or moisture accumulated in the crankcase, there is very good likelihood it will never go away, unless manually vacuumed or removed. The reason for this is because the air-fuel mixture is lighter than water and tends to get blown back out the most through the carbs while the water stays puddled at the bottom of the crankcase. And because of the crankcase motion, it tends to be milky due to continuous agitation.

I recommend, you do your own diagnosis and inspections. We just cannot rely on the "cracked block" diagnosis from your mechanic. You need to move forward with inspections while awaiting for your parts and be ready to put it back together. Then even before your first re-start we will do some testings firsts, i.e. compression and spark testings.
 

blackd

Petty Officer 2nd Class
Joined
Sep 27, 2013
Messages
152
Jiggz, I have a reeds related question. Are the 4 and 5 plates the same size and screw pattern? If so a retrofit to the round 5 petal may be possible. With the 5's we can still get new petals.

Oscarjm, that may be an alternative solution to just replacing the 4 reed reed/reed blocks with the older round 5 reed plates. IIRC Jiggz or Pwnboat said the older style round reeds were nearly bullet proof compared to the new ?improved? square 4s.
 
Last edited:

pnwboat

Rear Admiral
Joined
Oct 8, 2007
Messages
4,251
The reed blocks or reed cages, that is the piece that the reed petals attach to have the same bolt hole mounting configuration. You can take an older 5 petal reed cage assy., and mount it in a newer block that originally had the 4 petal reed assy. You cannot take a 5 petal reed and attach it to 4 petal reed block, you have to swap the whole assy. I've done this to several motors. There is no noticeable difference in performance.

Oscarjm has a couple of choices here. First off, I would not trust the OEM 4 petal reeds. Seen too many of them break. Once they start breaking, it's only a matter of time before the rest start doing the same thing.
1. You can purchase new OEM assy., but that is very expensive. Run you about $100 per reed block assy. and you need 4 of them.
2. You can replace just the petals themselves with after market composite petals from Boyesen or Chris Carson Marine. They run about $80 - $100 a set to replace all the reed petals.
3. You can replace the whole reed block assy. with the older 5 petal units which are available on the auction sites etc.
 

NYBo

Admiral
Joined
Oct 23, 2008
Messages
7,107
Is that a piece of the broken reed in the close-up picture of cylinder #4?
 

Jiggz

Captain
Joined
Oct 23, 2009
Messages
3,817
It seems both #2 and #4 were missing petals while the rest are only chipped. I would go with PNW's suggestions of either just replacing the petals or replacing the entire reed blocks (w/ petals) with the 5 petal blocks from the auction site. They have many used 5 petal blocks which goes from $40~$60 a piece which would cost a total of roughly $200 for the entire sets. Since these reed blocks are well known to last a long time even used one should suffice.

The one thing I believe that makes the 5 petals more durable is the petal back stopper or support that limits the travel or opening of the petals. It is a full coverage while the 4 petals are barely half covered. This is a very critical design that limits the flexing of the petal thus reducing metal fatigue, especially when vibrating at more than thousands per minute.
 

oscarjm

Cadet
Joined
Sep 4, 2014
Messages
13
I'll definitely consider switching to the 5 petal reed blocks if I can avoid future issues, but I need to make sure I have this water in the cylinder issue figured out before I sink more $ into the motor. I'll cobble together my existing reeds with the used sets I got dirt cheap on eBay, and get it running again and check for water leaks. If that's fixed, I'll improve the reeds. They were easy enough to remove. Thanks for the ideas! Amazing that Mercury went with a different reed design in the 1996 and later Force engines. Really seems like they didn't want these engines to last!
 

GA_Boater

Honorary Moderator Emeritus
Joined
May 24, 2011
Messages
49,038
Oscar - Did you find the missing reed chunks? Floating around the crankcase might not be good after you get the motor running like a banshee.
 

Frank Acampora

Supreme Mariner
Joined
Jan 19, 2007
Messages
12,004
In fact, the same reeds are used in some Mercury engines. So it might be interesting to go over to the Mercury forum and ask if these reeds are a problem on those engines. too

It isn't that they didn't want the Force engines to last: The thinking was that the rubber coated reed blocks would seal better. The half backing plates with holes in them would limit reed petal sticking to the backing plate, improving action and reducing blow-back through the carbs. We can't blame Brunswick. All they wanted to do was decrease manufacturing costs by using the same parts on multiple engines. In fact, Those Force engines that use Mercury ignitions use the same stator across multiple engine lines and sizes. You really must admit that when Brunswick started modifying Force engines to use Mercury parts, performance did increase.

However, while these reeds may have improved performance on Mercury engines, they do nothing on Force engines and there is no difference in performance over the old five petal round-tipped reeds. If you look closely at the photos of the intakes, you will see that Brunswick changed the casting by adding screw relief pockets to the original pockets. THUS on later engines either 4 or 5 reed petal blocks can be used. ON early Force engines, the only way to use 4 petal reed blocks is to modify the backing plates to use flat-head screws and to mill off about 1/8 inch from the vee block mounting screw pads.
 

oscarjm

Cadet
Joined
Sep 4, 2014
Messages
13
Oscar - Did you find the missing reed chunks? Floating around the crankcase might not be good after you get the motor running like a banshee.

I didn't see any obvious reed chunks... I think they would be extremely difficult to find. Don't know if they are ferrous, and if I could probe around a bit with a flexible magnet through the intakes and see if I could retrieve anything. Didn't see anything in the cylinders. I don't really know how long the boat has been running with the reeds in this condition, so it could be that they were ground into smithereens and exited the exhaust at some point. Cylinders and pistons look to be fine though.

I'm hoping to find a free weekend soon to get the parts back on the motor and see what I have in store for me during the off season!
 

blackd

Petty Officer 2nd Class
Joined
Sep 27, 2013
Messages
152
Oscarjm, I also could not find any reed remnants. I suspect they get ground up and eliminated.

Frank, thanks for the info. A retrofit appears the best medicine for these motors.
 

oscarjm

Cadet
Joined
Sep 4, 2014
Messages
13
It is going to be in the 60's this weekend, a very rare occurrence here in Missouri in December, so I am heading to where the boat is stored and am going to install the new exhaust gaskets, head gasket, and repaired reeds. One thing I am a little concerned about... the stainless exhaust plate was pretty warped. I've read that this is a common issue, but have seen conflicting advice on whether to replace the warped exhaust (divider) plate, or reinstall as properly torquing the bolts will flatten it out.

Any advice?

Also, RTV sealant on the exhaust plate gaskets or no? The manual doesn't require it. I'll definitely put anti seize on the bolts.

Thanks everyone for the help!
 

Jiggz

Captain
Joined
Oct 23, 2009
Messages
3,817
If you can replace the warped stainless exhaust plate to ensure it doesn't bite you back. There should be no need for RTV since the gasket will suffice. However, if you decide to re-use the warped exhaust plate, maybe high temp RTV maybe required.
 

oscarjm

Cadet
Joined
Sep 4, 2014
Messages
13
Thought I'd close the loop on this thread. I followed Jiggz advice and steps for reassembly (thanks Jiggz!). Spent a lot of time scraping the original gaskets off of the exhaust cover and stainless exhaust plate (probably close to 2 hours). I went ahead and used Napa/Permatex Ultra blue rtv (according to NAPA, it was OEM equivalent) on all exhaust gasket surfaces.

I was able to use a click type torque wrench on all exhaust bolts except for those behind the cowling. I had to use a beam style torque wrench on the lower exhaust bolts, and couldn't get anything but a small 1/4 drive ratchet on the bottom left side exhaust bolt and tighten to feel. Unless advised otherwise, I'm going to go back with a smaller 1/4 inch torque wrench and double check my torque on all exhaust bolts that I can reach.

The head gasket went on without a problem. Torqued all head bolts to 120 in/lbs then each another 90 degrees.

I replaced the broken reeds with used intact used petals from an auction site. There are two large screws on each reed block that secure it to the housing. If you don't have a new gasket and your old gasket is still attached firmly to the housing, it will cover these screws. I cut away the gasket around the screw and backed it out, which allowed me to pivot the reed block so that I could access all broken petals. I used thread lock on the reed petal screws and on the larger screw that secured the reed block to the housing. I had to reuse the reed housing gaskets because I didn't have new ones with me.

The mechanic who originally looked at the motor said the carbs were full of black rubber bits. He had replaced the fuel lines from the fuel pump to the carbs, thinking they were degrading. I squirted some fuel with the primer bulb into a glass, and found the same black bits. The primer bulb was bad, and this, coupled with the fuel filter installed backwards, allowed the rubber pieces to get all the way to the carbs. I'll admit, the fuel filter was my fault. I replaced the primer bulb and fuel filter.

Everything was back together, so I put it on muffs and turned the key. Fired right up and ran, and I didn't even have the throttle pushed up. I ran it a bit until the thermostat warmed up and started peeing. Pulled the spark plug wire off of each plug- each cylinder was firing (noticeable RPM change when spark plug wire reconnected). After I turned off the motor, I pulled each spark plug and didn't notice any water on them, but will have to wait for some extended running and a test on the lake before I know if the problem is fixed. I was just happy it was running again.

I do know that replacing the reed plates made a big difference... it is idling really smooth. Looking forward to a lake test, but that is months away. If all goes well, I'll look into upgrading the reed blocks. Thanks again everyone- especially Jiggz!
 
Last edited:

Jiggz

Captain
Joined
Oct 23, 2009
Messages
3,817
No worries, it was a pleasure to help. And now here is the kicker . . . after all these hardwork you gained experience thus making you to do things better. You can operate the unit with better working knowledge and at the same time could probably correct any deficiencies or problem you identified, saving both time and money!
 

orbanp

Petty Officer 1st Class
Joined
Jun 26, 2011
Messages
324
Hi Oscar,

+1 to the comment by GA_Boater on finding those missing pieces of the reeds!

Those leafs are made of steel alloy, those are not wheat grains, and it is highly unlikely that they got "ground up to smithereens and just disappeared".
Those pieces are probably bashed into the casting inside of the crankcase for now. If they get loose and they get caught by the crankshaft and bearings, you will have mechanical problems with your motor.
For the piece of mind I would open up the crankcase and would find and remove those missing pieces.

Good luck, Peter
 
Status
Not open for further replies.
Top