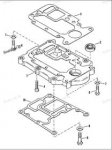
Exhaust Adapter Plate Gaskets Won't Stop Leaking Water

ERock82

Petty Officer 1st Class
Joined
Aug 14, 2014
Messages
230
I have been having an ongoing issue with my powerhead to exhaust adapter plate gaskets leaking water into the cowling. I have had the gaskets replaced 3 times, each time removing the powerhead. The first time it happened, I took it to a marine mechanic who discovered there was a cracked adapter plate and loose powerhead bolts. I had just bought the boat so had no idea. However, during the first outing there was no water leak. This tells me that even with a cracked plate this leak can be stopped. I ended up buying a new (used) plate that was in good shape. The mechanic agreed too. New gaskets were put on and it leaked again when I took it out. His response was that 3 of the 6 powerhead bolts were not OEM and didn't have the shoulder on them. I ordered new OEM bolts and torqued to spec when I once again replaced the gaskets. It is still leaking water. I am baffled. I know it must be possible to stop this leak. The only things I can thing of here are this: 1.) I did not put gasket sealer on all 4 surfaces. I put #2 Permatex sealer (recommended by mechanic) on one side of the gasket that mated with the plate and did same with the other gasket. I did not put sealer on the side of the gasket that lays on the cowling (bottom of adapter plate). The marine mechanic said they didn't think I would even need sealer at all. 2.) Maybe when I lowered the powerhead on the drive shaft it damaged the gasket but I don't think so bc it went on smoothly. 3.) I did not torque the adapter plate onto the powerhead itself. I tightened very hard though. I torqued the head bolts to the adapter plate. Still doesn't explain why lower gasket would leak. 4.) Maybe a warped powerhead or plate. Still doesn't explain how a guy who sold me a boat with a cracked plate could prevent the leak for one 3hour outing when I (who am following specs) can't prevent it for 5 mins. I am going to remove the powerhead 1 more time this weekend and redo. If this happens again I am going to have to get rid of this boat and motor and I really don't want to. Any thoughts on what this could be and how to make it work. Even ideas that would help it hold up for a few outings would be better than selling it. Here is a link to the gaskets: http://www.boats.net/parts/search/Me...PER/parts.html It is a 1995 Force 40 hp stroke motor. Thanks.
 

jerryjerry05

Supreme Mariner
Joined
May 7, 2008
Messages
17,926
Goop it up!!!!
I had a leak start on one of my motors.
I smeared silly cone all over the leak and it stopped it.
Make sure it's clean and dry.
 

ERock82

Petty Officer 1st Class
Joined
Aug 14, 2014
Messages
230
Goop it up!!!!
I had a leak start on one of my motors.
I smeared silly cone all over the leak and it stopped it.
Make sure it's clean and dry.

I used Permatex #2 "Non hardening" sealer last time. Are you saying I should throw that out and use a silicone type? If so, which kind exactly is good that I can get locally? Also, are you agreeing that all 4 sides (as in both sides of each gasket) should be gooped?
 

pnwboat

Rear Admiral
Joined
Oct 8, 2007
Messages
4,251
I've used the Permatex Ulta Grey RTV silicone with good success. Really tough stuff if done correctly. Look closely at the sealing surfaces of the block and cover to see if you can see any damage that may cause a less than ideal seal. Clean all sealing surfaces off. You may have to take a gasket scraper and gently remove any stubborn gasket material. Be very careful not to gouge the aluminum sealing surfaces. Afterwards, wipe off all sealing surfaces with Acetone. Apply the Permatex sparingly to both sides of the gaskets. After you put it all back together, wait at least a few hours for the Permatex to set up properly. Then fire it up and check for leaks.

NOTE: Are you sure it's the exhaust plate that's leaking? I've seen a few adapter plate gaskets that have failed and leaked water into the cowling. The adapter plate is bolted between the power head and the upper lower unit.
 

Jiggz

Captain
Joined
Oct 23, 2009
Messages
3,817
Follow PNW's suggestions. In addition,when tightening the plates and adapter, always cross torque. And when torquing, always do a two step (or even three) process instead of a single step torquing. You can also use high temp copper silicone but the secret is to give it time to cure properly. Personally, I apply it a little more than sparingly because when it comes to sealing surfaces, I want to see a little bit of the sealant squeezed out of the mating surface to ensure it is very tight throughout. And then thereafter just wipe off the excess with my finger, pushing it back in and flattened.
 

ERock82

Petty Officer 1st Class
Joined
Aug 14, 2014
Messages
230
I've used the Permatex Ulta Grey RTV silicone with good success. Really tough stuff if done correctly. Look closely at the sealing surfaces of the block and cover to see if you can see any damage that may cause a less than ideal seal. Clean all sealing surfaces off. You may have to take a gasket scraper and gently remove any stubborn gasket material. Be very careful not to gouge the aluminum sealing surfaces. Afterwards, wipe off all sealing surfaces with Acetone. Apply the Permatex sparingly to both sides of the gaskets. After you put it all back together, wait at least a few hours for the Permatex to set up properly. Then fire it up and check for leaks.

NOTE: Are you sure it's the exhaust plate that's leaking? I've seen a few adapter plate gaskets that have failed and leaked water into the cowling. The adapter plate is bolted between the power head and the upper lower unit.

It is an adapter plate. The one that the powehead bolts to. Now, I just looked up that Silicone RTV Sealant and on the package it says gasket maker…..Is that right? I thought gasket maker was used in place of a gasket.

Here is a link to the adapter plate and 2 gaskets I have:

http://www.boats.net/parts/search/M...HRU 0E138599/ADAPTOR PLATE - UPPER/parts.html


The bottom gasket is paper and the top is rubber. Would it make sense to try and find a bottom one made from rubber? I don't know why they would use paper on the bottom.

Also, the other guy mentioned High Temp Copper Silicone. Do you think that would be better than the Grey one? I plan on removing the plate and inspecting for flatness after I clean it up.
 

ERock82

Petty Officer 1st Class
Joined
Aug 14, 2014
Messages
230
It is an adapter plate. The one that the powehead bolts to. Now, I just looked up that Silicone RTV Sealant and on the package it says gasket maker…..Is that right? I thought gasket maker was used in place of a gasket.

Here is a link to the adapter plate and 2 gaskets I have:

http://www.**********/parts/search/...HRU 0E138599/ADAPTOR PLATE - UPPER/parts.html


The bottom gasket is paper and the top is rubber. Would it make sense to try and find a bottom one made from rubber? I don't know why they would use paper on the bottom.

Also, the other guy mentioned High Temp Copper Silicone. Do you think that would be better than the Grey one? I plan on removing the plate and inspecting for flatness after I clean it up.

For some reason link doesn't show up. Just google "1995 Force 40hp boats.net" and click on "Adapter Plate".
 

ERock82

Petty Officer 1st Class
Joined
Aug 14, 2014
Messages
230
For some reason link doesn't show up. Just google 1995 Force 40hp BOATS DOT NET and click on "Adapter Plate".
 

Jiggz

Captain
Joined
Oct 23, 2009
Messages
3,817
Just so we are clear on the terminologies, "Gasket maker" refers to when you decide to use raw "gasket maker" (in this case RTV silicone) on clean mating surfaces (i.e., without a gasket material, e.g. cut paper, rubber, etc) by making a continuous bead of the RTV along the mating surfaces. The term sealant refers to using RTV silicone to fill gaps between mating surfaces and usually involves a gasket material and sometimes not at all. The difference lies not if a gasket material was used or not but whether a continuous bead of the RTV was used or not to create a seal. When it is a continuous bead then it is referred to as gasket maker otherwise it is called sealant.

In your case, since you are using gasket material and your intention is to fill the gaps between the gasket and the mating surfaces, then it is referred to as a sealant. The top rubber gasket probably requires very little sealant while the bottom will probably need a lot more not only to seal but at the same time reinforce it. Personally, I would use the sealant as a gasket maker on the paper (thus making a continuous bead) by applying the sealant on both sides to seal and strengthen it at the same time. Look it this way, the paper gasket is probably there only to provide a "skeleton" for a gasket maker to be applied.

Here's a description of the high temp copper silicone RTV (Room Temperature Vulcanization) I was referring about. There are many types and brands out there but this is the most common one I've seen that is affordable and effective. Again, curing time is very critical to work properly.
 

pnwboat

Rear Admiral
Joined
Oct 8, 2007
Messages
4,251
I guess I misunderstood your original post. I thought you were referring to the exhaust plate on the side of the motor. That's why I said to apply the sealant sparingly. There are some small water passages that you don't want to plug up.

Anyways, since it's the adapter plate that sits under the power head, you don't have that issue. The Permatex Ultra Grey silicone RTV is rated for continuous use up to 450 degrees F, and is the OEM equivalent for many automotive manufacturers. Again, make sure all sealing surfaces are clean and oil free. I would apply it liberally to both the bottom and top sealing surfaces of the adapter plate and gaskets. The instructions say that it will fully cure after 24 hours, but I think that's probably a worse case scenario with a really thick bead. I would wait at least 2 - 4 hours if the temperature is 70 degrees or warmer before starting it up.

The Permatex Ultra High Temp. Copper is rated up to 600 degrees continuous use, so I'm sure it would work just fine. The set up time is the same as the Ultra Grey.
 

smoedog

Petty Officer 1st Class
Joined
Mar 25, 2012
Messages
238
Go get a torque wrench, or borrow one from orielly's and actually torque the plate in a 2 step cross pattern. There are some things you can get away with "good-n-tight" but this isn't one of them. With how big the plate is and how narrow some of the sealing surfaces are, just smoking them down you can warp the plate and blow out a gasket. I also used gasket sealer, basically looks like molasses and gave all surfaces a healthy coating, and also used loc-tite. First time I did this job I didn't use locktite and some of the bolts backed out causing me to blow out both gaskets, which In turn let my motor overheat since my impeller was basically pumping water out the exhuast port.
 

ERock82

Petty Officer 1st Class
Joined
Aug 14, 2014
Messages
230
I guess I misunderstood your original post. I thought you were referring to the exhaust plate on the side of the motor. That's why I said to apply the sealant sparingly. There are some small water passages that you don't want to plug up.

Anyways, since it's the adapter plate that sits under the power head, you don't have that issue. The Permatex Ultra Grey silicone RTV is rated for continuous use up to 450 degrees F, and is the OEM equivalent for many automotive manufacturers. Again, make sure all sealing surfaces are clean and oil free. I would apply it liberally to both the bottom and top sealing surfaces of the adapter plate and gaskets. The instructions say that it will fully cure after 24 hours, but I think that's probably a worse case scenario with a really thick bead. I would wait at least 2 - 4 hours if the temperature is 70 degrees or warmer before starting it up.

The Permatex Ultra High Temp. Copper is rated up to 600 degrees continuous use, so I'm sure it would work just fine. The set up time is the same as the Ultra Grey.

Here is an update on what happened with the gaskets:

1.) I bought Permatex Ultra Copper Gasket Maker as suggested.
2.) I applied it moderately-liberally to both sides of each gasket
3.) I put the adapter plate back on the powerhead( which was laying on the ground at the time)
4.) Put Loctite on the adapter plate bolts (as suggested by manual) and started cross torqueing.

Here is the kicker:
My official manual says the torque specs are as follows:

Adapter Plate: 55 ft lbs
Powerhead: 55 ft. lbs.

I read this over many times to be absolutely sure.

I started cross torqueing very gradually and at about 20ft lbs, THE UPPER GASKET SPLIT IN PIECES FROM OVER TIGHTENING!!!!

I was so mad!!! How could the manual say 55 ft lbs and this happen at just 20?

Continuing on...

6.) Just not caring anymore from being so upset, I took plate off, tore gasket off and used the copper gasket maker just by itself on the top gasket. There was no way to use just a continuous bead bc of the widths so I caked it on good. I only torqued to 35ft lbs. It seemed that at 55 something was gonna break but that's what manual says.

7.) put lower gasket on, placed powerhead back on lower unit and torqued up to spec.


I plan on test tomorrow. I just know it's not gonna work. Keeping fingers crossed. If I have to buy another gasket maybe I use no sealant. I really don't know...
 

Jiggz

Captain
Joined
Oct 23, 2009
Messages
3,817
I'm really very surprised with the torque requirements of 55 whereas bigger motor like the 120 only needs 50 while the older ones need only 22.5 FT-lbs! And yet the spacer only needs 225 in-lbs. or 18.75 FT-lbs.
 
Top