Need help Please on my 86 force 125 tilt/trim

bemer

Cadet
Joined
Oct 11, 2008
Messages
24
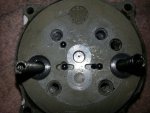
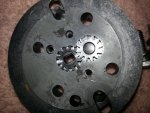
I am trying to Find someone that can help me. I have a 1986 Force 125 with the round external pump and res together along with one shock and one cylinder. I am looking for a diagram to help me put back together the valve cylinder. on the tilt/trim. I have looked many hours and though many fourns on here and can only find the diagram for the single setup can some one please help me.
 

Jiggz

Captain
Joined
Oct 23, 2009
Messages
3,817
No Title

I am not really sure which diagram you are referring to, is it the connection or the ball bearing placement diagram? Anyways, here's both.
 
Last edited:

bemer

Cadet
Joined
Oct 11, 2008
Messages
24
No Title

I understand that pic. my problem is, mine looks different. all 3 bbs are the same size, am I missing things or did someone put the wrong size bb in the mix.
 

bemer

Cadet
Joined
Oct 11, 2008
Messages
24
No Title
 

Attachments

  • photo203021.jpg
    photo203021.jpg
    156 KB · Views: 1
  • photo203022.jpg
    photo203022.jpg
    172.3 KB · Views: 1

Jiggz

Captain
Joined
Oct 23, 2009
Messages
3,817
No Title

photo203026.jpg OK, then maybe this will help. photo203026.jpg
 
Last edited:

riderfan77

Recruit
Joined
Sep 18, 2011
Messages
5
I am no expert but by looking at the drawing all the BB's are the same size, the larger one goes with the large spring.
 

bemer

Cadet
Joined
Oct 11, 2008
Messages
24
Jiggz that's the one, where did you find that if I may ask. so I can get the full page, I have the Clymer book , Never seen that page, But yes it looks like all the BB's are the same, looking at mine both springs look Identical , hard to tell witch is med. and witch is heavy, I was able to put it back together but still have a slow leak down, I am going to do the leak down test tomorrow, to see whether its the cylinder or valve. Only good note is that I have a second tilt trim incase a screw up bad . though as a note I have taken out the clamps off the sides but how do you get the check valve out from there the sides seem stuck in .
 

Jiggz

Captain
Joined
Oct 23, 2009
Messages
3,817
No Title

Most leak downs are either caused by worn out o-rings on the tilt cylinder or worn out o-rings on the spool valves and shuttle valves. You should review the post PNW posted and also the leak down test I've posted from other previous threads. If you cannot locate the leak down test, let us know I can post it again. But for now just make sure you put the valve body back together accordingly. In fact, from experience I can tell there is little to no reason to even disassemble the valve body except to dismount the spool and shuttle valves which does not require disassembly of the BB and springs.

Remove the circ clips one at a time. Use compress air to blow into one of the pressure holes (while trying to cover the hyd line connections with your fingers) and it should blow out one of the spool valves (with the clips removed) and with the shuttle valve (just make sure you have rag to catch all the parts). I don't remember which hole just try one of the three holes shown below although yours maybe different but will have the same holes. As for the remaining spool valve, just remove the remaining circ clips and then using a long rod or screw driver just push it out.
photo195966.jpg
 
Last edited:

bemer

Cadet
Joined
Oct 11, 2008
Messages
24
Yes I tried to blow them out took the clips out coved the hydraulic holes but it did budge. I put about 80 psi to it. Im going to try scrap ing where the clips where and try again.
 

bemer

Cadet
Joined
Oct 11, 2008
Messages
24
Well first atempt on the leak down test. Had a snag, the cap leaked a little. So im going to refill the system and try agaain with a different cap. And tha k you again for all the help jiggz's
 

bemer

Cadet
Joined
Oct 11, 2008
Messages
24
Sec attempt is working great, caped of hydro line from trim cylinder lower end and it hasnt moved yet. Cant even push it down . It doesnt budge. Will do other test a little later.
 

Jiggz

Captain
Joined
Oct 23, 2009
Messages
3,817
Yes, you need to clean around the circ clip area and spray WD40. The spool valves can only go out in one direction, from the inside out, because they rest on a shoulders inside the cylinder. After a try of blowing them out and they would not bulge, you need to push them back in and try again. Do not try blowing air without pushing them back in because it will not help at all. You can tell you are blowing into the right hole if you hear the shuttle valve slams on the side the spool valve you are trying to remove. Or you can have both circ clips removed (just make sure you have rags to catch both sides) and alternate the compressed air between the holes, thus making the shuttle valve work like a sliding hammer until one of the spool valves pop out.
 

bemer

Cadet
Joined
Oct 11, 2008
Messages
24
Well im going to try the last test a little later, then take it apart and make sure I didnt mix up the heavy Nd medium springs. Befor trying to push out the valve again. I do appreciate all the help you are giveing me jiggz.
 

Jiggz

Captain
Joined
Oct 23, 2009
Messages
3,817
The first leak down test basically tests the tilt cylinder. If there is no leak down, then the second test will involve both tilt and trim cylinders. If there is a leak down then the trim cylinder needs to be repaired (replacing o rings) and if there is no leak down, then the only part that can leak will be the valve body. And 99 percent of the time, it's only replacing the o-rings (seat valves) on the spool valves and shuttle valve.

Now clarify me a little, are you testing the same unit you are trying to disassemble or is this the spare VB? As for getting the spool vlvs out, make sure you use a pointed end air gun pushed hard against the pressure hole. You can even use the brass plug to cover the hyd line connections on the VB.
 

bemer

Cadet
Joined
Oct 11, 2008
Messages
24
No I am res ing on system now, but going to take the spare apart also just incase the other is bad, so I have test one, also takeing spare tilt cylinder apart and going to replace rings also . Im hopeing to trim unit is good so I dont have to fiddle with that.
 

bemer

Cadet
Joined
Oct 11, 2008
Messages
24
Ok well I did the second test for the trim , the trim never came out when it went up. I figure that would be normal, but it falled the test so I gues I have to take the trim unit apart and repace the o rings, im hopeing I can do it with to motor just up and not have to take the hole thing off.
 

bemer

Cadet
Joined
Oct 11, 2008
Messages
24
I tasting the main unit and was just working on the spare at the same time because it does the same thing.
 

bemer

Cadet
Joined
Oct 11, 2008
Messages
24
You dont happen to have a expoded view with torc specification do you for the trim unit?
 

bemer

Cadet
Joined
Oct 11, 2008
Messages
24
Well I took it apart sec one not the one on the boat but I fout a top and bottom rubber ring along with a real fat one on trim plunger. The one on the plunger looks ok the other to look flatened.
 
Top