88 force 85hp trim drop help.

Status
Not open for further replies.

Sloppy78

Seaman Apprentice
Joined
Jul 2, 2013
Messages
46
Hello all it is been a while since my last post. I finally got the boat out of storage and ready to go for the season. My last post we were talking about my motor coming down by itself very very slowly. My shock absorber shock had a leak in it so I bought a new shock and switched it out per advice of another member. It did not help it may of slowed down a little more now it takes about 20 minutes for it to go from full up position to full-down position on it's own. I burped the lines ,I added more fluid and still continues to drop. I do not see any visible leaks and I'm really quite stumped. Any help would be greatly appreciated.

1988 bayliner trophy bass 17ft
88 force 85hp #856x8B
 
Last edited by a moderator:

pnwboat

Rear Admiral
Joined
Oct 8, 2007
Messages
4,251
Re: 88 force 85hp trim drop help.

If I were a betting man, I would bet that it was the check valves in the valve body, however, it could be the "O" rings in the Tilt/Trim cylinders too. Here is some info on repairing both....just in case.

It could be the "O" rings in the Tilt/Trim cylinders, which aren't that hard to replace. The link below is a kit that will take care of that problem, if your Tilt/Trim assy. is the type pictured in the details of the kit. It does require a pin wrench to remove the top of the Tilt cylinder. A picture of the pin wrench tool is shown in the literature that comes with the kit. Also, the bolts that hold the Trim cylinder cover are prone to break. If you break one, you'll have to drill it out and replace it.

Rebuild Kit Chrysler Force Power Trim and Tilt Cylinder Seal Kit | eBay

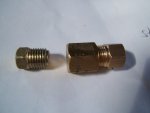
If that doesn't take care of it, most likely it is one of the "O" rings on one of the check valves in the valve body itself. Easiest way to work on it is to remove the Tilt/Trim motor and Valvebody assy. from the boat. 4 bolts hold the valve body to the motor/fluid reservoir. Note, when you remove the hydraulic lines, make sure you note which port in the valve body they go in. Also, when re-attaching the lines, it's very easy to cross thread the fittings. Be very careful when re-attaching the hydraulic fittings. Attached below is a picture of the valve body with the check valves removed and disassembled. On your year motor, the check valves are typically held in with a couple of circlips. Remove one circlip at a time and I use compressed air to get the check valve out. If you remove both circlips at once, there's a chance that the compressed air will blow both valves out, sending them flying across the shop to who knows where. Sometimes you can also remove the circlip and tap the valve body against a piece of wood to get the check valve assy. out.

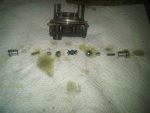
The picture below shows the disassembled check valves removed from the valve body and placed in order of assembly. Part numbers 1 -4 are the check valve assy. #1 is the body itself, #2 is the spring, #3 is the hexagonal check valve, #4 is the cap which is pressed into the check valve body #1. #5 is the shuttle valve with an "O" ring around it. There is a very small "O" ring that sits around the small nipple on part #3. That "O" ring is often the culprit. The part number that I use for the "O" ring is in a Briggs and Stratton lawn mower needle& valve seat repair kit 398188. Cost is $3 - $5 and you'll need two. I've also included a clearer picture of the valve body and check valves without the numbers.

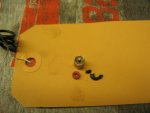
Third picture below is of the hexagonal check valve with a bad black "O" ring which is pretty much disintegrated, and the new red replacement. The new rubber piece fits over the nipple and the nipple pokes through the hole in the rubber seal.

valvebody1.jpgtrim tilt.jpgcheck valve3.JPG

Jiggz who is another forum member here, has come up with a way to remove the pressed in cap #4 using an automotive panel clip tool.
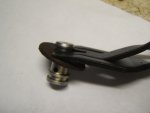
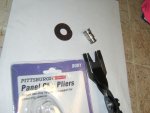
panel clip1.jpgPanel clip.jpg


If you have some decent mechanical abilities, you should be able to accomplish the repair, however, there is a certain amount of risk involved in attempting this repair as you could completely disable the Tilt/Trim assy.
 
Last edited:

Sloppy78

Seaman Apprentice
Joined
Jul 2, 2013
Messages
46
Re: 88 force 85hp trim drop help.

That my friend is one hell of an answer! Thank you for such detail and if I can work up the courage to do such a repair I'll follow it step by step! I just don't want to mess it up anymore then it is and end up Costing more then the initial repair from a pro.
 

MickLovin

Master Chief Petty Officer
Joined
Feb 18, 2013
Messages
822
Re: 88 force 85hp trim drop help.

Have to bookmark this one oldboat1 comes through again.
 

riderfan77

Recruit
Joined
Sep 18, 2011
Messages
5
Just did this repair today and everything is working like a charm! Thank you very much for the info and pics. It is actually quite easy to do, just seemed more daunting then it was. Thanks again.
 

Jiggz

Captain
Joined
Oct 23, 2009
Messages
3,909
No Title

I think this is a very informative thread for tilt and trims. I would like to include the leak down test procedures for the typical 3-wire Tilt and Trim system with shock absorber system and request the moderators to put it up with the sticky posts.

Leak down test procedure:
The following is a test procedure to determine which component is causing the leak down. You will need a 3/16” brass cap and also a 3/16” plug. Both are available at Ace Hardware or some auto stores.
Step 1: Test the tilt cylinder for leak down
  1. Raise the tilt cylinder fully and then support the motor with a suitable block
  2. Relieve pressure by slightly tilting down
  3. Disconnect “raise” line from pump assembly connecting to the bottom of tilt cylinder
  4. Cap line with the female brass cap and also the valve body port with the brass plug
  5. Remove block support from gearcase
  6. Mark across the swivel and stern bracket with a marker to note movement. This may take a few minutes to about 30 minutes to see movement or leak down
  7. If leak down is noted, replace tilt cylinder or in your case rebuild it.
  8. IF NO LEAK DOWN IS NOTED RECONNECT LINE AND PROCEED TO NEXT PROCESS
Step 2: Valve Body leak down test
  1. Lower the outboard motor to full trimmed down position
  2. Remove the “lower” trim cylinder line from the valve body. This line is the one located on the upper portion of the trim cylinder. Plug and cap both the line and the valve body port.
  3. Raise the motor to fully up position (Full tilt)
  4. Mark across the swivel and stern bracket with a marker to note movement
  5. If leak down occurs, troubleshoot the valve body
  6. If leak down DOES NOT OCCUR, REBUILD OR REPLACE TRIM CYLINDER. NOTE THIS IS WITH THE CONCLUSION THAT THE TILT CYLINDER PASSED THE LEAK DOWN TEST IN STEP 1.
Valve Body troubleshooting:
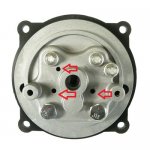
  1. Do not disassemble the entire valve body. You do not even need to dismount the motor. Instead you just need to dismount the valve body (VB). With the VB dismounted, remove the circ clips (or unscrew depending on model) one at a time. Use compress air to blow into one of the holes on the VB (see arrows on pics) while at the same time covering the hyd lines with fingers. Use a rag to catch all the parts. See above pics to disassemble the spool valves and inspect the seat o-ring for wear. Replace as required and also the o-rings on the shuttle valve.
photo203058.jpg

photo195966.jpg

photo203059.jpg
 
Last edited:

comet424

Petty Officer 1st Class
Joined
Jul 28, 2012
Messages
203
hi I bought the briggs and straton seals to do this project
I got the 2 caps unscrewed and the shuttle valve out but I don't have panel pliers how do you pull these apart.. and it is suppsed to be tight or is it supposed to move freely.. any other tricks then using panel piliers.. I used the compressed air to shoot the shuttle valve out
 

SkiDad

Lieutenant Commander
Joined
Jul 18, 2010
Messages
1,518
you can get those pliers at Harbor Freight really cheap. Don't try without this tool as you will mark it up too much. you need a washer like shown in picture for leverage. it's VERY tight. I've done 2 of them and you need to put a towel over when you are popping it off so it doesn't launch too far.

yes, I know this post is old but it's a sticky.
 
Status
Not open for further replies.
Top