force 125 trim motor valve assmbly diagram please

masonman

Cadet
Joined
Aug 11, 2017
Messages
11
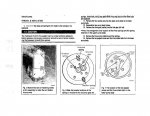
I have one of the older force 125 . the problem is a leakdown with the trim up.
leakdown test shows something wrong with the valve body.
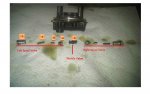
like a dumb *** i took it apart and now dont know how to put back together, balls springs and all.
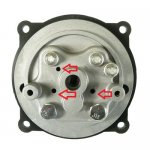
i suspect now its the check valve thats held in with the 2 snap rings.
i havent took that out or apart yet.
i found a few new valve body assembly but $108.00

http://www.ebay.com/itm/NEW-Force-6...09-/152053568476?_trksid=p2385738.m2548.l4275

I hate to do that if i can get this back together and make it work rite.
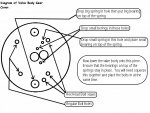
i can not find any blown up teardown diagram anywhere on the big www
or in the kinda usless force book .
does anybody have a diagram i can print off.
I sure hope i can get this back together and make it work.
also any advise about the check valve i dident take out yet.
thanks in advance.
force 125 one of the blue purple ones.
 
Last edited:

jerryjerry05

Supreme Mariner
Joined
May 7, 2008
Messages
17,927
The ironic part to your story is.
​The check valves is what you should have taken apart to fix the leakdown.
​The pump itself seems to never go bad just the seals in the check valves.:(
​Someone might know how to re-assemble it?? I've never had any luck doing that.

I've never seen a parts breakdown on the pump.
​The best bet is usually buy one.
The cheap ones on line are just that. Cheap Chinese CRAP.
IF?? it works at all??? it doesn't seem to last.

​Buy it from someone who has no trouble taking parts back.

The top 3 posts of this forum has tips on working on your own stuff.


Jiggz

Captain
Joined
Oct 23, 2009
Messages
3,817
No Title

Here's some pics diagram of the VB and also its cover. Hopefully, this is exactly the same as yours.
 

Attachments

  • photo273939.jpg
    photo273939.jpg
    219.1 KB · Views: 39
  • photo273940.jpg
    photo273940.jpg
    113.3 KB · Views: 38
  • photo273941.jpg
    photo273941.jpg
    63.7 KB · Views: 37

masonman

Cadet
Joined
Aug 11, 2017
Messages
11
thanks for the pics jiggz.
I think i have it back together rite.
now my problem is how do i get that releif valve assy out.
I got the snap rings out but the valve will not move one way or the other.
i even tried pressing it threw with the vice and a socket. i dident go to hard so i woulden't break the valve body.
Just if anyone wants to know how i held the balls springs and gears in place .
is i used a dab of packing grease to hold everything in place.
while linening in place and bolt back together.
i did it in 2 trys.
then just dushed it all out with gas to melt out the grease.
Jerryjerry05
I did go ahead and orderd that $100. valve assy should be here next thursday.
i would still try to fix the original if i can get that releif valve out see whats might be happening there.
i can return the new one if i dont use it.
thanks everyone.
 

Jiggz

Captain
Joined
Oct 23, 2009
Messages
3,817
No Title

After removing the circ clips, you will need pressurize air to blow out the check valves. The best way to do this is to remove one circ clips one at a time. And then using air pressure applied to one of the holes in the valve body to push out the check valves. As soon as one is removed and so with the shuttle valve, then the next step to remove the other check valve is with a rod or long screw driver to push it out. Of course, after you remove the circ clip on it. Here a pics where to apply the air pressure. Well one of these arrows depending which circ clips you initially pulled out.
 

Attachments

  • photo195966.jpg
    photo195966.jpg
    75.2 KB · Views: 6

jerryjerry05

Supreme Mariner
Joined
May 7, 2008
Messages
17,927
PB Blaster.
Propane torch.
A socket that just fits inside the hole.
PATIENCE is a MUST
​SOFT aluminum, you can destroy it very easily.

​You can push the relief valve IN just a very tiny bit.
It won't push all the way through.
Then on a piece of wood, tap the body trying to get the RV to come back out.
​Try it on both ends.
​Use compressed air in the corresponding hole.
It's best to plug the other hole while trying to do this
​One should be easier to move than the other.
Keep working at it and it will come out.
​If it's ever been in salt water?? the difficulty will be 100% harder.

Once one comes out the shuttle will come out and the other can be pushed out.

​Then inside the relief valve is a very tiny washer that needs to be replaced.
Again PATIENCE!!!
​The directions to modify a door panel removal tool are in the top posts.

I've found a propane torch is a must to get these apart.

I'll try to get a pic of the tool in use.
 

masonman

Cadet
Joined
Aug 11, 2017
Messages
11
thanks jiggz and Jerry.
You guys are lots of help cool.
Mabe i should start a new tred for this question.
since i have the pump out with the 2 wires one green and one blue.
is there a way to tap in and put a trim switch of some kind in the transom or motor.
for beach and docking.
 

masonman

Cadet
Joined
Aug 11, 2017
Messages
11
ok i played with it some more today.
i used the torch to heat it up and then tryed to drive the end caps threw with a socket like you can do on a u joint.
still no movement.
after reading more from you guys .
jerry and Jiggz
i take it now the ends dont come out that way.
anyhow i did use compressed air about 80lb i blew air in all the holes where the bearing and springs and also the tube line holes .
The front cap would move out just about flush with the valve body.i can do that back and forth all day,but the other one im gonna call the back one because thats the one thats burried when on the boat. that oneyou no move.
Ok just what am I trying to acomplish here.
do the caps both come out and more parts inside to free up and clean .
also there isent any plastic or rubber parts in there to worry about melting is there.
you guys have any pics on this now.
I just might b able to salvage this thing.
thanks guys.
 

jerryjerry05

Supreme Mariner
Joined
May 7, 2008
Messages
17,927
If you got the one flush???
Then it's almost out.
​When that comes out the other just pushes out.

Yes they both have stuff inside that needs to be replaced.
Look at the top 3 posts.
One covers the repair.
​There is a gasket inside there that needs to be replaced.
​You can destroy it if not careful. READ the post.
 

masonman

Cadet
Joined
Aug 11, 2017
Messages
11
Jerry i have them both flush with air and push back in then can push out with air again, i did this for quite awhile.
i can try some more later.
thing is Jerry I did use the propain torch a little.
If there is plastic in there its probably shot.
i dident get it too hot tho.
where do i get those parts and what rebuild kit do i look for or parts numbers.
Hey Jerry where are the top 3 posts you refer to.
im a newbi here.
what am i missing
 
Last edited:

jerryjerry05

Supreme Mariner
Joined
May 7, 2008
Messages
17,927
If you can open the Force forum you have the top 3 posts right there.

​I'm going to add a post in a few minutes expanding on the T@T rebuild already there.
 

jerryjerry05

Supreme Mariner
Joined
May 7, 2008
Messages
17,927
Your posting on the Force forum.
The first 3 posts you can't find?
​Open up the Force forum.
Then read/open the first 3 posts.
The posts start with: Sticky or Closed Sticky.
Open and read the posts.
​T@T Is short for Trim @ Tilt.
 

Jiggz

Captain
Joined
Oct 23, 2009
Messages
3,817
No Title

If the spool valve moves out and stops flushed to the VB, it means you need to thoroughly clean the hole to the point it show bare metal. I still recommend just removing one circ clip at a time. Everytime the spool valve cap gets stuck at the hole lip, you need to push it back in and apply few drops of oil before re-applying air pressure. Remember, to get more pressure to go to one side of the VB, you need to cover the other holes with your fingers from your other hand. And use only a short blast of air. Make sure you use a rag to catch all the parts that will come out.

And yes, it will be all over the place and the sharp pointed shuttle valve you need to worry about stabbing you. SO DON'T EVEN THINK ABOUT CATCHING IT WITH YOUR BARE HANDS. Here's pic just so you know what you're up against. The rubber tipped air nozzle gun is perfect for this job. And yes, you can use up to 100 psi of air pressure.
 

Attachments

  • photo203059.jpg
    photo203059.jpg
    126.6 KB · Views: 10

masonman

Cadet
Joined
Aug 11, 2017
Messages
11
Hey does anyone know where I can get the rebuild kit for this? And a part number for the kit so I can look for it? Thanks in advance
 

Jiggz

Captain
Joined
Oct 23, 2009
Messages
3,817
No Title

Basically, you only need two parts to replace the O ring on the spool check valve. It is not an OEM but an excellent replacement O ring which is basically originally use for small engine carb fuel inlet needle valve seat. Here's a pic and part number. You can google the part number and easily find numerous online store have it available. You will need 2 pieces; one for each side. And here's a pic of the set of Viton O-rings (from Harbor Freight) to replace the rest of the O rings, i.e. shuttle valve and spool valve body.
 

Attachments

  • photo211262.JPG
    photo211262.JPG
    45.2 KB · Views: 4
  • photo274205.jpg
    photo274205.jpg
    210.7 KB · Views: 6

masonman

Cadet
Joined
Aug 11, 2017
Messages
11
Thanks Jiggz thats what i needed pics and numbers.
I followed your directions and i finally got it apart.
now here is my question.
there is only 5 o rings look at pic what are the harbor freight size rings that go on to the end plugs valves and what size is the one that goes on that spool valve .
i put one on there that looks same but that whole thing is loose as a goose and rattels while in the valve cavity.
does the same with the old o ring.
is it suppose to be that way or is it suppose to fit tite .
i cant see how the fluid dont just go past that part .
now iboats wont let me upload some pics, as they are too big in byts geeeez.
i will try with the pis via my puter instead of my phone.
o btw i got my new valve body came just now.
but now that this is apart i would like to fix for a few bucks.
instead this $100.00 part if i can fix with 5 o rings from harbor freight and i can go to the lawnmower shop for the rest.
 

Jiggz

Captain
Joined
Oct 23, 2009
Messages
3,817
There are actually 18 different sizes of Viton O rings in that particular set. The pics is only more of a demo than the real thing. If you want to see a detail pic of the O rings, go to HF and search for "Viton O ring". You should be able to replace all O rings from this set. Or if the old ones are not too worn out you can reuse them.
 

jerryjerry05

Supreme Mariner
Joined
May 7, 2008
Messages
17,927
Once it's back together and the snap rings are in place and the oil gets in, they will seat and not move.
​If the o-ring are the wrong size?? they will leak.
 
Top