1983 Chrysler 45hp Head Gasket Replacement

CApTaInGoOfy

Petty Officer 3rd Class
Joined
Aug 17, 2015
Messages
91
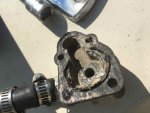
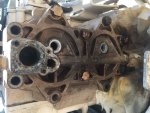
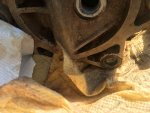
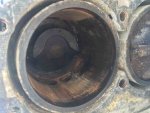
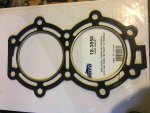
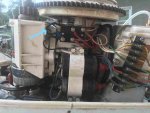
Does anyone happen to know what the torque specs are? I have a 1983 Chrysler 45hp: 457H3P.

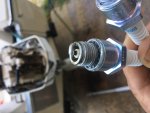
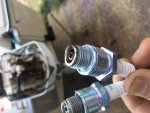
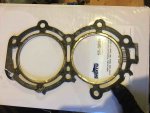
Just replaced the spark plugs on this as well as the impeller and the housing, and all the seals in the lower unit.

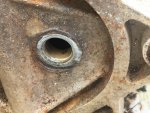
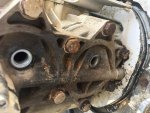
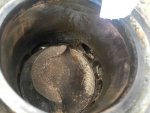
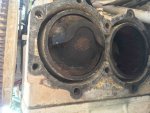
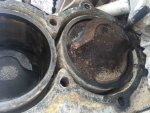
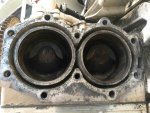
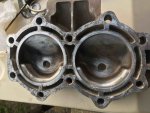
Was having issues with the motor turning over as it was slowly turning. Removed the spark plugs one by one, when I removed the top plug it was the same slow turn, removed the lower plug and the motor was turning over just fine. I guess the 300 yards away from the ramp when I noticed it wasn't pushing water out of the telltale did the damage....

Is there a way to clean the water out of the head or will it just evaporate when I get this running again... I'm running out of luck with this motor this summer... Thanks to all that have given input and tips on previous posts! Wouldn't have gotten here by myself. Thanks again.
 

CApTaInGoOfy

Petty Officer 3rd Class
Joined
Aug 17, 2015
Messages
91
No Title

Just replaced these plugs like a week ago....
 

Attachments

  • photo273812.jpg
    photo273812.jpg
    346.1 KB · Views: 0
  • photo273813.jpg
    photo273813.jpg
    345.2 KB · Views: 0
  • photo273814.jpg
    photo273814.jpg
    334.6 KB · Views: 0
  • photo273815.jpg
    photo273815.jpg
    354.6 KB · Views: 0

Nordin

Commander
Joined
Jun 12, 2010
Messages
2,424
I have answer you in the other thread about this.
It has overheated and you have to pull the head and inspect.

Maybe the rings have stucked too.
 

CApTaInGoOfy

Petty Officer 3rd Class
Joined
Aug 17, 2015
Messages
91
I have answer you in the other thread about this.
It has overheated and you have to pull the head and inspect.

Maybe the rings have stucked too.


Thanks, about to pull the head, just sourcing a head gasket so I can get one hopefully by tomorrow.
 

CApTaInGoOfy

Petty Officer 3rd Class
Joined
Aug 17, 2015
Messages
91
No Title

Spray the bolts up with PB let them sit, heated the head/block up with heat gun when taking off the bolts 9 bolts hooray! The last lower right bolt.....you guessed it son of a *$&^# broke off! You would think the head would still slide off as there are no threads on the bolt that are in the head but the darn thing one budge. The entire head does turn to the right with some force but it seems like the bolt is frozen onto the head. Sprayed the crap out of it with PB, applied heat via a heat gun and nothing. There is roughly 2.5" worth of clearance between the head and the housing of the outboard.

Any ingenious approaches would be greatly appreciated as my frustration is getting the best of me right now! Can't win...
 

Attachments

  • photo273833.jpg
    photo273833.jpg
    309.9 KB · Views: 0
  • photo273834.jpg
    photo273834.jpg
    373 KB · Views: 0
  • photo273835.jpg
    photo273835.jpg
    271.3 KB · Views: 0

jerryjerry05

Supreme Mariner
Joined
May 7, 2008
Messages
17,923
A heat gun probably won't be hot enough.
​A propane torch might be enough?
​Heat , spray , heat ,spray and tap on the side next to the bolt.
Turn the head back and forth and repeat. the heat, spray.

​I use an acetylene torch but am VERY careful not to melt the aluminum.
 

CApTaInGoOfy

Petty Officer 3rd Class
Joined
Aug 17, 2015
Messages
91
A heat gun probably won't be hot enough.
​A propane torch might be enough?
​Heat , spray , heat ,spray and tap on the side next to the bolt.
Turn the head back and forth and repeat. the heat, spray.

​I use an acetylene torch but am VERY careful not to melt the aluminum.


Will have to go get my oxy/acet setup from my buddy who doesn't like to return things and give it a go. Was debating about using a mig but can't get the tip of the gun in there not enough room... Went out to spray some more PB and turned the head to the right same thing, the bolt is turning with the head. If the head could only slide off that darn bolt I could probably use a pair of pliers to remove the bolt as the head turns to the right pretty well now. Seems to be a tight fit in the head where the shaft of the bolt goes through.
 

pnwboat

Rear Admiral
Joined
Oct 8, 2007
Messages
4,251
Obviously corrosion has seized shank of the bolt to the hole in the head.

Some of the worst seized bolts that I've ever seen were on marine motors where steel bolts were threaded into or through aluminum alloy parts. You would have though that they were welded together.

Application of heat and gentle tapping usually works. Just takes a long time....be patient. You might be able to take the bolts that hold the lower part of the housing to the leg and shift the lower housing over a bit to get more room to get at that bolt.
 

CApTaInGoOfy

Petty Officer 3rd Class
Joined
Aug 17, 2015
Messages
91
Picked up my oxy/acety setup and got that head off. Took a series of x4 heating cooling spraying with PB. And tapped from behind and got it off.

Now have to heat up the block a little to remove the rest of the bolt.

Anyone know what the torque specs are for the head bolts?
 

Nordin

Commander
Joined
Jun 12, 2010
Messages
2,424
Torque spec. headbolts are 270 in pound.
Do it in three steps and start at middle right bolt in a CW circular pattern.
 

CApTaInGoOfy

Petty Officer 3rd Class
Joined
Aug 17, 2015
Messages
91
Torque spec. headbolts are 270 in pound.
Do it in three steps and start at middle right bolt in a CW circular pattern.


Just found a website that has Chrysler Service Manuals that you can view for free online. Was able to see that it was the same spec that you said 270 in/lb. When I was trying to check the post earlier, looked like the site was down for some reason.

Head is bolted up and I did it in 4 passes in a clockwise direction started from the center bolt on the right. Replaced all the head bolts as well, didn't want another snapping on me again. I put grease on the bolts as jerryjerry05 said in another post that anti-seize and outboards are no good.
 

CApTaInGoOfy

Petty Officer 3rd Class
Joined
Aug 17, 2015
Messages
91
Ok so buttoned her all up and went to fire her up and.....nothing. Charged up the battery and tried again and it turns over maybe once or twice slowly like the battery is dead and than stops. I even tried rope starting her up and nothing but a loud pop of a backfire... I take the bottom plug out as that was where the water was spurting out prior to changing the head gasket and the motor turns over just fine. Put that plug back in and did the same for the top plug with the bottom plug in and it spins just fine.

Touched the starter and it was hot, I'm assuming from me turning the motor over and it struggling to turn the motor. By hand the motor turns fine in my amateur opinion. Of course it spins by hand easier with the plugs out, with the plugs in it has what I think is the normal tension when the piston gets close to the top or bottom, I'm not grunting to turn it either.

Prior to doing the head gasket the motor was acting like this but the speed of the motor turning over only changed when I removed the lower plug. When I removed the upper plug the speed the motor turned over was the same which was a slow turn over once or twice. Now it reacts the same regardless of which plug I remove...

I'm curious on why it won't fire up, I know I have spark as it backfires every now and then when I try to rope start it. I hit a wall again on this motor. This motor was running fine up until I noticed it wasn't pumping water from the telltale after leaving the ramp. This in turn started my adventure which started with impeller and housing replacement, lower unit seals, replacing the telltale, and now the head gasket as well as head bolts. Now the darn thing doesn't want to start. You think it could be as simple as a battery? Bought the battery 8/26/16 its a starting battery with 800CCA, fully charged today it was reading 13.04v. I wonder if I should go get it load tested... but again it does turn the motor over when I remove either one of the plugs...

In need of words of encouragement... thanks...
 

CApTaInGoOfy

Petty Officer 3rd Class
Joined
Aug 17, 2015
Messages
91
No Title
 

Attachments

  • photo273981.jpg
    photo273981.jpg
    219.1 KB · Views: 0
  • photo273982.jpg
    photo273982.jpg
    190.7 KB · Views: 0
  • photo273982.jpg
    photo273982.jpg
    190.7 KB · Views: 0
  • photo273983.jpg
    photo273983.jpg
    285.6 KB · Views: 0
  • photo273984.jpg
    photo273984.jpg
    351.9 KB · Views: 0
  • photo273985.jpg
    photo273985.jpg
    190.3 KB · Views: 0
  • photo273986.jpg
    photo273986.jpg
    196.2 KB · Views: 0
  • photo273987.jpg
    photo273987.jpg
    330.2 KB · Views: 0
  • photo273988.jpg
    photo273988.jpg
    344.6 KB · Views: 0

CApTaInGoOfy

Petty Officer 3rd Class
Joined
Aug 17, 2015
Messages
91
No Title

Anyone have any ideas what this wire is. I noticed it while checking the voltage at the starter which checks out fine...12.79v at rest and 11.2 while cranking... This motor reminds me of my VW's when the timing is off... But I don't think this has a distributor if it does than I have no idea where it is! Don't know the correct marine terminology so I apologize in advance. Watched numerous timing videos on youtube and via this search function on iboats and on the web. All the videos I have seen so far have to do with distributors or magnetos or 2 to 3 carbs. Watched the video in the sticky by Frank Acampora RIP, met him while fishing on the PA side of the river roughly three years ago and he told me about this site. Great guy and we both shocked each other when our conversation turned toward education as we both have degrees in Biochemistry. Was shocked on the sheer number of posts he has on this site! Will get the battery load tested on Monday as my two day work week begins.... until then thanks again for all the tips/info!
 

Attachments

  • photo273989.jpg
    photo273989.jpg
    162 KB · Views: 0
  • photo273990.jpg
    photo273990.jpg
    167.3 KB · Views: 0
Last edited:

Nordin

Commander
Joined
Jun 12, 2010
Messages
2,424
CapTainGoOfy.....looked at the pics of the cylinders, but it is difficult to see how the walls are.
Was one of the cylinders scored or both?
You can check the compression with rope start it instead of electric starting it.
Compression should be about 145PSI (factory spec.).

You should be able to turn the flywheel by hand with some hard/force when each piston shall overcome the compression at TDC.

The wire you point out is the grounding wire from the alternator to the rectifire.
Your engine has battery ignition system and it use the battery voltage to feed the ignition coils.
Under the flywheel there are two sets of points and two condensers, one for each cylinder. Then there is an alternator which produce voltage to charge the battery through the rectifire.
The points triggers the coils to dump voltage to the plugs.

You have to check a couple of things to get it to fire up.

1. Compression should at least be 120-145PSI, and maximum 10% in different between the cylinders.

2. The coils must have battery voltage at + terminal (blue wires). Ignition ON.

3. Points clean and gaped at 015.

4. Check the flywheel key if it is shared. If it is, the timing is off.


As you have measure the voltage at the starter while cranking and it is 11,2V.
With 11,2V at the starter it should be able to turn the engine over if it is healthy.
Check the starter, clean the commutator and check the brushes and even the bushings for the rotor.
 

CApTaInGoOfy

Petty Officer 3rd Class
Joined
Aug 17, 2015
Messages
91
CapTainGoOfy.....looked at the pics of the cylinders, but it is difficult to see how the walls are.
Was one of the cylinders scored or both?
You can check the compression with rope start it instead of electric starting it.
Compression should be about 145PSI (factory spec.).

You should be able to turn the flywheel by hand with some hard/force when each piston shall overcome the compression at TDC.

The wire you point out is the grounding wire from the alternator to the rectifire.
Your engine has battery ignition system and it use the battery voltage to feed the ignition coils.
Under the flywheel there are two sets of points and two condensers, one for each cylinder. Then there is an alternator which produce voltage to charge the battery through the rectifire.
The points triggers the coils to dump voltage to the plugs.

You have to check a couple of things to get it to fire up.

1. Compression should at least be 120-145PSI, and maximum 10% in different between the cylinders.

2. The coils must have battery voltage at + terminal (blue wires). Ignition ON.

3. Points clean and gaped at 015.

4. Check the flywheel key if it is shared. If it is, the timing is off.


As you have measure the voltage at the starter while cranking and it is 11,2V.
With 11,2V at the starter it should be able to turn the engine over if it is healthy.
Check the starter, clean the commutator and check the brushes and even the bushings for the rotor.


Surprisingly the walls are good, had to get a second opinion before I bolted it back up so I had a friend of mine who runs a machine shop take a peek as well and he gave me the green light. Will do all the things you said above on Monday and hopefully it helps.


When you referenced the points and to gap them. Did you mean 0.15? 0.015?


Thanks for all the help I wouldn't have gotten to this point this quickly without the members of this forum!
 

CApTaInGoOfy

Petty Officer 3rd Class
Joined
Aug 17, 2015
Messages
91
Been out for a while because of health issues....Pneumonia gives you a swift kick in the pants... The motor is totally frozen...Can't turn it over by hand or with a rope or the starter.

At this point I'm debating if I should rebuild it or do I just source out another motor for this little boat or or do I sell it all...

Anyone ever do a rebuild on one of these old motors? Is it worth it?
 

jerryjerry05

Supreme Mariner
Joined
May 7, 2008
Messages
17,923
The rebuild isn't hard if you have some mechanical ability??

Parts can be found fairly easy.

​Try a mix of acetone and trans fluid(50/50) spray/pour a bunch in each cyl.
​Let set over night. Then try to force it.
​Put it in gear and stand on the prop and try turning.
 
Top