Recently purchased a 1980 Silverline Kodiac 16GTL that came with a 1980 Chrysler Charger 140hp outboard. On our first trip out I took things easy just to get a feel for the boat (our first boat), but towards the end of the outing I gave the motor a bit more throttle.
Right about 4600 rpm there was a pretty fierce 'jolt' that only happened once and I backed off the throttle. Thought I had hit a sunken log or something. Circled and looked around and did not see anything in the water, so continued on and about 5 minute later I ran the throttle up again - same thing, around 4600 rpm the "jolt" happened again.
I had the boat out a couple more times and just kept the rpm's below 4200 and all seemed to work ok. But this past weekend while out fishing the same "jolt" effect started happening around 3600 rpm.
I did quite a bit of searching here (and other places) with the result that some other conversations indicate that the motor might be coming out of gear momentarily.
One other indication that I will add is that I was having problems getting the starter to engage in neutral. After some front yard investigations, I discovered that the shift cable would only allow the neutral interlock to be depressed if shifting from reverse to neutral. If shifted from forward to neutral, the arm that is supposed to depress the neutral interlock was about 1/2" towards the back of the powerhead - not even touching the button on the interlock.
Fortunately, I received the outboard owners manual when I purchased the boat so I scanned the appropriate figures and typed in the instructions for adjusting the gear shift cable below.
I went through the procedure, but I do have a few questions for someone with more knowledge.
The first question is on step 9. When adjusting the shift arm "until it is aligned with tab on towershaft". The image in figure 6 almost looks like the tabs are at the same height - this doesn't seem right though as the throttle cannot be increased with the neutral lock-out pulled out as they butt into one another.
So the question is, is the proper alignment having the bottom of the tower shaft tab align with the top of the shift arm tab - or something else?
The second question is on steps 10&11. For step 10, does this indicate to pull the shift arm toward the rear of the powerhead 'just until' the lower unit is fully engaged? And then try to keep it in that position while adjusting the shift connector?
The first attempt I made seemed to all go well, until step 11 - there were not enough threads to line up the shift connector with the shift connector stud.
(In step 9 I had adjusted the bottom of the tower shaft tab to just slide over the top of the shift arm tab). (Shift arm was in the proper position to depress the neutral interlock button with this setup when shifting from forward to neutral).
I then re-adjusted the tower shaft tab to what it 'looks like' in the figure where both tabs are on the same plane, that created the throttle limitation where the throttle could not be increased with the neutral lock disengaged.
Any help would be greatly appreciated, first time boat owner and trying to get things 'right'.")
Gear Shift Cable:
(Adjustment Procedure)
1. Disconnect shift connector from connector stud on side of powerhead (see Figure 4).

2. Shift remote control box into forward gear.
3. While turning propeller, pull shift arm toward rear of powerhead until lower unit is fully engaged in forward gear.
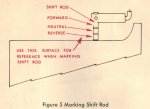
4. Mark location of shift rod where it emerges from the motor leg (see figure 5.)
5. While turning propeller, pull shift arm to front of powerhead until unit is fully engaged in reverse gear.
6. Mark location of shift rod where it emerges from motor leg (see Figure 5.)
7. Place mark on shift rod half way between the forward and reverse marks. This center mark represents the neutral position on the shift rod.
8. Align neutral mark on shift rod with surface of motor leg.

9. Raise or lower tab on shift arm until it is aligned with tab on towershaft (see Figure 6.)
10. While turning propeller, pull shift arm toward rear of powerhead until unit is fully engaged in forward gear.
11. Maintain moderate pressure on shift arm (toward rear of powerhead) and adjust shift connector until it is centered on connector stud. Secure connector to stud.
IMPORTANT
NOTE: When performing Step 11, apply only enough rearward pressure to take the lost motion out of the shift linkage. DO NOT APPLY SO MUCH PRESSURE THAT YOU CAUSE PRE-LOADING BETWEEN THE CLUTCH AND FORWARD GEAR.
12. Shift control box into neutral.
13. Adjust interlock switch as necessary so that starter will engage when control box is in neutral.
CHECKING REMOTE CONTROL INSTALLATION
Check the controls for correct operation by rotating the propeller and by moving the control lever in the remote control box to the "Forward", "Neutral", and "Reverse" positions, the propeller should be locked firmly in place. When in "Neutral", the propeller should turn freely.
Note: The initial installation of your remote controls and adjustments must be made by your Authorized Chrysler Outboard Dealer.

Right about 4600 rpm there was a pretty fierce 'jolt' that only happened once and I backed off the throttle. Thought I had hit a sunken log or something. Circled and looked around and did not see anything in the water, so continued on and about 5 minute later I ran the throttle up again - same thing, around 4600 rpm the "jolt" happened again.
I had the boat out a couple more times and just kept the rpm's below 4200 and all seemed to work ok. But this past weekend while out fishing the same "jolt" effect started happening around 3600 rpm.
I did quite a bit of searching here (and other places) with the result that some other conversations indicate that the motor might be coming out of gear momentarily.
One other indication that I will add is that I was having problems getting the starter to engage in neutral. After some front yard investigations, I discovered that the shift cable would only allow the neutral interlock to be depressed if shifting from reverse to neutral. If shifted from forward to neutral, the arm that is supposed to depress the neutral interlock was about 1/2" towards the back of the powerhead - not even touching the button on the interlock.
Fortunately, I received the outboard owners manual when I purchased the boat so I scanned the appropriate figures and typed in the instructions for adjusting the gear shift cable below.
I went through the procedure, but I do have a few questions for someone with more knowledge.
The first question is on step 9. When adjusting the shift arm "until it is aligned with tab on towershaft". The image in figure 6 almost looks like the tabs are at the same height - this doesn't seem right though as the throttle cannot be increased with the neutral lock-out pulled out as they butt into one another.
So the question is, is the proper alignment having the bottom of the tower shaft tab align with the top of the shift arm tab - or something else?
The second question is on steps 10&11. For step 10, does this indicate to pull the shift arm toward the rear of the powerhead 'just until' the lower unit is fully engaged? And then try to keep it in that position while adjusting the shift connector?
The first attempt I made seemed to all go well, until step 11 - there were not enough threads to line up the shift connector with the shift connector stud.
(In step 9 I had adjusted the bottom of the tower shaft tab to just slide over the top of the shift arm tab). (Shift arm was in the proper position to depress the neutral interlock button with this setup when shifting from forward to neutral).
I then re-adjusted the tower shaft tab to what it 'looks like' in the figure where both tabs are on the same plane, that created the throttle limitation where the throttle could not be increased with the neutral lock disengaged.
Any help would be greatly appreciated, first time boat owner and trying to get things 'right'.
Gear Shift Cable:
(Adjustment Procedure)
1. Disconnect shift connector from connector stud on side of powerhead (see Figure 4).
2. Shift remote control box into forward gear.
3. While turning propeller, pull shift arm toward rear of powerhead until lower unit is fully engaged in forward gear.
4. Mark location of shift rod where it emerges from the motor leg (see figure 5.)
5. While turning propeller, pull shift arm to front of powerhead until unit is fully engaged in reverse gear.
6. Mark location of shift rod where it emerges from motor leg (see Figure 5.)
7. Place mark on shift rod half way between the forward and reverse marks. This center mark represents the neutral position on the shift rod.
8. Align neutral mark on shift rod with surface of motor leg.
9. Raise or lower tab on shift arm until it is aligned with tab on towershaft (see Figure 6.)
10. While turning propeller, pull shift arm toward rear of powerhead until unit is fully engaged in forward gear.
11. Maintain moderate pressure on shift arm (toward rear of powerhead) and adjust shift connector until it is centered on connector stud. Secure connector to stud.
IMPORTANT
NOTE: When performing Step 11, apply only enough rearward pressure to take the lost motion out of the shift linkage. DO NOT APPLY SO MUCH PRESSURE THAT YOU CAUSE PRE-LOADING BETWEEN THE CLUTCH AND FORWARD GEAR.
12. Shift control box into neutral.
13. Adjust interlock switch as necessary so that starter will engage when control box is in neutral.
CHECKING REMOTE CONTROL INSTALLATION
Check the controls for correct operation by rotating the propeller and by moving the control lever in the remote control box to the "Forward", "Neutral", and "Reverse" positions, the propeller should be locked firmly in place. When in "Neutral", the propeller should turn freely.
Note: The initial installation of your remote controls and adjustments must be made by your Authorized Chrysler Outboard Dealer.