Force 125 not running after fresh rebuild - low compression

ewilderson

Cadet
Joined
May 14, 2016
Messages
14
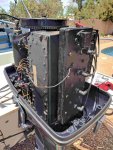
Ok, found myself in a little deeper than I wanted. I recently (March '15) rebuilt my '87 Force 125. Bought an entire rebuild kit from powerhead exchange and had the block machined. Have taken it to the lake about 5 times since then, working out minor problems (primer bulb air leak) until the last trip to the lake, where everything worked well, except for a rough idle.

As we were getting ready to pull the boat onto the trailer at the end of the day, it struggled to idle, and after multiple restarts decided it was dead for the day. We pulled the boat onto the trailer and took it home. Now I am starting to look into what is going on and cannot find the issue (completely).

I now have the boat at home, pulled both carbs and rebuilt. Soaked in cleaner over night, blew out all passages, look brand new. Reinstall on the boat, and try to start it on the hose, and it will just crank, full speed but will not pop or start. I decide to check the compression, and find I have 60-65 psi in all cylinders. I now know what my problem is, and pull the head.

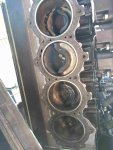
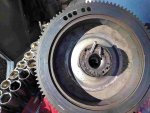
Inspecting the cylinders and everything looks OK (no major wear, the pistons look OK to me), buy a new head gasket, clean both surfaces before mounting and reinstall the head. Spray some WD40 in the spark plug holes and test compression again. I still get ~65psi in every cylinder, and the boat wont start.

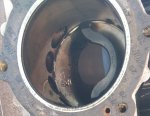
I have attached pictures from when I removed the head, maybe someone can tell me that these really dont look OK. All the cylinders look about the same.


cylinder1.jpg cylinder3.jpg


I am lost... I am not really a mechanic by any means, but an engineer by trade. I am not sure where to go next. It seems odd to me that all the cylinders would be low on compression but reading so close to each other. Could anyone point me in the right direction on what could be causing my compression issues?

HEAD_OFF.jpg
 

Attachments

  • cylinder1.jpg
    cylinder1.jpg
    367.6 KB · Views: 1
  • cylinder1.jpg
    cylinder1.jpg
    367.6 KB · Views: 1
  • HEAD_OFF.jpg
    HEAD_OFF.jpg
    378.1 KB · Views: 1
  • HEAD_OFF.jpg
    HEAD_OFF.jpg
    378.1 KB · Views: 1
  • HEAD_OFF.jpg
    HEAD_OFF.jpg
    378.1 KB · Views: 0
  • MOTOR.jpg
    MOTOR.jpg
    388.2 KB · Views: 1

Nordin

Commander
Joined
Jun 12, 2010
Messages
2,436
Do you have spark at all plugs?
The compression gauge maybe shown low values as all four is even but low.

Cylinders looks good and all rings can not got bad.

Check for spark. The issue might be no sparks.
 

alldodge

Moderator
Staff member
Joined
Mar 8, 2009
Messages
40,719
I'm a novice outboard guy but a pretty good motor guy. The 2-stroke ring gap should be no more then the 4-stroke gap. Unless I'm seeing things (and please forgive if I am) I see your rings showing on the outside of the pistons.

Your pistons should be just a few thousands less then the bore. Since you rebuilt the motor you either need to bore the cylinders and get larger pistons and rings, or bore and sleeve the cylinders so you can use original pistons and rings.

So my question is what did you do to the block and what did the rebuild kit contain?

Slide1.JPG

Slide2.JPG
 

ewilderson

Cadet
Joined
May 14, 2016
Messages
14
Hey Nordin,

Yes I have checked and get good spark on all cylinders. I also wanted to suspect the gauge, but it is the same gauge I used to check compression after the rebuild and was getting ~150psi across all the cylinders then. I may see if I can borrow another gauge to see if the one I have is suspect.

AllDodge,

Your arrows are pointing to the piston. Near the top surface, the outer edge is machined down about .010", and it makes a flat section which could be what you are pointing to. These are forged Wiseco pistons, .030 over sided. The engine shop that machined them matched each piston to a cylinder. I believe the wall clearance was about .002"

The rebuild kit replaced all the pistons, wrist pins, crankshaft bearings and seals.

I'm still hoping there is a "gotcha, just check here" item. The motor was running well after the rebuild, and would always start up on the first attempt.
 

alldodge

Moderator
Staff member
Joined
Mar 8, 2009
Messages
40,719
Guess I'm out, with only .002 clearance you should have great compression. Only thing left is the head, the head gasket surfaces look good. What does the head look like?
 

ewilderson

Cadet
Joined
May 14, 2016
Messages
14
You and me both!

When I took the head off today, it looked pretty good. It had some residual gasket pressed on from the old head gasket. I cleaned it all off and used a light scotch brite pad before I put in the new gasket.

I'm going to pick up a different compression test gauge tomorrow and see if the compression numbers are really this bad. Could it be really bad fuel? Should I try to run it off of a 5 gal gas can?

I'm banging my head against the wall on this one...
 

tommarvin

Ensign
Joined
Nov 22, 2015
Messages
999
You said you had 150 psi after the rebuild ? Now your saying you have 60-65 psi, psi can't change that fast. Do you torque the head down like the factory service manual said? You could do a leak down test, its fast, easy, safer,Boatus recommends leakdown test and has a article about compression testing. we do three tests each cylinder,and average them., HF has the kit for 40 bucks.
In closing, the boat ran great after the rebuild, the boat doesn't run now, your still learning your boat, like us, all your pictures look perfect.
This sounds like an ignition problem. Did you get all new gaskets with your carb rebuild kit including between the carb and carb adaptor.
Your good if you can set the motor up after a total rebuild.
 

Jiggz

Captain
Joined
Oct 23, 2009
Messages
3,817
I agree you need to re-validate compression before going any further. You can just probably rent one from any auto part store just to validate your own gage at the same time. If compression stays low, the only thing I can think off is to mic all the cylinders. With oversized piston of 0.030 and with the maximum allowable at 0.040, there is a good possibility the cylinders have become too thin and have bulged or expanded. If mic reading is acceptable, you need to dismount the cover off the starboard side to inspect the piston rings. If this is not feasible (you need to check if the ring gaps are still 180 degrees from each other) you can also access it from the exhaust cover (this is less preferred).

However, if the compression seems to be good and the only reason you have low initial compression is due to a bad gauge, then the next step in the troubleshooting is the spray bottle method. Fill a spray bottle with fuel oil mix, remove the air covers on the carbs. Set the motor for running with cooling water on muffs. Have someone do the cranking while you spray fuel oil mix in each of the carbs. You said you have sparks on all plugs so the motor should at least fire on one or two cylinders or "cough". If it does, then it means you have fuel delivery or carburetion problem.

Let us know.
 

pnwboat

Rear Admiral
Joined
Oct 8, 2007
Messages
4,251
Might want to verify that the rings are installed correctly. I think on the Wiesco pistons, there is a little dot stamped on the flat wide edge of the ring that should be pointing up towards the top of the piston. If the ring was installed with the dot pointing down, the ring will not function properly.
 

Nordin

Commander
Joined
Jun 12, 2010
Messages
2,436
pnwboat I am at your trace too.

Maybe the pistonrings been assembled in wrong way (if that is possible with Wiseco I do not know. When I have rebuild with Wiseco and that is a couple of times, I have taken carefully notice about the way of the rings).
The rings might not give a proper seal or they have brake due to wrong assembling.

Otherwise there might be more then one issue with this engine/troubleshooting.

1. All of a sudden a bad gauge with low readings as you ewilderson says it is the same gauge you use after the rebuild and the reading was 150PSI.
Check with another gauge.

2. You got spark BUT the flywheelkey might be shared. Then you have spark at all cylinders BUT you get the spark in the wrong time.
Check with a timing light at #1 plug. Throttle in idle and turn the engine with the starter with the ignition ON and point the light at the flywheel.
The TDC mark should show up at the timing mark plate pointing at about 0-3dgr.
If the mark does not show up or if it far away from the 0 dgr. The key is shared.
 
Last edited:

jerryjerry05

Supreme Mariner
Joined
May 7, 2008
Messages
17,926
To find TDC. remove the plugs.
​Put a screwdriver in top hole.
Turn flywheel until screwey is pushed all the way out.
Then check the timing marks on front above the carbs.
It needs to be close to the mark.
Head off? just turn till the top piston is at the farthest out.
A leak down test, not needed but an electronic diagnosis is.
outboardignition.com has procedures.

AllDodge might be on to something??
Take a pic of each cylinder when the piston is at the top of it's travel.
Post these. I'd like to see how much space around the piston crown and how much ring is showing?
The machine shop? They know what they're doing?
 

ewilderson

Cadet
Joined
May 14, 2016
Messages
14
No Title

Alright, I think I have the issue.

Thanks to Nordin/JerryJerry05 for pointing me in the right direction. I decided to check the TDC timing mark this morning and found that it was out by about 60 degrees. This made me pull the flywheel to check the key, and voila! My flywheel key is sheared in half.

So that leads me to believe this is my no start issue. I will still go over to Autozone and rent another compression gauge to be sure, but I suspect the low compression numbers are due to my test gauge.

I'll get a new key ordered. In the mean time, do the taper surfaces look alright to you guys? What would be the best way to clean them up before I re-fit it together? It looks like there was a small amount of surface gauling from the flywheel spinning.

Thanks again for the support guys!
 

Attachments

  • photo243917.jpg
    photo243917.jpg
    389.3 KB · Views: 0
  • photo243918.jpg
    photo243918.jpg
    381 KB · Views: 0
Last edited:

pnwboat

Rear Admiral
Joined
Oct 8, 2007
Messages
4,251
Hopefully your gauge is bad. Some gauges have an "O" ring seal to prevent any pressure from escaping past the spark plug threads that goes bad resulting in lower readings.

For the gauling, place a small amount of valve grinding compound on the crankshaft and flywheel mating surfaces. Place the flywheel on the crankshaft and turn the flywheel while the crankshaft is stationary. Basically you want to lap the two surfaces so they make good contact. You don't want to over do it. Afterwards, make sure you torque the flywheel to the proper spec's. I believe the 1987 125HP motors are 95 ft LBS. Might also be a good idea to use some loctite on the flywheel nut too.
 

Jiggz

Captain
Joined
Oct 23, 2009
Messages
3,817
Oh wow! Sheared flywheel key is a sure cause for the engine not to start. However, that is totally isolated from the low compression readings. Hopefully it is just a bad gauge or procedural. Note, contrary to popular belief the flywheel key is not designed to hold the flywheel in place instead it is there to orient the flywheel to TDC for timing purposes. What holds the flywheel in place is with its mating surface with the shaft held down by the flywheel nut.
 

jerryjerry05

Supreme Mariner
Joined
May 7, 2008
Messages
17,926
I need better pics of the flywheel taper.
​The crank end is ok, it's WAYYYY harder than the flywheel.
The flywheel doesn't look too good.

And what are the gouge marks in the FW the big circle around the center?

Still take pics of the end of the pistons and post.
 

ewilderson

Cadet
Joined
May 14, 2016
Messages
14
Thought would post a quick follow up. I received my replacement key and nut today and installed on the motor. It started up on the first try. I am very happy about this!

I wanted to note that I noticed that the old flywheel nut that was reused during the rebuild could spin freely up and down the threads on the crankshaft, where as the new replacement was very tight due to the locking feature. I suspect that the older nut worked it's way lose without the functioning locking features and allowed the old key to break. I don't think I'll have any issues in the future.

I also found the reason for the low compression readings. I learned that I have 2 compression gauges (we just moved), and the one I was using has the shraeder valve near the gauge and not at the tip of the hose that connects to the cylinder. This effectively added volume to the cylinder and gave lower readings. On the other gauge, compression reads ~140psi

All in all a good learning experience, and a cheap fix!

https://youtu.be/YinjDNk6U6I
 
Top