1995 force overheating still and other problems

rcb130

Petty Officer 1st Class
Joined
Sep 28, 2005
Messages
221
Hello All,
Same motor as I was working on before. 1995 force 90 Hp S/N OE104323.
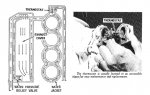
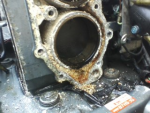
I have replaced the head gasket as it was leaking between #'s 2 and 3. Still getting water in those cylinders.
Complete new water pump. I hook a garden hose to the lower end of the water tube and nothing comes out the pee hole. after a minute or so with the garden hose connected I start getting a lot of water out of what I take it is the exhaust but nothing out of the pee hole. Water pump is assembled correctly.Why no water out of the pee hole? Also installed a CDI regulator and now I cannot turn engine off with either key or Emergency kill switch. I have a black/yel wire unattached to anything.
It is located between the regulator mounting plate and the block on the right hand side. Where should it connect?
How do I check for a cracked block without pulling the powerhead? I have not taken the exhaust chest cover off as I see a lot of horror stories about bolts breaking.
Thanks in advance for any and all help.
 

jerryjerry05

Supreme Mariner
Joined
May 7, 2008
Messages
17,926
Location? Salt or fresh water?
Get a factory manual.
Maybe someone will post an electrical diagram??

The water in the cyl. after the head gasket replacement?
The head could be warped? The mounting surface uneven?
Some sillycone on the gasket might help seal it?
The exhaust chest gaskets bad?

Removing the screws: PB Blaster seems to work better than any others I have tried.

A small propane torch and PB and a small hammer.

Start spraying a couple of days before you start the actual process of removing the screws.

Heat a bit, spray and heat again.

Repeat every couple hours.

Your trying to work the spray into the threads to help loosen.

The bottom ones are usually the hardest to remove.

Try to turn the screws, they just might come loose?

There isn't a lot of torque on the screws.
 

rcb130

Petty Officer 1st Class
Joined
Sep 28, 2005
Messages
221
Fresh water only as far as I know. No evidence of salt water.
overheating before and after head gasket replacement. Gasket sealer used on new gasket, Head machined flat by machine shop.
How would bad exhaust chest gaskets allow water in cylinders? Please explain.
When I hook garden hose to water pump tube it take the full force of the hose to get water out of the pee hole. I get water coming out of the exhaust area on the lower end of the mid section before the pee hole.
How would I verify a crack in the block without magnafluxing?
 

pnwboat

Rear Admiral
Joined
Oct 8, 2007
Messages
4,251
The Black/Yellow wire is the ignition Kill Circuit. Depending on what type of ignition system you have, that will determine where the Black/Yellow wire goes. This wire is grounded when you turn the ignition key to the OFF position, or if you engage the Emergency Kill Switch. I suspect that you probably have the Mercury Switch Box ignition system. If this is the case, then the Black/Yellow wire from the harness goes to Black/Yellow wire on the Switch Box itself.

Water in the cylinders can occur if the exhaust cover gasket fails or the stainless steel exhaust cover baffle has a crack in it. All of the exhaust ports empty into a common exhaust chamber. If water leaks into the chamber, which is pressurized from the exhaust pulses, it can force water into an open exhaust port. Typically it occurs in the bottom cylinders. I guess because water flows down.

You will not get any water exiting the pee hole while the motor is not running. The water pump impeller has to be turning before you will get any water out of the pee hole. If you are not getting any water out of the pee hole while the motor is running, then I would suspect that you don't have enough water pressure/volume to the motor (this is pretty common), or the muffs are not properly aligned over the water intake.
 

rcb130

Petty Officer 1st Class
Joined
Sep 28, 2005
Messages
221
pnwboat,
Thanks for the info. Let me clarify my previous post. I hook a garden hose up to the water pump tube ( with lower unit removed) and turn on the water and no water exits thru the pee hole. The water comes out of the exhaust area of the mid section. By this I mean the bottom of the mid section.
I pulled the exhaust chest open and found that the screws did not appear to have been tightened to 70 in lbs. No visible blockages in the passageways and no visible cracks in the exhaust baffle.If I hook the garden hose up to the water pump tube I can see water come up in the left hand rear corner of the exhaust chest.
I will check the wires in the switch box area for an unconnected black/yel wire.
Any thoughts on the above are welcome and thanks for the info provided.
rcb130
 

pnwboat

Rear Admiral
Joined
Oct 8, 2007
Messages
4,251
Thanks for the clarification on your test for the water flow. Well from your test, then I would suspect that you don't have enough water pressure to get the water to come out of the pee hole. Normally the pee hole supply tube is attached to a fitting just behind the thermostat, however, I did see one that had the fitting tapped into the upper exhaust chest water passage. With the exhaust cover on, and the thermostat/thermostat housing off, you should see a steady flow of water coming out of the passage behind the thermostat with the garden hose attached directly to the water supply tube. Also, make sure you have a gasket on both sides of the stainless steel exhaust baffle. One to seal it against the aluminum cover, and one to seal it against the block.

Have you tested the thermostat? Drop it in some hot water and it should open up at about 143? F.

Here is a diagram that better explains the water flow. It's for a 4 cylinder motor, but yours is the same. Disreagrd the water pressure relief valve. This applies to the early Force motors and is not used on your model. The "tube" on the diagram just after the thermostat represents the water passage that is part of the head. After the water exits the head, it gets dumped into the exhaust cavity in the lower unit. Also if you notice the water is supposed to flow down the cylinder water jacket on the left side and up on the right side. If you had the head off, you should have seen some rubber tubes or actual casting that prevents the water from flowing directly from the left to the right side (except on the very bottom cylinder). If any of the tubes are missing/damaged, or if there are any large grains of sand blocking the water passage around the cylinder water jacket you may not cool properly.
water flow.JPG


Last but not least, make sure your ignition timing is not too far advanced/retarded.
 

Attachments

  • water flow.JPG
    water flow.JPG
    113.2 KB · Views: 1
Last edited:

rcb130

Petty Officer 1st Class
Joined
Sep 28, 2005
Messages
221
pnwboat,
You were spot on with the black/yel wire. It was disconnected at switch box. Got the exhaust chest opened up with no problems. The screws felt like they were not even torqued. No passages blocked but there was some evidence of sand/gravel in the lower areas which I believe was washed out by backflushing the motor. My current question is this. How much warpage is allowed on the exhaust plate? Also, right in the middle where the exhaust would hit there are what appear to be depressions in the plate. Is this normal and acceptable?
Thanks for the help to date.
rcb130
 

pnwboat

Rear Admiral
Joined
Oct 8, 2007
Messages
4,251
It's normal for the stainless steel exhaust baffle to be warped and distorted.......well let me say that every one that I've seen has been warped and distorted. If you are just dealing with some warpage and depressions where the exhaust hits, you should be fine. Just inspect very closely for hairline cracks. If you suspect a crack, flex the baffle slightly to see if it is actually a crack. Replacement baffles are available for about $30 + shipping.

If the exhaust cover bolts were not torqued down properly, or had loosened up over time, I would suspect that this could be the source of the water in the cylinders. The sealing edges on some of the exhaust cover passages are pretty thin in spots, so it doesn't take much to loose the seal there. But this is just a guess. Only way to tell is to replace both gaskets and try it out. Make sure you clean all sealing surfaces with some type of solvent like carburetor cleaner or Acetone.

It's not uncommon to find some small amounts of sand in the lower areas of the water passages in the exhaust chest. I think the next thing t do would be to test the thermostat if you haven't already done so. You can run the motor without a thermostat, however, the motor will not be running at maximum efficiency. The motor need to be at optimum temperature in order to run at maximum efficiency.
 

jerryjerry05

Supreme Mariner
Joined
May 7, 2008
Messages
17,926
No Title

70in #s isn't a lot.
The stainless plate is always warped when removed.
It will flatten out along the edges when it's reinstalled.
Any tears or breaks in the gaskets?

Anyone who runs in shallow water should end up with sand in the chest and the cooling passages.
Use a sealer on the gaskets.​

The pic is a Yam that was NEVER flushed.
It had 169hrs.
The exhaust chest was worse.
 

Attachments

  • photo230035.png
    photo230035.png
    154 KB · Views: 0

rcb130

Petty Officer 1st Class
Joined
Sep 28, 2005
Messages
221
used sealer on all new exhaust chest gaskets. Reassembled and torqued all screws. Tested thermostat and opens at 140-145. Started motor and it still overheats at idle or below 2000 rpm. Running in a barrel so there is plenty of water to suck up. Cylinder head temps in area of 220 when I shut it down. Checked water pump impeller for correct orientation of impeller fins. All is fine there. I am really starting to suspect a cracked block. Will check timing tomorrow. The motor only wants to start with fast idle fully advanced. I am looking for 5 degrees at idle and 28 cranking at WOT. Any other thoughts on what could be the problem with this motor would be greatly appreciated. After reassembly exhaust chest I hooked garden hose to water tube and water flowed from pee hole.
Thanks in advance again for all the help
rcb13
 

rcb130

Petty Officer 1st Class
Joined
Sep 28, 2005
Messages
221
pnwboat,
timing was off a good 10-15 degrees. No longer overheating and it is now peeing a good steady stream. Replaced squeeze bulb as it would not get hard. New bulb gets hard after a couple of squeezes. Only problem now is an occasional sneeze or cough at idle. Idle mixture screws all set at 1 1/4 turns out from lightly seated.
Will check for steady spark with a timing light. Any thoughts on the above sneeze or cough? I think Jerry Jerry will tell me the sneeze is from a lean mix. How to fix with carbs set at recommended setting?
 

jerryjerry05

Supreme Mariner
Joined
May 7, 2008
Messages
17,926
Your right I will tell you that a sneeze at idle is probably the air screws.
Carbs clean and reeds intact.
A broken bent reed can cause a sneeze at idle.
Check them and then procede.

Idle about 750-800 in gear in the water.
Motor warm.
Both screws set at 1 and 1/8th. turns out.
Turn the top screw in 1/8th turn and wait 10 seconds.
Repeat the process until the motor coughs, sneezes or stalls.
Then turn out 1/2 turn.
Gotta wait the 10 seconds between the turns.
It burns the fuel at the old setting and gives the motor time to catch up.

Then repeat the process on the bottom carb.


Sometimes??? No matter what you do an outboard will sneeze just cause it does???

A decarb can sometimes help clean up a dirty system?
Mercury's Powertune or OMC's Engine Tuner. Never had good results from Seafoam.

OR.
I use a small gas tank with 1gal premium. and jug of Chevrons Fuel Injector Cleaner. The one with Techron.
Mix the proper amount of oil or you'll need a rebuild.
I hook up the small tank to the system I'm working on.​
I try to drain as much old fuel from the lines(if possible)
Start and run until the mix is in the system.
Run for 15 min and let set for an hour or three.
This helps clean up the sludge in the system.
 

rcb130

Petty Officer 1st Class
Joined
Sep 28, 2005
Messages
221
Jerry Jerry,
Spark is hot blue and steady. No problem seen while watching with timing light on each cylinder. Propane enrichment had no effect on sneezing. Will check reeds.
Could a clogged recirculation system cause the sneeze?
thanks for the help and advice.
rcb130
 

pnwboat

Rear Admiral
Joined
Oct 8, 2007
Messages
4,251
Sounds like you're slowly chipping away at your problems one by one. Occasional sneezing could be several things. Clogged recirculation system can cause poor low RPM performance. Pretty easy to check. Make sure all the lines for the recircualtion system are clear and not clogged. There are a couple of one-way check valves that you can test by blowing or sucking into.

As mentioned above, reed valves that are not working properly or are marginal will more likely affect low RPM performance and also when starting. Factory specs are no more than .010" gap between the reed petal and the sealing surface of the reed block. Exact factory replacements are pretty pricey as the are the complete reed block assy. Aftermarket composite, carbon graphite, or fibrerglass replacement reed petals are available at a more reasonable cost.

Double check the fuel enrichment solenoid (if you have this type of choke) to make sure it's not leaking. It should be mounted on a rubber grommet to help isolate it from the motor vibration. A couple squirts of carb cleaner in the ports/fittings while pushing on the black button on the top of it usually clears out any crud.
 

rcb130

Petty Officer 1st Class
Joined
Sep 28, 2005
Messages
221
Finally found the problem!!! Tested fuel pump per Mercury Service Information bulletin #2001-17.
Fuel pump not up to spec. Instead of 2.5 in vac it only pulls 1-1 1/2 in vac. apparently something was hanging in one of the check valves. When I squeezed off the supply line and then let it go, the engine started running like a top. No more sneezing or coughing. I intend to replace the fuel pump.
Thanks to all for your help and suggestions.
rcb130
 

pnwboat

Rear Admiral
Joined
Oct 8, 2007
Messages
4,251
Thanks for letting everyone know what you found. That's an easy cheap fix. Happy boating!
 
Top