89 Force 150, water in pistons.

Joined
Aug 27, 2015
Messages
18
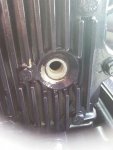
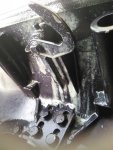
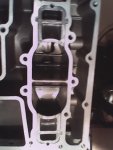
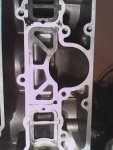
I have an 89 Force 150 that has water in the cylinder. (4 lower cylinders to some extent, especially the bottom cylinder) Motor had a bad impeller before I purchased it and I'm sure it was probably overheated. All cylinders have good compression (140 to 150 psi) I get a bunch of white milky substance spraying from the lower cylinders when I crank it over with water hooked up. (especially the bottom cylinder) I'm assuming I need to start at the head gasket. Do these have water jackets like a car that will leak into the cylinders with a blown head gasket? When I purchased it, it seemed to run fine but the problems started after the second time that we took it out. I have replaced the impellor and it now moved water like it should.
 
Joined
Aug 27, 2015
Messages
18
The more that I look at it, the more I'm thinking that it is the exhaust gaskets. Would it be possible to have 150lbs of compression with a bad head gasket?
 

Frank Acampora

Supreme Mariner
Joined
Jan 19, 2007
Messages
12,004
Not usually. I would expect some loss of compression with a bad head gasket. Now, the exhaust uses a couple of gaskets and yes, they can leak into the exhaust side of the cylinders. Be very careful removing the exhaust cover, The bolts are only 1/4 X 20 and can strip or snap easily. Clearances are tight and you may need to remove the lower cowl to get at the bottom bolts.
 
Joined
Aug 27, 2015
Messages
18
Thanks for the reply, that was my thinking as well. I am thinking that I can pull the bolts for the lower cowl and scoot it over enough to get the exhaust bolts off (hopefully). I have already ordered all 3 gaskets for the exhaust, hopefully that is it (fingers crossed). At least I'm happy about the 150 lbs of compression, that's about what it should have as a new motor, correct?
 

pnwboat

Rear Admiral
Joined
Oct 8, 2007
Messages
4,251
150lbs compression is very good. I've run into a couple motors that had the same scenario as yours. New owners replaced the water pump impeller and low and behold....water in the lower cylinders.

I know in one case, the previous owner had a habit of starting the motor out of the water at the boat ramp and letting it warm up for 20 or 30 seconds before putting it into the water. Impeller was shot, and when the new owner replaced the impeller, water was leaking into the bottom two cylinders.
 

Frank Acampora

Supreme Mariner
Joined
Jan 19, 2007
Messages
12,004
No Title

The outer gasket seals the water jacket cover. This arrangement is very similar to the older 3 cylinder Evinrudes. The water jacket actually covers the exhaust runners and it is not likely that water is getting into the exhaust that way. However, the inner gasket between the block and exhaust runner plate does seal the block jacket. It is more probable that the leak is there. However, while you have the thing apart, it is good practice to replace all gaskets.

These photos may give you a better idea . First is either top or bottom two exhausts. Second is the middle exhaust and the last is the runner plate and gasket.
 

Attachments

  • photo191130.jpg
    photo191130.jpg
    45.8 KB · Views: 0
  • photo228009.jpg
    photo228009.jpg
    49 KB · Views: 0
  • photo228033.jpg
    photo228033.jpg
    33.1 KB · Views: 0
Last edited:
Joined
Aug 27, 2015
Messages
18
That's what I figured, also explains why it ran good the first time we took it out (before the impeller). I suspect there was no water getting up there to leak into the cylinders. Once the new impeller was in it's getting enough in there to hydrolock.
I should have trusted my insticts when I bought it, and it wasn't moving water out the pee holes. It ran great though and the guy swore none of the Chrysler's flow out of there at idle. I didn't really know enough about outboards, this is my first one, I've always has stern drives. I'm ramping up fast now though lol. Do you guys think that head gasket will be ok after I replace those exhaust gaskets?
 
Joined
Aug 27, 2015
Messages
18
The outer gasket seals the water jacket cover. This arrangement is very similar to the older 3 cylinder Evinrudes. The water jacket actually covers the exhaust runners and it is not likely that water is getting into the exhaust that way. However, the inner gasket between the block and exhaust runner plate does seal the block jacket. It is more probable that the leak is there. However, while you have the thing apart, it is good practice to replace all gaskets.

These photos may give you a better idea . First is either top or bottom two exhausts. Second is the middle exhaust and the last is the runner plate and gasket.

I wouldn't take it apart without replacing them all, also ordered the fuel pump kits and going to rebuild those while I'm in there. I also found out that someone had replaced the lower with the one with that damn bellows seal. Had to order the modified top plate from Franz. I'm batting 1000 so far with this boat. And after this I get to tackle that valve body since my trim bleeds down slowly.
Oh well, once I'm done I think I might be a Force expert as well lol.
 

Frank Acampora

Supreme Mariner
Joined
Jan 19, 2007
Messages
12,004
At 150 PSI on all cylinders I would not bother to remove the head. The gasket is fine now and probably will be in the future.

As an aside: When I first saw these 5 cylinder engines I thought they were crap. Now, after buying two, I have changed my opinion. They are well designed given the constraints of manufacturing

. The only two problems they seem to have are 1. Semi keystone top rings tend to catch in exhaust ports and break. Later Force 120s changed back to square rings--smart move. Should either of my engines break rings all pistons will be replaced with Wiseco. 2. Under racing conditions sometimes they will break the crankshaft.
 
Joined
Aug 27, 2015
Messages
18
I thought I saw someone mentioning champering the port edges with a file to address the ring catch issue, can't really remeber the specifics though as I was just browsing the Force forums. I do like the design of the motor, other than the exhaust problem the motor looks almost new under the cover. Seems relatively simple to work on as well. I probably got screwed on the boat, it's an 89 1903 Cobra and I paid 3800 for it. It is in fantastic condition though, with all original upholstery that is almost perfect. It was really the only thing I could find in that price range that met our needs, I wanted a bass boat but we had to have seating for the kids, and the seating arrangement on the boat is really unique, it met our needs perfectly.
 
Last edited:

jerryjerry05

Supreme Mariner
Joined
May 7, 2008
Messages
17,926
On my 88/85 I was experiencing a miss.
Did a comp test. 145# all 3
When I pulled the plugs I found water in the bottom cyl.
.
I removed the head and the lower cylinder, the gasket had 1 tiny spot blown in the steel ring.

IF??? The exhaust chest got TOOOOO hot it could have screwed a gasket.

While your working, do head gasket too.
 

Frank Acampora

Supreme Mariner
Joined
Jan 19, 2007
Messages
12,004
If you are rebuilding the engine and either honing or re-boring the cylinders then it is good practice to chamfer the port edges. Since you will not be taking the block apart I would not bother. 1. it will be difficult to get the tool in there with the pistons in place and 2. It poses a risk of leaving metal filings in the cylinder. The head gasket on that engine is 60 bucks! I must disagree with Jerry: If you take off the head and damage the gasket then you are forced to replace it. First change the exhaust gaskets. THEN, if the problem persists check into the head gasket.

I would not think that you were "screwed" on the boat. Yes, I believe you did pay a little too much, but we all have made mistakes in out lives. I bought a Glastron GT150 for 1000 thinking I would restore it for a Sunday ride. It has been sitting in my side yard for two years now and I probably will sell it for pennies to another restorer guy. Don't beat yourself up. Remember: You bought the boat to have fun with your kids. If this happens and you get a couple of years out of it, then the money was well worth it. You can't put a price on family bonding.

Judging from your posts, the boat and engine may have been sold on good faith. The engine "fooled" you and developed problems. It is no fun when this happens but it does and unfortunately you miss a lot of boating time.

My position is different: I buy known non-working engines cheap and fix them--it is my hobby. I have so many engines that if one surprises me and goes bad in any way, I simply snatch it off and replace with another while I repair it.
 
Last edited:
Joined
Aug 27, 2015
Messages
18
If you are rebuilding the engine and either honing or re-boring the cylinders then it is good practice to chamfer the port edges. Since you will not be taking the block apart I would not bother. 1. it will be difficult to get the tool in there with the pistons in place and 2. It poses a risk of leaving metal filings in the cylinder. The head gasket on that engine is 60 bucks! I must disagree with Jerry: If you take off the head and damage the gasket then you are forced to replace it. First change the exhaust gaskets. THEN, if the problem persists check into the head gasket.

I would not think that you were "screwed" on the boat. Yes, I believe you did pay a little too much, but we all have made mistakes in out lives. I bought a Glastron GT150 for 1000 thinking I would restore it for a Sunday ride. It has been sitting in my side yard for two years now and I probably will sell it for pennies to another restorer guy. Don't beat yourself up. Remember: You bought the boat to have fun with your kids. If this happens and you get a couple of years out of it, then the money was well worth it. You can't put a price on family bonding.

Judging from your posts, the boat and engine may have been sold on good faith. The engine "fooled" you and developed problems. It is no fun when this happens but it does and unfortunately you miss a lot of boating time.

My position is different: I buy known non-working engines cheap and fix them--it is my hobby. I have so many engines that if one surprises me and goes bad in any way, I simply snatch it off and replace with another while I repair it.

Thanks Frank,
I'm trying to keep my mind on that. Just gets frustrating when it's one thing after another. Hopefully when it's done we'll gets a lot of years of fun out of it.
 
Joined
Aug 27, 2015
Messages
18
If you are rebuilding the engine and either honing or re-boring the cylinders then it is good practice to chamfer the port edges. Since you will not be taking the block apart I would not bother. 1. it will be difficult to get the tool in there with the pistons in place and 2. It poses a risk of leaving metal filings in the cylinder. The head gasket on that engine is 60 bucks! I must disagree with Jerry: If you take off the head and damage the gasket then you are forced to replace it. First change the exhaust gaskets. THEN, if the problem persists check into the head gasket.

I would not think that you were "screwed" on the boat. Yes, I believe you did pay a little too much, but we all have made mistakes in out lives. I bought a Glastron GT150 for 1000 thinking I would restore it for a Sunday ride. It has been sitting in my side yard for two years now and I probably will sell it for pennies to another restorer guy. Don't beat yourself up. Remember: You bought the boat to have fun with your kids. If this happens and you get a couple of years out of it, then the money was well worth it. You can't put a price on family bonding.

Judging from your posts, the boat and engine may have been sold on good faith. The engine "fooled" you and developed problems. It is no fun when this happens but it does and unfortunately you miss a lot of boating time.

My position is different: I buy known non-working engines cheap and fix them--it is my hobby. I have so many engines that if one surprises me and goes bad in any way, I simply snatch it off and replace with another while I repair it.

OK, update. Manifold is off today. Inner gasket had failed massively on every cylinder. 3 bolts broke off, all the rest came out, although most look pretty nasty.
Going to drill and tap those tomorrow. Hopefully they are pretty soft and I can drill them with titanium nitride, won't be able to get carbide bits until Tuesday.
I'm going to replace the bolts as well. Should I use stainless or something else? I know sometimes stainless can react with the aluminum and make them seize worse in the future so not sure what would be best here...
 

pnwboat

Rear Admiral
Joined
Oct 8, 2007
Messages
4,251
The factory bolts are fairly soft material. High Speed steel bits with a Titanium Nitride coating may work depending on the quality of the coating. I've found that many of the "TiN" coated bits are made off shore and are not very good. Cobalt or even better, like you mentioned, the Carbide bits should have no problem drilling out the broken bolts.

I myself prefer to use Stainless Steel bolts. I make sure I use some a light coating of marine anti-seize on the bolts. The idea is to prevent moisture from wicking into the threads. As long as the threads stay moisture free, you won't have any corrosion issues. Once water gets into the threads and stays for long periods of time, then you might have a problem.

I've had to deal with stainless steel fasteners corroded into aluminum due to a salt water environment. It's almost like the two metals have fused together. Really hard to get apart.
 

Frank Acampora

Supreme Mariner
Joined
Jan 19, 2007
Messages
12,004
The bolts are relatively soft compared to stainless steel or grade 8 but do yourself a favor: Spend the extra bucks for Cobalt drill bits. (not the brand Kobalt which is not worth stealing). They are far and away the best bet for drilling out bolts.I buy DeWalt, 30 bucks a set and they sell them single bits too at the big box stores

If you can find long enough roll pins, bolt the manifold back in place and drive 5/16 roll pins into the broken bolt holes They make a perfect guide for a 3/16 drill bit. Then you can clean out the holes with a 1/4 X 20 tap. If the threads get dicked-up, drill deeper and use longer bolts.
 
Last edited:
Joined
Aug 27, 2015
Messages
18
I got one drilled out and re-tapped today. Was a bit of a pain, used cobalt bits and it was really hard to keep it from walking, even after center punching it. I ended up using a carbide burr on a Dremel and making a divot in the middle of the bolt, then drilling a really small pilot hole on the bolt, then stepped the bits up a size at a time until I got to 13/64. I have a friend that works in a machine shop that is going to get me some carbide bits tomorrow for the other 2 bolts. What is the correct torque spec for these bolts once I put the new gaskets back on? Also, do the areas on the pic with the arrows actually do anything? Or are they just voids in the casting. force_ports.jpg
 

scout-j-m

Chief Petty Officer
Joined
Jul 31, 2009
Messages
636
The service manual for my 70hp states 70 in*lb. I think the Clymer manual also has a standard torque value for 1/4" bolts as 70. In a thread of mine, a popular poster told me 8 ft*lb (equates to 96 in*lb). I think that is safe as well, although if you do that I'd torque all to 70 starting from the center out and then bump them all up to 90-100.
 

Frank Acampora

Supreme Mariner
Joined
Jan 19, 2007
Messages
12,004
I have never studied the water flow in these 5 cylinder engines but since those two areas butt up against the cylinders I would make a safe bet that they are part of the water jacket system.
 
Top