1995 Force 120 Hp OB idle issue

EugeneP

Cadet
Joined
Aug 31, 2015
Messages
23
Hello,

I recently purchased a bayliner capri 1700 ls with an 1995 Force 120 hp outboard motor. I know..some say "friends dont let friends buy bayliners.." Its my first boat ever and i didnt know much about outboard and marine engines. Im an engineer and somehow mechanically inclined..and i wished i did a bit more research before buying the boat but..long story short now im stuck with it and trying to make the best out of it.

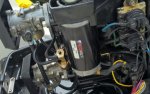
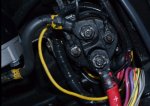
The boat runs great, it reaches about 40 mph at 5500 rpm and the only real problem was the idle..i'm be able to start it only with the throttle pressed about half way (even when is warmed up , not sure if this is the norm or should start with just the shock- key pressed) and then even when it warms up it would die shortly after being in neutral, it idles around 600 rpms. I knew this is very low and the potential cause of the issue..so i took it to a friend that used to be a marine mechanic for a long time but never worked on a force engine. He cleaned the carbs, adjusted idle..speed, carburetor and with a water hose attached it would idle at 1200. Great! i left for vacation and brought the boat with me.. ..it started very easy first time ..but after a few minutes running, the idle fell to around 600 rpms and it would die in neutral - it would take me 3-4 attempts to get it in gear from neutral. Unfortunately, I dont have access to my mechanic friend again..and would like to try to fix it myself...he had advised me the timing and carburetors are all set and if the idle is not running as it should in the water, i should just try to adjust the timing rod (screw next to flywheel)..I did that and after a few turns (clockwise) i managed to have it running at around 1000 rpms. At this point it would start right away..no need to accelerate in neutral. I ran the boat and minutes later again, idle fell again to 600 rpms, and same story..it would not start without acceleration. I noticed the nut holding the screw it would move towards the center of the screw..so probably from the vibration the screw would not keep its position. I attached the picture..with the screw ..after the adjustment I would find the nut to where the green mark is. So my question is..should I tighten the nut with a wrench while keeping the screw in the same position? Am I missing a spring there that should keep the pressure on the screw and prevent the nut moving? is the nut in the right position ?

I havent done a compression test yet..mostly cause of the fear of very bad news:) (spent all my savings on this boat)..but i keep thinking if the boat reaches 40mph and works well most of the time, compression its not an issue.

Another question i have should i use Seafoam motor treatment? if yes, should i use this all the time or just one - two tanks of gas?

thank you all for reading and i appreciate any advise you guys can give me.
Eugene force idle.png
force 2.png
 
Last edited:

Frank Acampora

Supreme Mariner
Joined
Jan 19, 2007
Messages
12,004
Well, first off the timing adjusting screw is way too far in. the gap between the two plastic blocks should only be about 1/2 inch. Now this is just an eyeball thing but it tells me that something else is out of adjustment.

So, first thing to do is to re-adjust the timing to 28 degreed before top dead center at wide open throttle at cranking. Disconnect fuel and drain carbs so the engine will not start. This timing setting is important because if timing is too advanced at WOT, the engine will "ping" but you will not hear it and you may get some piston damage. Note that at running WOT, timing should be 30 degrees BTDC. usually these engines will advance from the 28degree setting at cranking speed. It is a function of the magnets in the ignition system.

Now after setting timing you must reset the synchronization of the carburetors to the timing. To do this you must zero the carbs. Pop off the ball link at the timing tower and set the eccentric screw on the carb to just touch the cam at the mark or two marks on the cam.. Watch my video on synchronizing. If you can not get to it from the forum page, simply youtube Frank Acampora videos and look for it. It explains everything you need to do to set the engine.

NOW: If you have Mercury controls with the black plastic slug on the control cable. the throttle cable must be disconnected and reset by screwing in or out the black plastic slug. when the idle setting is changed. The control cable must easily slip over the retaining post or screw at idle.
 

Jiggz

Captain
Joined
Oct 23, 2009
Messages
3,817
Actually, the nut is in the wrong place. It should be on the outside rather on the inside of the control rod end, although this should not probably make a difference as long as the nut is tightened with a wrench while using a large flat tip screw driver to counter torque. Better yet, since this is not a regular maintenance setting, you can use some blue locktite on the nut to make sure it stays in place. Before tightening everything, make sure you set the timing correctly using a timing light. The setting should be at 30 degrees BTDC static (or using cranking speed). If you do not have the tools with you right now you can just rely on the marking that you have used reliably before but you need to reset it with the proper tools when you get back home. Idle rpm should be set to 750 RPM in gear in water. Usually this translates to around 1000 rpm in neutral on muffs.

As for starting, it is normal to choke it (pressing the ignition sw) and keep pressing while turning to start and also to put the control lever in fast idle (either pressing a center button and pushing the lever forward or pulling the control lever outwards and pushing it forward). After it warms up for about 20~30 seconds, usually no choking or fast idling is required to start and keep it idling. Remember for initial cold start you need to prime the fuel with the priming bulb. And most importantly, never ever run the engine without cooling water.
 

EugeneP

Cadet
Joined
Aug 31, 2015
Messages
23
Thank you so much Frank and Jigz for your prompt response. Frank..amazing and very useful video, i think i watch it about 10 times..just to make sure i catch all the details.

I realize how important is the timing and in the end i decided to take it to a mechanic in my area..although he clearly told me he doesnt like the Force engines ..quote "its like the Land Rover" for car mechanics..where parts are hard to come by and not easy to work on..In the end he accepted and tomorrow ill go pick up the boat. He did a compression test and the numbers are: Cyl 1: 125, Cyl 2: 125 Cyl 3: 150 Cyl4: 150..Are these numbers worrying? Do they say anything about the life left in the engine..before it needs a rebuilt?

I found a service bulletin where out of the factory this engine had a difference in compression: http://www.marinemechanic.com/merc/...rine/outboard/sportjet120-compressiontest.PDF

thank you so much
 

Frank Acampora

Supreme Mariner
Joined
Jan 19, 2007
Messages
12,004
I can not tell you exact numbers, but yes, some of these engines did have different compression on various cylinders, right from the factory and also the service manual.
 

EugeneP

Cadet
Joined
Aug 31, 2015
Messages
23
I can not tell you exact numbers, but yes, some of these engines did have different compression on various cylinders, right from the factory and also the service manual.

I have the exact numbers...but they dont really make sense, new they should have been : Cyl1: 135, Cyl2: 150 Cyl 3: 150 Cyl 4: 145.

Should i be worried? can the low compression on Cyl 2 be the cause of the low idle?
 

Frank Acampora

Supreme Mariner
Joined
Jan 19, 2007
Messages
12,004
That compression number is not low enough to cause idle problems.. As I mentioned in a previous post, The two center cylinders have a much smaller crankshaft counterweight.The two center cylinders are not a volumetrically efficient as the others and thus, the factory raised compression in an effort to equalize horsepower production in each cylinder. I still have not figured the reason for a different compression on the bottom cylinder but I am certain there is a good one.
 

EugeneP

Cadet
Joined
Aug 31, 2015
Messages
23
Well, first off the timing adjusting screw is way too far in. the gap between the two plastic blocks should only be about 1/2 inch. Now this is just an eyeball thing but it tells me that something else is out of adjustment.

So, first thing to do is to re-adjust the timing to 28 degreed before top dead center at wide open throttle at cranking. Disconnect fuel and drain carbs so the engine will not start. This timing setting is important because if timing is too advanced at WOT, the engine will "ping" but you will not hear it and you may get some piston damage. Note that at running WOT, timing should be 30 degrees BTDC. usually these engines will advance from the 28degree setting at cranking speed. It is a function of the magnets in the ignition system.

Now after setting timing you must reset the synchronization of the carburetors to the timing. To do this you must zero the carbs. Pop off the ball link at the timing tower and set the eccentric screw on the carb to just touch the cam at the mark or two marks on the cam.. Watch my video on synchronizing. If you can not get to it from the forum page, simply youtube Frank Acampora videos and look for it. It explains everything you need to do to set the engine.

NOW: If you have Mercury controls with the black plastic slug on the control cable. the throttle cable must be disconnected and reset by screwing in or out the black plastic slug. when the idle setting is changed. The control cable must easily slip over the retaining post or screw at idle.


HI Frank,

I read your previous posts and also watching the video tutorial and I'm a bit confused:

In your reply you say the timing should be at 28 degrees at cranking (spark plugs removed and timing light attached to the spark plug from cyl 1, and WOT)..but in your step by step tutorial: ..http://forums.iboats.com/forum/engin...force?t=431021 it says to ajust it at 30 degrees full throttle, step #6, is this with the motor running?

Whats the recommended way to set the timing? Static (cranking speed) or dynamic..with the motor running? would assume that with the motor running, the timing light cant be attached to the spark plug..?

Also, if i test at cranking and WOT, do I have to be in gear WOT or just push the round button and then accelerate to max (like the cold start procedure)?

thank you again and I'm sorry if my questions..
Eugene
 
Last edited:

Frank Acampora

Supreme Mariner
Joined
Jan 19, 2007
Messages
12,004
In the early days, Chrysler engines were timed at 32 degrees BTDC at wide open throttle. Due to poorer quality marine gas, in the very early 60s Chrysler issued a bulleting retarding timing to 30 Degrees BTDC at WOT. Most Force engines are timed at 30 degrees BTDC at WOT.

IF you are static timing a Force engine, most are timed at 28 degrees BTDC at cranking speeds because under running conditions it will advance to 30. SOME later Force engines with Mercury ignitions are NOT timed to 28 degrees and the service manual would tell you this. Static timing involves cranking the engine with the throttle wide open but having no fuel in the engine so it will not start. Dynamic timing is on the water with the engine running at full throttle.
 

EugeneP

Cadet
Joined
Aug 31, 2015
Messages
23
In the early days, Chrysler engines were timed at 32 degrees BTDC at wide open throttle. Due to poorer quality marine gas, in the very early 60s Chrysler issued a bulleting retarding timing to 30 Degrees BTDC at WOT. Most Force engines are timed at 30 degrees BTDC at WOT.

IF you are static timing a Force engine, most are timed at 28 degrees BTDC at cranking speeds because under running conditions it will advance to 30. SOME later Force engines with Mercury ignitions are NOT timed to 28 degrees and the service manual would tell you this. Static timing involves cranking the engine with the throttle wide open but having no fuel in the engine so it will not start. Dynamic timing is on the water with the engine running at full throttle.


Hello again,

I went to a local mechanic..i specifically asked him to reset the carbs and set the timing and when I picked up the boat he didn't even touch the timing, its still way off, I asked him if he has a timing light..he said he doenst need one, what a waste of time and money !!!?? (charged me 70$ for this). I think ill invest in a decent timing light and based on information provided from Frank will try to do it my self, following the steps on the tutorial.

Before I start though, would have 3 questions:
- To set timing at WOT? can I use the controls - middle button pressed, acceleration all the way down? or should I just disconnect the cables from the engine and use the cam to achieve WOT? right..now, I cant move the cam manually.
- Do all spark plugs have to be grounded? or I leave the top one cyl one (the one to be attached to the timing light) connected to the spark plug?
- Removing all gas from the engine? I start the engine and with the engine running I remove the gas hose..is this how I should proceed?

thank you so much.
Eugene
 
Last edited:

pnwboat

Rear Admiral
Joined
Oct 8, 2007
Messages
4,251
Yes you can use the controls to set the timing. You cannot achieve WOT by using the fast idle neutral function on the throttle control (middle button pressed, throttle handle all the way down)l. It limits the amount the throttle will advance to prevent over revving the motor while out of gear.

Basically you remove all of the plugs and ground the body of the plugs to the engine block. There are several methods to do this. You can take some wire and wrap around each plug on the threaded portion and tie all of them together and attach to a convenient point on the block or mounting bracket that it attached to the block. By-pass the neutral safety switch by shorting the two Yellow or Yellow/Red wires together, so the starter will engage with the throttle set to the normal WOT position. Push the throttle to the normal WOT position. Attach your timing light to number one plug wire. Have an assistant crank the motor over while you look at the timing marks. Be aware, that the gear case is engaged and the propeller will turn when you engage the starter. Either remove the propeller or just be careful.
 

EugeneP

Cadet
Joined
Aug 31, 2015
Messages
23
I did further research and seems there is no neutral safety switch around the engine, this might be part of the front controls. Can I try starting in gear by just shorting the solenoid? there are 4 wires..one thick red that comes from the battery with the ++ sign and another thick yellow wire that goes to the starter and other two thinner wires on the side. Can I short the yellow and red wire?
 

EugeneP

Cadet
Joined
Aug 31, 2015
Messages
23
No Title

Here are the pictures of the solenoid:
 

Attachments

  • photo229970.jpg
    photo229970.jpg
    136.9 KB · Views: 1
  • photo229971.jpg
    photo229971.jpg
    183.8 KB · Views: 1

pnwboat

Rear Admiral
Joined
Oct 8, 2007
Messages
4,251
Yes, just short the terminal with the small Yellow wire to the Red wire that comes from the battery. Forgot to mention.....make sure the ignition key in in the ON normal running position.

You can use a remote starter switch like this and attach it to the terminals. Makes it a little more convenient.

Remote starter switch.jpg
 

EugeneP

Cadet
Joined
Aug 31, 2015
Messages
23
Yes, just short the terminal with the small Yellow wire to the Red wire that comes from the battery. Forgot to mention.....make sure the ignition key in in the ON normal running position.

You can use a remote starter switch like this and attach it to the terminals. Makes it a little more convenient.


thanks pnwboat
Im planning to do it today with the help of a friend...abt the key switch being to on, normally when in gear..it will not crank when I turn the key all the way.., I assume when I short the solenoid will bypass the key switch and just crank..right?

One last questions...I know it may be stupid, but I really want to take all the necessary precautions, from the pictures I uploaded above..what would be the safest point to ground the spark plugs?

thanks!
 

pnwboat

Rear Admiral
Joined
Oct 8, 2007
Messages
4,251
Im planning to do it today with the help of a friend...abt the key switch being to on, normally when in gear..it will not crank when I turn the key all the way.., I assume when I short the solenoid will bypass the key switch and just crank..right?Yes, when you short the terminal on the starter solenoid that has the small Yellow wire attached to the battery cable, you are by-passing the neutral safety switch and the starter will engage. The ignition key must be in the "ON" position so that the ignition system will provide spark so your timing light will work.

One last questions...I know it may be stupid, but I really want to take all the necessary precautions, from the pictures I uploaded above..what would be the safest point to ground the spark plugs? Any spot that is convenient on the engine block. Just make sure if you're using a wire connector that it doesn't get caught in any moving parts.

The video link posted by SkiDad pretty much shows how it is done. The only problem with the video is that it shows the plug wires grounded to the block. I've had some instances where this did not work, or did not work consistently. I suspect that the ignition wires being directly grounded to the block did not allow enough voltage to build up for the timing light to pick it up. I've found that if you leave the plugs attached to the end of the spark plug wires, and ground the threaded portion of the plug, which allows an actual spark to occur across the plug gap works the best. Using this method, I've never had an issue with triggering the timing light.
 

EugeneP

Cadet
Joined
Aug 31, 2015
Messages
23
Im planning to do it today with the help of a friend...abt the key switch being to on, normally when in gear..it will not crank when I turn the key all the way.., I assume when I short the solenoid will bypass the key switch and just crank..right?Yes, when you short the terminal on the starter solenoid that has the small Yellow wire attached to the battery cable, you are by-passing the neutral safety switch and the starter will engage. The ignition key must be in the "ON" position so that the ignition system will provide spark so your timing light will work.

One last questions...I know it may be stupid, but I really want to take all the necessary precautions, from the pictures I uploaded above..what would be the safest point to ground the spark plugs? Any spot that is convenient on the engine block. Just make sure if you're using a wire connector that it doesn't get caught in any moving parts.

The video link posted by SkiDad pretty much shows how it is done. The only problem with the video is that it shows the plug wires grounded to the block. I've had some instances where this did not work, or did not work consistently. I suspect that the ignition wires being directly grounded to the block did not allow enough voltage to build up for the timing light to pick it up. I've found that if you leave the plugs attached to the end of the spark plug wires, and ground the threaded portion of the plug, which allows an actual spark to occur across the plug gap works the best. Using this method, I've never had an issue with triggering the timing light.

I tried all this yesterday with the spark plugs wires grounded to a block screw (the screw where the battery negative cable is held to the block)...and there was no light coming from the timing light. i assumed was a bad tool and was looking to go to the store today looking for a refund....Should i attached all 4 spark plugs to the coils or just the first one thats needed for the timing light?

Now, the ignition..when i start it, the key goes all the way to the right but..when in gear..the neutral switch will not allow me to engage the key all the way. So, i could only move the key to a position where all the lights are open and cranking using the solenoid. Do i need a 3 helper to keep the key pressed all the way to the right?:)
 

pnwboat

Rear Admiral
Joined
Oct 8, 2007
Messages
4,251
I tried all this yesterday with the spark plugs wires grounded to a block screw (the screw where the battery negative cable is held to the block)...and there was no light coming from the timing light. i assumed was a bad tool and was looking to go to the store today looking for a refund....Should i attached all 4 spark plugs to the coils or just the first one thats needed for the timing light? I use a fixture that I made where I remove all 4 plugs and attach them to the plug wires. I guess that you only need #1 plug attached to the plug wire. The rest can probably be grounded directly without the plug. Try it. If it doesn't work, hook up all 4 plugs to the wire and see if that solves the problem.


Now, the ignition..when i start it, the key goes all the way to the right but..when in gear..the neutral switch will not allow me to engage the key all the way. So, i could only move the key to a position where all the lights are open and cranking using the solenoid. Do i need a 3 helper to keep the key pressed all the way to the right?
smile.gif
I'm not that familiar with your type of control. I do not think that you need a helper. You just need to put the key in "ON" position so that any accessories gauges etc. are being supplied with power. It does not have to be turned all the way to the momentary spring loaded right position as though you are using it to engage the starter. The objective is to turn the key so that it is not in the "OFF" position. When the key is in the "OFF" position, it disables the ignition spark which stops the motor and you will not be able to check the timing. Turn the key to the "ON" position, leave it in that position and use a jumper on the starter solenoid to engage the starter to check the timing.
 

EugeneP

Cadet
Joined
Aug 31, 2015
Messages
23
I tried all this yesterday with the spark plugs wires grounded to a block screw (the screw where the battery negative cable is held to the block)...and there was no light coming from the timing light. i assumed was a bad tool and was looking to go to the store today looking for a refund....Should i attached all 4 spark plugs to the coils or just the first one thats needed for the timing light? I use a fixture that I made where I remove all 4 plugs and attach them to the plug wires. I guess that you only need #1 plug attached to the plug wire. The rest can probably be grounded directly without the plug. Try it. If it doesn't work, hook up all 4 plugs to the wire and see if that solves the problem.


Now, the ignition..when i start it, the key goes all the way to the right but..when in gear..the neutral switch will not allow me to engage the key all the way. So, i could only move the key to a position where all the lights are open and cranking using the solenoid. Do i need a 3 helper to keep the key pressed all the way to the right?
smile.gif
I'm not that familiar with your type of control. I do not think that you need a helper. You just need to put the key in "ON" position so that any accessories gauges etc. are being supplied with power. It does not have to be turned all the way to the momentary spring loaded right position as though you are using it to engage the starter. The objective is to turn the key so that it is not in the "OFF" position. When the key is in the "OFF" position, it disables the ignition spark which stops the motor and you will not be able to check the timing. Turn the key to the "ON" position, leave it in that position and use a jumper on the starter solenoid to engage the starter to check the timing.


thanks! Will try this ..tonight or in the week-end.
on a separate..note, I did a compression test again..and the results are a bit scary for me:
Cyl 1: 130
Cyl 2: 105
Cyl 3: 150
Cyl 4: 150

How bad is this? will this engine need a rebuild soon? are there any other things I could do to improve compression on Cyl 2? These measurements were done with the engine cold and all spark plugs removed (disabled the ignition from the safety switch. )
 
Last edited:
Top