Searay 250 martinique
Seaman
- Joined
- Feb 2, 2016
- Messages
- 65
Hello you happy fellow boaters.
First of all, please forgive my english since it?s not my mother tongue. I?ll try my best to be clear in the following explanations.
I read a lot of good advice on this forum regarding engine and boat maintenance, so it?s time for me to do my own contribution !
This one concerns the overhaul of the steering actuator #21910902, that started leaking badly on my VP DPS-A drive / 5.7 GXI-H engine (2008).
And YES it IS serviceable though VP says it?s not !
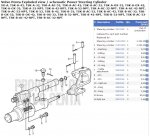
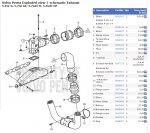
Here?s the exploded drawing of the assembly :

In general the problem is located at the base of the steering rod, where the seal starts to wear and leak hydraulic fluid in your bilge.

This is the step by step method used to overhaul my actuator :

3 - Disconnect hydraulic lines, remove cotter pins and pins #8-9-10, and unscrew the steering cable. Remove it from the actuator. ? Easy until now
4 - Time to remove your actuator from the bracket of the inner transom plate ! If you?re lucky you?ll be able to remove cotter pin #14, then unscrewing the 2 screws #13 is a breeze.If your cotter pin are stuck, you?ll have to remove the engine !
Mine where completely stuck due to electrolysis (SS cotter pin in aluminium bracket IS bad engineering !). I had to remove the engine and punch/drill the cotter pin. Took me about 3 hours, after engine removed?
Now you have your actuator out of the boat, it?s time to dismantle it !
5 - First step : remove the blue aluminium back cover : easy job. If you got a tool that could fit in the holes (like a pin wrench), use it and crack open the cover. If you don?t have a tool, you can make one using 2 nails in a wood lumber. You can also (like I did) punch in the holes 2 small allen wrench and use them to turn around the cover with a screw driver.

6 -Step 2 : remove head #7 WITHOUT denting the stainless rod ! A good tip here : place the rod between 2 wood luber (like pine, no hardwood). Place the assembly in a vise. If you don?t have a vise, you can place the assembly on the ground and apply pressure with a car jack.Once the rod is firmly secured between the lumber, you can unscrew the head with an adjustable wrench without problem, it?s not very tight.
7 -Remove the rod from the cylinder
Your actuator is now dismanteled, time to overhaul it
8 - Remove old seals (wiper seal + rod seal) and clean thoroughly the cylinder. My own rod seal was brown, and fell apart in small pieces when trying to remove it. The wiper seal was not in good shape too (7 years old)
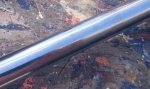
9 -Clean SS rod and look for small dents or traces of corrosion. If you have any defect on the rod, it must be sanded out. I used a dremel with small sanding disc on the different gouges I had and finished with 400 + 800 grit wet sanding. A good polishing with rotative pad and polish paste finished the job. The rod must be shining new otherwise your actuator is good for garbage. On the photo you can see small discolorations where the shaft has been sanded.


10 -If you need to change the O-ring on the piston, you may do so. I didn?t have to replace mine so don?t have the parts number.
11 -SEAL REFERENCES :Every manufacturer has his own seal references, so I?ll indicate the size of the seals I used (it?s metric).
The hydraulic assembly is very classical and follows the principle below (there?s no guide ring though) :

The rod seal is 16mm X 24mm X 5mm (ID X OD X thickness). It?s standard C cup shape. I Had mine made of Polyur?thane (PU- better) wich is medium hard plastic (red or blue) but you can have also nitrile (NBR - good) wich is a maybe a little more supple.
The wiper seal I used is 16mm X 24mm X 3.50-5mm (ID X OD X thickness/lips). I Had mine made of nitrile (NBR) with a metallic insert.

Each one is about 10$...
For some reason, VP used a oil seal (without spring) instead of a wiper seal. But I think it?s not a proper installation so I used a wiper.
12 -Installing the seals :Installing the wiper seal is no problem. If you use PU wiper seal, you may have to glue it in place, just to be sure it won?t pop out. I didn?t have to with the NBR one.
Installing the rod seal is another story, because it?s in a closed grove and you must introduce a 24mm seal by a 15mm hole ! The NBR seal could be easier to install than the PU seal (wich is made of medium hard plastic), but the PU seal is better quality I believe, so I choosed to install the PU.
Forget about the special plyers or tools sold on internet for these types of seal. It?s useless here since it?s too small seals.
The tip is to give the PU seal the good shape to manage to introduce it in the groove and let it expand.
Following is a drawing of the different steps :
Step 1 : use a plyer to crush the seal in the middle and use a thin twine to attach it in this 8 shape
Step 2 : bend the attached seal to one side like a C
Step 3 : continue bending it until it makes a superposed loop. Introduce a toothpick in the loops to hold it in this shape. This step is hard to achieve and the seal is suffering somewhat.
Step 4 : introduce the seal in the groove (the lip must be facing the oil side like in the drawing before) and release the toothpick. The seal is now trying to unbend in the groove. You can help it settling in the groove by maintaining it gently with the rod from the other side. Now cut the twine and remove it with a plyer. Help the seal to pop in the groove.

13 - Reassemble the cylinder, use red loctite to re-assemble the head
14 - Have a beer. You just spared 600$ !!!
Update : I reassembled everything yesterday , filled with oil and started the engine : works perfect. No leak. No play. It never has been so smooth.
Hope it helps you, fellow DIYers.
Cheers !
Laurent (Martinique ? Caribbean)
First of all, please forgive my english since it?s not my mother tongue. I?ll try my best to be clear in the following explanations.
I read a lot of good advice on this forum regarding engine and boat maintenance, so it?s time for me to do my own contribution !
This one concerns the overhaul of the steering actuator #21910902, that started leaking badly on my VP DPS-A drive / 5.7 GXI-H engine (2008).
And YES it IS serviceable though VP says it?s not !
Here?s the exploded drawing of the assembly :
In general the problem is located at the base of the steering rod, where the seal starts to wear and leak hydraulic fluid in your bilge.
This is the step by step method used to overhaul my actuator :
- Put your boat on the dry : it?s impossible to continue onward if you?re on the water
3 - Disconnect hydraulic lines, remove cotter pins and pins #8-9-10, and unscrew the steering cable. Remove it from the actuator. ? Easy until now
4 - Time to remove your actuator from the bracket of the inner transom plate ! If you?re lucky you?ll be able to remove cotter pin #14, then unscrewing the 2 screws #13 is a breeze.If your cotter pin are stuck, you?ll have to remove the engine !
Mine where completely stuck due to electrolysis (SS cotter pin in aluminium bracket IS bad engineering !). I had to remove the engine and punch/drill the cotter pin. Took me about 3 hours, after engine removed?
Now you have your actuator out of the boat, it?s time to dismantle it !
5 - First step : remove the blue aluminium back cover : easy job. If you got a tool that could fit in the holes (like a pin wrench), use it and crack open the cover. If you don?t have a tool, you can make one using 2 nails in a wood lumber. You can also (like I did) punch in the holes 2 small allen wrench and use them to turn around the cover with a screw driver.
6 -Step 2 : remove head #7 WITHOUT denting the stainless rod ! A good tip here : place the rod between 2 wood luber (like pine, no hardwood). Place the assembly in a vise. If you don?t have a vise, you can place the assembly on the ground and apply pressure with a car jack.Once the rod is firmly secured between the lumber, you can unscrew the head with an adjustable wrench without problem, it?s not very tight.
7 -Remove the rod from the cylinder
Your actuator is now dismanteled, time to overhaul it
8 - Remove old seals (wiper seal + rod seal) and clean thoroughly the cylinder. My own rod seal was brown, and fell apart in small pieces when trying to remove it. The wiper seal was not in good shape too (7 years old)
9 -Clean SS rod and look for small dents or traces of corrosion. If you have any defect on the rod, it must be sanded out. I used a dremel with small sanding disc on the different gouges I had and finished with 400 + 800 grit wet sanding. A good polishing with rotative pad and polish paste finished the job. The rod must be shining new otherwise your actuator is good for garbage. On the photo you can see small discolorations where the shaft has been sanded.
10 -If you need to change the O-ring on the piston, you may do so. I didn?t have to replace mine so don?t have the parts number.
11 -SEAL REFERENCES :Every manufacturer has his own seal references, so I?ll indicate the size of the seals I used (it?s metric).
The hydraulic assembly is very classical and follows the principle below (there?s no guide ring though) :
The rod seal is 16mm X 24mm X 5mm (ID X OD X thickness). It?s standard C cup shape. I Had mine made of Polyur?thane (PU- better) wich is medium hard plastic (red or blue) but you can have also nitrile (NBR - good) wich is a maybe a little more supple.
The wiper seal I used is 16mm X 24mm X 3.50-5mm (ID X OD X thickness/lips). I Had mine made of nitrile (NBR) with a metallic insert.
Each one is about 10$...
For some reason, VP used a oil seal (without spring) instead of a wiper seal. But I think it?s not a proper installation so I used a wiper.
12 -Installing the seals :Installing the wiper seal is no problem. If you use PU wiper seal, you may have to glue it in place, just to be sure it won?t pop out. I didn?t have to with the NBR one.
Installing the rod seal is another story, because it?s in a closed grove and you must introduce a 24mm seal by a 15mm hole ! The NBR seal could be easier to install than the PU seal (wich is made of medium hard plastic), but the PU seal is better quality I believe, so I choosed to install the PU.
Forget about the special plyers or tools sold on internet for these types of seal. It?s useless here since it?s too small seals.
The tip is to give the PU seal the good shape to manage to introduce it in the groove and let it expand.
Following is a drawing of the different steps :
Step 1 : use a plyer to crush the seal in the middle and use a thin twine to attach it in this 8 shape
Step 2 : bend the attached seal to one side like a C
Step 3 : continue bending it until it makes a superposed loop. Introduce a toothpick in the loops to hold it in this shape. This step is hard to achieve and the seal is suffering somewhat.
Step 4 : introduce the seal in the groove (the lip must be facing the oil side like in the drawing before) and release the toothpick. The seal is now trying to unbend in the groove. You can help it settling in the groove by maintaining it gently with the rod from the other side. Now cut the twine and remove it with a plyer. Help the seal to pop in the groove.
13 - Reassemble the cylinder, use red loctite to re-assemble the head
14 - Have a beer. You just spared 600$ !!!
Update : I reassembled everything yesterday , filled with oil and started the engine : works perfect. No leak. No play. It never has been so smooth.
Hope it helps you, fellow DIYers.
Cheers !
Laurent (Martinique ? Caribbean)