Hydraulic Steering on a 1996 FORCE 75hp on pontoon

surfsalterpath

Petty Officer 2nd Class
Joined
Aug 6, 2003
Messages
116
.......thanks. I like that. "SHOULD" ??? I always run into issues when things "SHOULD" :)
The salesman said the unit "SHOULD" work also. I'm wondering if the hydraulic add-on will fit on WITHOUT having to remove the engine. We cannot get the old steering cable/rod out just by pulling. We would have to remove the engine. SO my plan is to take "bolt cutters" and chop up the rod and or cabling to remove and then pray the engine will not have to be removed. "SHOULD" yea!
I'm thinking for an extra $300 we should be able to upgrade' and it would be worth it. Only drawback would be if the '96 FORCE conks out. It has been a GOOD outboard engine....so far!! :hail:

http://uflexusa.ultraflexgroup.com/easystore/schedevedi.asp?schedaid=909

I wish these manufacturers would put more detail in their marketing material!
 

Frank Acampora

Supreme Mariner
Joined
Jan 19, 2007
Messages
12,004
Well, the SHOULD is in there because never having done this set-up I need to qualify my answer. But, as I said the engine has Mercury type transom mounts and through the tilt tube steering which uses a return arm to the lower cowl. Thus the hydraulic unit also has the return arm and SHOULD work. As with anything that is not commonly done, you may need to do some modification.
 

SkiDad

Lieutenant Commander
Joined
Jul 18, 2010
Messages
1,518
What about a teleflex 4.2 turn NFB. I'm thinking about the 3 turn NFB for my boat. I have a few inches of play when driving. But no real torque steer so I might just replace the cable. the No Feed Back seems like a cool idea
 
Last edited:

surfsalterpath

Petty Officer 2nd Class
Joined
Aug 6, 2003
Messages
116
....well the 'should' turned into the will not. Here is my experience with the uFlex HyTeck 1.0 kit. Got the uFlex hydraulic steering kit yesterday. After getting verification from sellers tech rep and uFlex this kit would fit I proceed to attempt the install this AM. Does not fit. The bolt the attaches the 75hp FORCE tiller arm tab to the hydraulic cylinder arm is too long and not enough clearance for uFlex cylinder body to fold back under the FORCE tiller arm to enable the brackets on the tilt/trim bar to slide on the uFlex hydraulic cylinder bar. Talked with the uFlex rep and he just said basically too bad--does not fit. Bummed. Looks like have to go back to the mechanical (rotary helm or rackNpinion) steering options which look to require the engine removal. DANG!
If I put the uFlex cylinder linkage arm UNDER the FORCE engine tab then there is not enough room for the engine to tilt all the way forward. Part of the problem is the transom is angled towards the back of the boat at the top and the bottom of the transom is toward the front of the boat. That reduces the room need to have a good full engine forward tilt to raise the prop out of the water when parked.
 

surfsalterpath

Petty Officer 2nd Class
Joined
Aug 6, 2003
Messages
116
...going to pull out the hydraulic cylinder one more time and mount it on the bolt position B just to see if there is any way possible. I don't think so but taking a second look should not hurt before returning the uFlex hydraulic steering kit. Thanks!!!
 

surfsalterpath

Petty Officer 2nd Class
Joined
Aug 6, 2003
Messages
116
No Title

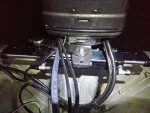
Well, hell. After sleeping on it and going through the process step by step in my head......and drinking a beer, or 2, mustered up the courage to pull the hydraulic cylinder back out of its box and go for it. Used a cut-off tool to cut off about 2" of 2 tabs off the engine support bracket, serving no purpose, that were hooked downwards over the top of the transom. And replaced the 2 too long bolts sticking through the transom securing the engine bracket. This left enough clear space for the hydraulic cylinder and its bullhorn brackets to move to when the tilt/trim lifted the prop out of the water. Dang. It worked! to my surprise. This was the 1st hurdle. Then the next hurdle was making sure full right and left engine turns would make it all the way to the engine stops. My 1st attempt failed as I had connected the hydraulic cylinder link arm ON TOP of the 1996 FORCE 75hp engine tiller tab. This created a bind when turning the engine to the left: link arm hitting engine tiller tab support edge. See pic. So then I called uFlex and talked with Mike. Extremely helpful. He looked over my pic and said go for it on attaching the hydraulic cylinder link arm UNDER the engine tiller tab. Did that and now get free and clear left/right movement of engine to the engine stops. YEA! Next step is hooking up the hydraulic lines and bleeding the system. Don't look forward to that but I think I am on track to having hydraulic steering vs the cable fed mechanical rotary NFB or rack/pinion manual steering. Hope it's worth it! I'll report back after installing the hydraulic lines. Then I'm going to replace the original mercury quicksilver REMOTE CONTROL BOX w/ a uFlex RCB. That will be interesting too.


****one thing I have learned is when you are needing a real tight secure fit use FINE thread BOLTS. Not coarse. When I replaced the top 2 bolts holding the engine bracket to the transom I must have tightened the bolt/nut w/ COARSE threads TOO TIGHT
"Stainless steel can unpredictably sustain galling (cold welding). Stainless steel self-generates an oxide surface film for corrosion protection. During fastener tightening, as pressure builds between the contacting and sliding, thread surfaces, protective oxides are broken, possibly wiped off, and interface metal high points shear or lock together. This cumulative clogging-shearing-locking action causes increasing adhesion. In the extreme, galling leads to seizing - the actual freezing together of the threads. If tightening is continued, the fastener can be twisted off or its threads ripped out.
and now I cannot unscrew one. Evidently the threads warped and now the nut is stuck. Cannot unscrew it. Any ideas on how to unscrew it? If not will have to cut the 1/2" stainless steel bolt. Dread that too!

What are the benefits of fine threaded fasteners over coarse threaded fasteners?
The potential benefits of fine threads are:
1. Size for size a fine thread is stronger than a coarse thread . This is both in tension (because of the larger stress area) and shear (because of their larger minor diameter).
2. Fine threads have also less tendency to loosen since the thread incline is smaller and hence so is the off torque.
3. Because of the smaller pitch they allow finer adjustments in applications that need such a feature.
4. Fine threads can be more easily tapped into hard materials and thin walled tubes.
5. Fine threads require less torque to develop equivalent bolt preloads.
On the negative side:
1. Fine threads are more susceptible to galling than coarse threads.
2. They need longer thread engagements and are more prone to damage and thread fouling.
3. They are also less suitable for high speed assembly since they are more likely to seize when being tightened.
Normally a coarse thread is specified unless there is an over-riding reason to specify a fine thread, certainly for metric fasteners, fine threads are more difficult to obtain.
 

Attachments

  • photo228741.jpg
    photo228741.jpg
    354.9 KB · Views: 2
Last edited:

smokeonthewater

Fleet Admiral
Joined
Dec 3, 2009
Messages
9,838
Galling is a common problem with stainless and fine thread will make it worse.

To remove that bolt the easiest way would be to get out your breaker bar and tighten it till it twists off.

IMPORTANT!.... Watch it and make sure it's twisting off and not tightening... Wouldn't want to crush the transom.
 
Last edited:

surfsalterpath

Petty Officer 2nd Class
Joined
Aug 6, 2003
Messages
116
....never used a 'breaker bar' before. Will have to check into that. THANKS! I do have a little slot I can get a metal blade in to maybe cut the bolt. . Which do you think? A breaker bar vs a recip saw on this 1/2" stainless?

I've never had a 'galling' problem before. I know I should have greased that freekin bolt! That's why I was taking it off. To grease it so electrolysis would not set in.
 
Last edited:

Frank Acampora

Supreme Mariner
Joined
Jan 19, 2007
Messages
12,004
Well, just be prepared: On a bolt that size, instead of snapping the galling may strip the threads when broken free and the nut may turn in place. Then you will need to grind the head off. A hand grinder will be much more precise and faster than a recip saw.

And just for info: Why do you think the stock nuts are bronze nylock?--to prevent galling.
 

surfsalterpath

Petty Officer 2nd Class
Joined
Aug 6, 2003
Messages
116
Are the bronze nylock nuts strong enough to hold the engine mount to the transom? I assume the engine is about 400lbs (1996 FORCE 75hp on a 24' Brunswick pontoon) and for sure lots of vibration.
 

surfsalterpath

Petty Officer 2nd Class
Joined
Aug 6, 2003
Messages
116
No Title

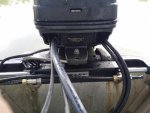
....uFlex hydraulic steering installed and working properly.....so far. See pic below. Next on the agenda is the binnacle uFlex B77 REMOTE CONTROL BOX connections. The original Mercury Quicksilver control (gas & shifter) cables do NOT adjust to fit the universal UFLEX b77 rcb. The uflex fittings do not come close to matching up. Anyone know if this 'accessory' would solve the connection problem?

http://www.amazon.com/Uflex-Mercury-Connection-Cables-Controls/dp/B0000BYMVW
 

Attachments

  • photo228834.jpg
    photo228834.jpg
    88.1 KB · Views: 2

lmuss53

Lieutenant Junior Grade
Joined
Sep 9, 2008
Messages
1,227
Great job on the steering install surfsalterpath.

I have started using stainless bolts and washers with zinc coated nuts on all of my boat stuff. I just got tired of having the SS nuts gall up with very little tightening.

Nice description of what happens when the bolts and nuts gall up, I'm going to copy it and send to my nephew the engineer, who got to have his first bad experience with SS hardware last weekend mounting a kicker bracket on his Trophy.

The first time you see that you are like "WTH just happened?"
 
Last edited:

surfsalterpath

Petty Officer 2nd Class
Joined
Aug 6, 2003
Messages
116
.....THANKS dude! I'm not very mechanically oriented and I feel pretty good about this.....so far. It took me a while, a few beers, lots of patience and just taking it one step at a time. Funny about those SS engine mount bolts. I ALWAYS put marine grease on all the parts back here due to the corrosion factor. Just got a little antsy and forgot to do it on this one. Went back to take it off and DANG!!! Uns
crewed about 4 turns and got tighter & tighter then locked up. Still have that bolt on my plate for grinding or recip blade or breaker bar manhandling. Don't look forward to it. I'm going to take your advice on the ZINC nuts in the future. RATS!

In addition to that minor issue, I'll also be working on the REMOTE CONTROL BOX accessory hookup required
Mercury Connection Kit for UFlex Single Lever Controls
for the uFlec top mount(binnacle) RCB I was unable to complete due to not knowing about this control cable extensions! :(

Hope this weekend I can finally get the sweet wahine out for a test ride.
 

lmuss53

Lieutenant Junior Grade
Joined
Sep 9, 2008
Messages
1,227
If you have the clearance, a cutoff wheel in a dremel or 4 inch grinder will make short work of that half inch bolt.

Let us know how the mid-range power outboard handles with that hydraulic steering, should be sweet.
 

Georgesalmon

Lieutenant Commander
Joined
Apr 14, 2012
Messages
1,793
Little tip for SS bolts. Always use anti-seize, never use power tools. After 30+ years and thousands of SS bolts in the boating industry I can say that. You can get a ketchup sized package at any auto parts store cheap and it will do many bolts. Even if you are lucky and get it on and tight you might not get it off without galling, so again use anti-seize. Brand doesn't matter though I prefer permatex myself.
 

surfsalterpath

Petty Officer 2nd Class
Joined
Aug 6, 2003
Messages
116
....THANKS for the advice!!. Never knew about SS seizing up. Heard about the anti-seize product but never in a MILLION years thought it would apply to SS bolts or anything that I would have the ability to do. I do have a Dremel and a 4" cut-off grinder blade. Ready to do this this weekend! :embarassed:
 
Top