With huge thanks to Bud Rig (via a PM), I was able to successfully do this job.
This YouTube video is also helpful:
https://www.youtube.com/watch?v=C9awOKpZ7K0
The job of getting to that trim switch essentially comes down to:
(1) Remove the
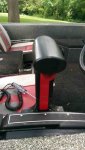
whole control unit from the console (but leave all the cables attached).
(2) Prise off that square 'mercury' cover using a small flat-bladed screwdriver. Under it you'll find the T/S wires and in the middle you'll also see the end tip of the large bolt that secures the throttle lever in place.
ENSURE THE THROTTLE LEVER & THE FAST_IDLE LEVERS ARE IN THEIR 'OFF/NEUTRAL' POSITIONS. (Don't worry or panic too much about this, but it'll help avoid adding unnecessary complications...)
(3) From the back of the unit, undo that single large bolt to remove the throttle lever. The lever will still be attached to the main unit by the T/S wires.
(4) On the back of the throttle lever you'll find a small metal plate held by two screws - these hold the red 'neutral-lock' lever in place. Undo these two screws and remove the red lever (it'll likely have a spring behind it - take care!)
5) This should now provide access to the back of the trim switch.
(6) Lay the main unit flat on a suitable surface - small table, stool, etc - with its 'back' facing upwards, and place a heavy object on the cables about a foot from where they come out of the unit - that should hold it all flat and steady! Undo the 5 screws that hold on the back cover - two for the bottom plate and 3 for the main one. (See the video above for hints).
That's it - you now have full access to everything - wires, connectors and gubbins. Don't disturb any of the mechs inside unless you need to, but do add a goodly dollop of fresh grease before reassembly. Don't move the cables around too much - in fact don't do anything you don't actually want to...