Tachometer Wiring

RinkerMane

Cadet
Joined
Mar 17, 2016
Messages
26
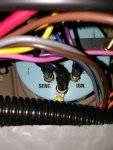
I have searched all over for an answer to this question. I am replacing the tach on my boat (1995) and the tach, which is a teleflex amgega 0-6k tach, has what looks like heat shrink covered push on connections. The wires are covered in heat shrink and look like they are just pushed onto the threaded terminals on the back of the tach. I have done a lot of electrical work on the boat regarding audio and new depth sounder but I have never replaced any gauges. I'm not sure if I should just pull these off, cut the heat shrink, or what. I'm afraid to just pull them when I can't see what's really holding them on. I can't see how they would be threaded on because the wire would have to twist. I definitely believe all the gauges and wiring are original to the boat and have never been touched. They are on there tight. Is this typical and do I just pull them off with a pair of pliers? Thanks!
 

alldodge

Moderator
Staff member
Joined
Mar 8, 2009
Messages
40,755
This is one of those things were we will say, we cannot see what you see

ThisThreadIsWorthlessWithoutPictures.jpg
 

RinkerMane

Cadet
Joined
Mar 17, 2016
Messages
26
Understood and will get them after work today. I just thought, while sitting here at work, that someone had seen this or it was commonplace. Thanks
 

wrench 3

Commander
Joined
Aug 12, 2012
Messages
2,108
They're usually ring terminals on the wires that go over a stud on the gauge and are held on with a nut. But it would be nice to see a picture.
 

Silvertip

Supreme Mariner
Joined
Sep 22, 2003
Messages
28,762
If the wires seem to go straight onto the threaded stud (not off the side), then you likely have a simple push on connector that over time has some crude build-up making it seem a little tough to remove them. But normally, as was stated, these connections are ring terminals held secure with a nut. In your case, pull the wire off, clip off the current terminal and replace it with a ring terminal. Either way works, Ring terminals are a little more secure. Electricity doesn't care what the connection looks like. It cares how clean and tight the connection remains.
 

RinkerMane

Cadet
Joined
Mar 17, 2016
Messages
26
I will get a pic of the wiring just so everyone can say "yeah, I've seen that before."

I don't want to pollute the forum with a new thread so I'm adding on to this one. I got the connections off. They are just push-on and were held good by the terminal threads. They are also all pristine clean so I'm not worried about corrosion. This boat is stored in a garage and is only used 5 or 6 times a year. The tach has a good ground and zeroes out when power is applied. The light also works.I just replaced the tach with a new one and ran a wire from the negative side of the coil straight to the send post on the tach and got nothing. Tach still at zero while engine running and engine runs fine.

My question, is it possible the coil is bad (not sending) but the engine still runs? I'm not sure what else to do. The tach is wired correctly, all clean, good power, good ground, wired directly to the negative side of the coil. Pegged at zero and won't read RPMs at all. Any one have any other ideas? I've searched for hours and I'm not seeing anyone with this exact problem. Thanks in advance.
 

GA_Boater

Honorary Moderator Emeritus
Joined
May 24, 2011
Messages
49,038
It helps to tell us what is supplying pulses to the tach. Outboard or IO and which one?
 

RinkerMane

Cadet
Joined
Mar 17, 2016
Messages
26
My apologies. I forgot that I never gave engine info in OP. It's a 1995 Merc 3.0LX
Engine Serial OF453022, if that helps.
 

ajgraz

Lieutenant Commander
Joined
Mar 1, 2010
Messages
1,858
I don't know crap about the pole setting you want on the tach for your I/O...

But as to those "push-on" connectors you mentioned...I am curious, is that something like a female spade, but round? Or maybe something like the female part of a bullet connector? Can't say I've ever seen a connection made that way before.
 

RinkerMane

Cadet
Joined
Mar 17, 2016
Messages
26
I don't know crap about the pole setting you want on the tach for your I/O...

But as to those "push-on" connectors you mentioned...I am curious, is that something like a female spade, but round? Or maybe something like the female part of a bullet connector? Can't say I've ever seen a connection made that way before.


Very much like a female bullet connector, yes. I didn't think to explain it that way. Every gauge is wired this way and it definitely looks factory. Looks like all original wiring, harnesses, etc., and very tidy.

Edit: Additionally, the pulse setting on the tach is correct. 4 cylinder, 2P.
 

RinkerMane

Cadet
Joined
Mar 17, 2016
Messages
26
No Title

They just plug onto the posts. Very tightly.
 

Attachments

  • photo261065.jpg
    photo261065.jpg
    302 KB · Views: 1

alldodge

Moderator
Staff member
Joined
Mar 8, 2009
Messages
40,755
Was not thinking of those when reading your first post, but with that, they should just pull off

fetch
 

RinkerMane

Cadet
Joined
Mar 17, 2016
Messages
26
They do pull off but I didn't know that when I started the thread and I didn't want to yank on them without knowing. The pic actually shows them back on the new tach. I just had requests for pictures so I uploaded. My current problem is that the tach is not reading RPMs. I should have probably started a new thread after I figured out the connections but I tacked my current tach problem to this thread.
 

alldodge

Moderator
Staff member
Joined
Mar 8, 2009
Messages
40,755
replaced the tach with a new one and ran a wire from the negative side of the coil straight to the send post on the tach and got nothing. Tach still at zero while engine running and engine runs fine.

Check again it is on the negative post and not the positive post on the coil

My question, is it possible the coil is bad (not sending) but the engine still runs?

If the coil was grounded or open the coil would not work and the motor will not run. I don't see the coil as the problem
 

RinkerMane

Cadet
Joined
Mar 17, 2016
Messages
26
Check again it is on the negative post and not the positive post on the coil


If the coil was grounded or open the coil would not work and the motor will not run. I don't see the coil as the problem


Then it must not be the coil. That answered my question. I am going to check the ground again. When I ran the wire from the coil it was connected to the grey wire straight off of the coil wire harness plug so I know it was the negative side. I have to admit that I did not use a connector to test that jumper wire, I just touched it against the post and had my wife look at the tach to see if it started working. I think I will use a connector this time on the grey signal wire and maybe run a ground straight from the tach to the power buss (-) I use for the audio system. I'm one answer closer though, if the coil doesn't work the engine won't either, so thanks for that!
 

alldodge

Moderator
Staff member
Joined
Mar 8, 2009
Messages
40,755
My comment was make sure the wire goes from the tach sense post to the negative post on the coil

The ground needs to be on the distributor housing. The new sensors inside the distributor use an extra ground wire which comes out to make sure its grounded.

If you can get a cheap hand held tach, you should read rpms off the negative post of the coil

The coil will not work if there is a constant open or ground on the negative side of the coil. So if the motor is running, then its not the coil
 

wrench 3

Commander
Joined
Aug 12, 2012
Messages
2,108
I'm curious as to why you were replacing the tack in the first place?
 

RinkerMane

Cadet
Joined
Mar 17, 2016
Messages
26
I'm curious as to why you were replacing the tack in the first place?


The tach was working fine until mid last summer when the needle started to jump all over the place (floating, basically) then it just stopped reading rpm entirely. It has power and will zero when the key is turned on but it just stays on zero when the engine is running. The needle float made me thing the tach was bad, based on all the searching and reading I did. I replaced the tach but no dice.
 

wrench 3

Commander
Joined
Aug 12, 2012
Messages
2,108
Verify that you have 12v and a good ground on the appropriate terminals on the gauge. Get an old style incandescent 12v test light and hook it up to the ground and the sender terminal on the gauge. With the engine running the test light should blink rapidly, maybe more like a flicker.
With all of these present a good gauge will give some sort of a reading.
 

RinkerMane

Cadet
Joined
Mar 17, 2016
Messages
26
I'm going to try what AllDodge and wrench suggested. I should get a handheld tach and a test light for the toolbox anyway. But, I think I need to do something else too. I've been reading about dielectric grease as I search for anything and everything that might be causing this problem. I didn't know it's non-conductive. Last year, I used a liberal amount on the coil both coil harnesses thinking it would keep corrosion at bay. This might have been a mistake and I think I need to clean all the contacts. I wanted to add this post because I did not know it really shouldn't be used on the actual connections and this might keep someone else from doing the same.
 
Top