wiring question

brooksville_rebel

Petty Officer 1st Class
Joined
Aug 12, 2011
Messages
240
I went through the stickies and did some searches on the net but didn't seem to get an exact answer to my concern. This is a 24ft pontoon boat, wood floor.
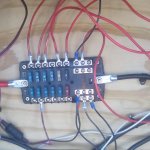
My front (bow) navigational lights need rewired. Currently they are wired with the negatives from each light wired to the negative back to the panel. Same with the positives. In the few diagrams I have viewed it seems to show each light going individually back to the panel or only one nav light.
Is that okay to wire like that or should each light be wired back on its own ? and if splicing is okay what's the best way to make those connections.? (I haven't unwrapped the current setup till I knew what was the proper way to wire them up to see how currently done and looks like its been rewired before so sure it was done the quick and cheap way
In my head I was thinking of putting a screw into the underneath and using a screw with washers and then put ring terminals on the wires and do it that way but again not sure its a good way or allowed to be done that way. Just want a hassle free, safe lasting rewire .
Thanks
Mark
 

JoLin

Vice Admiral
Joined
Aug 18, 2007
Messages
5,146
You can wire the positives together, and wire the negatives together as the factory did. Your bow lights must be either both on or both off at the same time anyway. Hard to visualize your connections from here, but I've done similar wiring by using a butt connector. For example, two 16 ga. wires from the lights into one end of the butt connector, then one 14 ga. wire out to the terminal on the switch. Make good connections and use strain relief. Use shrink connectors or shrink sleeve if they'll be exposed to moisture. DON'T ever use wire nuts.

My .02
 

Grandad

Lieutenant Commander
Joined
Jun 7, 2011
Messages
1,504
brooksville_rebel;n10311450In my head I was thinking of putting a screw into the underneath and using a screw with washers and then put ring terminals on the wires and do it that way but again not sure its a good way or allowed to be done that way. Just want a hassle free said:
Keep your wiring independent of the structure, be it metal or wood. A loose screw where the rings are piled under a screw can give you grief. As JoLin says, use butt splice connectors and seal them from dampness. If possible, only make joints in places where they are dry and easily accessible later for test and repair. This sometimes means using a little more wire, but pays handsomely later. - Grandad
 

brooksville_rebel

Petty Officer 1st Class
Joined
Aug 12, 2011
Messages
240
You can wire the positives together, and wire the negatives together as the factory did. Your bow lights must be either both on or both off at the same time anyway. Hard to visualize your connections from here, but I've done similar wiring by using a butt connector. For example, two 16 ga. wires from the lights into one end of the butt connector, then one 14 ga. wire out to the terminal on the switch. Make good connections and use strain relief. Use shrink connectors or shrink sleeve if they'll be exposed to moisture. DON'T ever use wire nuts.

My .02


Thanks. I plan on using 12 gauge wire (from one of those wire lenght calculators due to the length of the run and return).. So when you add two wires into the one end of the butt connector are you going to a bigger connector like for a 10 gauge connector ? or even bigger ? Thanks.
 

Peter Eikenberry

Chief Petty Officer
Joined
Sep 3, 2007
Messages
408
Moisture is the worst enemy of wiring on a boat. To keep it out at connections you need agood watertight connection. First of course you need good marine stranded copper wire. Don't use the cheap auto stuff. If does not meet the standards for marine wire. size the connectors to the wire size. Get some dielectric grease (any place that sells marine wire should have it. Also get some shrink type tubes to go over the connection. I buy it at West Marine but I have seen it at other marine supply stores.) Strip about 1/4 inch of the insulation off. Slide the shrink tube over the wire. Squirt a little dieletric grease into the connector. slide the wire into the butt connector (or ring connector) Crimp with a good crimper. Do the same for the other wire. Then slide the shrink tube over the connection and heat until it shrinks. Now you have a watertight connection.
 

JoLin

Vice Admiral
Joined
Aug 18, 2007
Messages
5,146
I dunno, 12 ga. wire end to end seems like way overkill for a pair of bow lights. Not doubting the tables, but I've never seen such a heavy gauge used for that purpose on any boat I owned.

Ancor and Seachoice make marine rated 'step-down' butt connectors. I googled it and saw that Seachoice makes one that accepts 12-10 ga. at one end and 8 ga. at the other, which should be big enough to handle the pair of 12 ga. wires running to the lights.

My .02
 

brooksville_rebel

Petty Officer 1st Class
Joined
Aug 12, 2011
Messages
240
So finally got it wired up. I have still have a few things to do. But tested it out and the new rocker panel rocks and all the lights are working. I decided not to join the wires and ran each set back. I did this cuz in my head it seemed like if there was a issue I would only have to track down a set of wires and not multi connected wires.
I got the panel off amazon. I really didn't need one this big but it was the only one that fit the holes that was in the console already. All the rest were 2-3 inches to short. And but the time I bought rockers and all was dang near same price so went with a decked out one.
It has the voltage display on it. usb ports and cig lighter and cig plug. 8 rockers , one being horn. The original panel was in the bottom hole and only had 4 rockers on it. The top hole had the radio which went in to a big ass holder. I had to move the new panel up top to being litte wider than the original and had to do a little trimming.
Wiring is not complete. I will seal the connections and screw down neatly as I can. Things didn't quite work out like I had it planned in my head but think it will last.
I had them on it the daylight and was bright to were I could see them lite up. Which I like cuz my little grandson's like to play with them buttons.
Was a nice learning experience being first time doing this and I tried like hell to stay away from any wires going to the ignition/gear box and engine. Not that confident yet.
 

Attachments

  • IMG_20170101_183740.jpg
    IMG_20170101_183740.jpg
    341.7 KB · Views: 0
  • IMG_20170101_183732.jpg
    IMG_20170101_183732.jpg
    278.7 KB · Views: 0
  • IMG_20170101_183715.jpg
    IMG_20170101_183715.jpg
    316.7 KB · Views: 0
  • fuse panel.jpg
    fuse panel.jpg
    46.8 KB · Views: 0
  • rocker panel face.jpg
    rocker panel face.jpg
    35.3 KB · Views: 0
Top