Adding a deep cycle battery to a mid-80's fish and ski

Twhjelmgren28

Seaman
Joined
May 31, 2016
Messages
71
Hey there,

So I recently purchased a boat from my grandfather and I have a couple questions on getting the electronics setup how I would like them. First of all, I assume it makes sense to keep all of the accessories on a deep cycle battery and isolate the starting battery for starting only. I've noticed that the starting battery isn't maintaining enough juice to start consistently (hmm...I wonder why - see below). Currently the boat is setup as follows:

Starting Battery:
-Ignition / starter
-Radio (recently added myself) - wired through accessory switch
-Lights - wired to switch
-Blower - wired to switch
-Bilge - wired to switch

Deep Cycle:
-Trolling Motor
-Depth Finder

Question 1: Does it make sense to put everything other than the ignition/starter onto the deep cycle battery?

Question 2: As I noted above, all of the accessories on the starting battery are wired to switches on the dash. For some reason, these accessories will ONLY work if they are wired onto the starting battery - my grandpa has several cables including the ignition cables taped together that go onto the starting battery - how do I get the switches wired over to the deep cycle - example - my radio (wired to accessory switch) will only work when coupled and attached with the ignition cables and a few other unknown cables. Are the switches wired positive / negative to the battery - as in, are they one of these other unknown cables but not the ignition/starting cables? Or are the switches wired through/with the ignition cables. Essentially, I'm trying to get the accessory switches to run on the deep cycle not the starter. It doesn't help that my grandpa is the king of jerry-rigging and there are cables and duct tape running every which way!

Sorry for all the info and thank you very much for any help!
 

NicoPags

Petty Officer 1st Class
Joined
Mar 24, 2014
Messages
217
No Title

Welcome to iBoats,

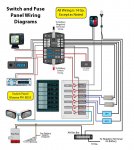
I don't know who gets credit for this picture, I think its Bruce, but its a great diagram and guide for understanding electrical accessories.

Also, is there a battery switch installed? I cant tell if you are adding the battery or if there is already two batteries

The picture shows the accessory side of wiring, ideally you would run heavier gauge from the non starting battery to supply the panel Rather than having X amount of runs back and fourth.

For identifying your motor wiring, wiring codes were always used with most references available through iboats. Generally, accessory wiring is Red and Black. Many members find that previous owners don't always stick to the plan and rather use what they have, making circuits hard to identify. Your grandfather may have years of fixes in that boat. You may be better served starting over (but that depends truly on the shape its all in).

I personally run all accessory's on a 24 hour fused circuit (exact setup as pictured)
My keyswitch solely starts (and kills) my motor, nothing else.

If you just want to leave your setup alone and figure out why some circuits have power and some do not, than pull out the voltmeter and start checking for power at your switches
 

Attachments

  • photo244246.jpg
    photo244246.jpg
    130.8 KB · Views: 0
Last edited:

Twhjelmgren28

Seaman
Joined
May 31, 2016
Messages
71
Thanks for the diagram. So there is no battery switch. It's just the switches installed on the dash and those switches are then wired to an old school fuse panel at about knee height under the dash. The fuse panel itself doesn't appear to be wired to anything, but it obviously holds the fuses and allows the positive (?) wires from each switch to connect. There is also a separate terminal on the panel without a spot for a fuse that I can only assume is for a ground...
 

Twhjelmgren28

Seaman
Joined
May 31, 2016
Messages
71
Thanks for the replies! So, all of my switches work properly it's just that I'm trying to get them to run to a different battery. I think my confusion comes from the fact that there is a separate fuse panel that has an open spot for a ground...

Based on the diagram, it appears that the switches must be wired to one another but are still wired separately from the ignition start. I assume this means that one of the "unknown" positive and negative cables leading to the starting battery, should operate ALL of the switches. I'm going to fiddle around with them and see if I can figure out which positive & negative combo power the switches.

Does that makes sense? The diagram clarified that there should be a positive and negative set of cables that powers JUST the switches...
 

NicoPags

Petty Officer 1st Class
Joined
Mar 24, 2014
Messages
217
I assume this means that one of the "unknown" positive and negative cables leading to the starting battery, should operate ALL of the switches. I'm going to fiddle around with them and see if I can figure out which positive & negative combo power the switches.

Sounds right to me. I realize now that my reply wasn't really your issue. but it could help in the future. Sorry for that.
If you can identify the power and ground intended to power your switch panel, your in business.


Edit: I lost my point again! Geeze I'm bad. Back to your question to separate the batteries or to not. Other members will chime in. When I was on a budget, I used one battery for the whole operation. For your case, I would get a deep cycle for the accessories if its in the budget. I recently just separated everything to a deep cycle other than starting.
 
Last edited:

Twhjelmgren28

Seaman
Joined
May 31, 2016
Messages
71
UPDATE: So I dug into the electrical a bit more last night and I believe I know what's going on. So what I thought was the fuse panel that was wired to the battery, I believe is only fuses for the switches themselves. As far as I can tell, all the switch panels I can find online have individual fuses in them and because this boat is a bit older, the fuses are just separate from the switch panel. I then followed all the accessory wiring and realized that each accessory was individually wired to one of my two batteries.

From here, I just put the ignition cables onto the starting battery and moved everything else over to the deep cycle.

HOWEVER, I would still like to clean the wiring up a bit because it is kind of ridiculous. I plan on buying the blue sea systems fuse box you actually had posted in the wiring diagram above.

QUESTION: Is it necessary to wire the positive end of the fuse box through a battery switch? Can I just wire it to the positive terminal of the deep cycle battery? Should I be aware of anything else when wiring this fuse box in?

Thanks!
 

NicoPags

Petty Officer 1st Class
Joined
Mar 24, 2014
Messages
217
You can wire it right to the battery using 10awg minimum. I stuck with 6 awg as I had it lying around.

Keep in mind that the + leading to the box will always be hot if that's the path you take. For a direct install, I believe the instructions call for a 125a Fuse be installed as close to the battery as possible on your main positive lead to the panel.

The battery switch is to integrate and manage two batteries into on your boat. Your fuse box (and starter) would draw from either battery depending on the setting. Battery switch usually offers Batt 1, Batt, 2, Both, Off. You don't need it to run the setup above. Having the battery switch does offer the convenience of killing all circuits during storage or non-use of boat. The fact that you would like to keep your accessories separate from your starting battery, the switch option may not be for you (yet)


iBoats has great prices on everything you need. I am Canadian and even with exchange and shipping it far exceeds local dealers. And shipping is quite fast.
 

Twhjelmgren28

Seaman
Joined
May 31, 2016
Messages
71
Great, I was wondering about that 125 amp fuse when I saw it on the instructions. I will go with that. Thanks again.
 

Twhjelmgren28

Seaman
Joined
May 31, 2016
Messages
71
UPDATE: So, I got everything wired up and nearly everything works perfectly.

Issue 1: My dash lights won't work - they are wired through the switch panel and the switch panel is wired to the new fuse box; the odd thing is that the navigational lights work and they are on the same switch (up=nav & dash; middle=off; down=dash only), it's just the dash panel lights that don't work. In addition to that, when I switch the lights on, my fuel gauge spikes all the way up - it appears that the lights are grounded (???) through the fuel gauge....ANY HELP IS APPRECIATED.

Issue 2: This is mostly unrelated to the wiring I just did. My reverse on the trolling motor hasn't worked since I got the boat - forward does work. The motor is older. There is a dial switch to control it, this dial switch wire runs to a control module that is back by the batteries, and the control module has a positive and negative coming off of it ...ANY HELP WITH THIS IS ALSO APPRECIATED.

Sorry for all the questions. THANKS!
 

Twhjelmgren28

Seaman
Joined
May 31, 2016
Messages
71
So, I did figure out my dash lights & fuel gauge. The ground was actually on the negative ignition cable - woot woot! So my new fuse block is all set!

Only question now is: Any tricks for fixing a trolling motor that won't reverse. It's mounted on the engine - forward works well with variable speed but reverse is completely dead. Like I said, there is the control dial, the control module toward the back of the boat, and the trolling motor itself. THANKS!!!
 

NicoPags

Petty Officer 1st Class
Joined
Mar 24, 2014
Messages
217
Glad you worked out the wiring. I've never owned a trolling motor but if you give me a model I can do some searching
 

Twhjelmgren28

Seaman
Joined
May 31, 2016
Messages
71
So I have been doing a bit of research myself but there hasn't been much to go on. The trolling motor is a Neptune EX120 (it's mounted on the lower unit). After I got the wiring switched to the fuse box, the motor now goes forward in the middle position and forward position but turns off in the reverse position.

If you find any info, that would be great. I think I may pull apart the control module and see if anything is loose in there.
 
Top