Floor and most likely stringer replacement/repair advice

tbone999

Seaman
Joined
Jun 8, 2010
Messages
64
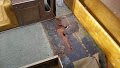
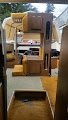
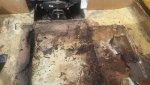
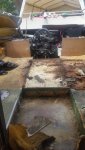
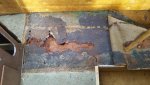
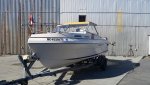
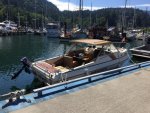
Hello guys, so I'm here looking for advice I have this 74 liberty that I have done mostly small visual upgrades (cut polishmade new teak hatches, tabs etc). The more I do the more I want to continue improving on her. So here it is I have a pretty decent soft spot on the rear port/stern area I'm looking to fix. I'm just assuming right away the stringers will need some help also, the good news is I just added trim tabs and the transom is nice and dry and in good shape. I'm hoping to remove the floors,up to the bulkhead but leave the cuddy alone as it is still super solid, the plan is to replace the bulkhead with thicker lumber and glass it In for added strength. I don't want to remove the engine for this job either, can this be done assuming the stringers don't need to be completely replaced?.
 

Attachments

  • image.jpg
    image.jpg
    180.7 KB · Views: 0

tpenfield

Moderator
Staff member
Joined
Jul 18, 2011
Messages
17,711
Usually it is in the stern area of the boat that needs the stringer replacement, so you may want to just get the engine out of the way and be able to do a better job of fixing things.
 

tbone999

Seaman
Joined
Jun 8, 2010
Messages
64
I'm not even sure yet if the stringers are bad, the boat seems to have a main glassed over floor which the cuddy is, a step down of sorts. Then raised area where the captains seat, table etc is which doesn't seem to be much more then plywood with carpet on it. Being that the transom is in such good shape I was hoping that maybe the stringers might be good or at least only need repair not replacing. I guess all I can do is ripe up part of the floor and see what's in store for me
 

Mark72233

Ensign
Joined
Jul 11, 2014
Messages
926
tbone999, you may have that 1 in a 1000 boat that has some deck rot but doesn't have rotted stringers, transom, motor mounts and bulkheads. I tend to agree with the philosophy that boats don't rot deck down they rot from the stern towards the front and from the bottom up unless you had a boat where someone stored it with the bow down then the front will be first. If your deck is soft anywhere it most likely has saturated wood in the transom and motor mounts. I will agree with you that your cabin stringers and bulkheads may be ok. On my boat which is a 1972 Thunderbird Formula the stringers under the cuddie cabin floor are all dry and solid. The bulkhead just in front of the tank right at the cabin entrance was rotted out though. My front motor mount that supported the twin inline 6 engines seemed very solid after all it had supported both engines. Turned out all the wood inside was mulch, the fiberglass was giving the impression it was solid. Take lots of core samples from several spots on your stringers, transom, motor mounts and bulkheads than you will have a better picture but even core samples aren't perfect they only tell you how the wood is right where you took the core from. Good luck with your project and I will be out here following along.
 

tbone999

Seaman
Joined
Jun 8, 2010
Messages
64
Thanks Mark, the funkie thing about this boat I'd it's a 74 but he went repowered late 90's early 2000 ish with a 3.0merc and alpha one, thay being said the bildge area and motor mounts etc look to be almost new that along with the transom seeming to be In good shape I'm wondering if someone started a job maybe replacing the transom with the motor change.... who knows I'll get a few more pics of the trouble area tomorrow, either way not diving into this job till at least late September or October. May as well get a season out of it
 

tbone999

Seaman
Joined
Jun 8, 2010
Messages
64
Ok guys I came to terms with the fact I didn't feel the might fish witch was safe to operate anymore this project I planned on doing in October would need to start now so......i started by removing the dinette and the floor under pretty much doesn't exists, I have found out the stringers are toast, just soaked and pretty much crumble when i touch them, take a look and tell me what u think. I'll be diving way deeper into it tomorrow and Im looking for advice pretty much every step of the way, what should I be expecting to spend on this?(ballpark) I am planning on doing 90% of the work or more myself

Thanks
 

Attachments

  • image.jpg
    image.jpg
    5.7 KB · Views: 0
  • image.jpg
    image.jpg
    5.7 KB · Views: 0
  • image.jpg
    image.jpg
    5.9 KB · Views: 0

tpenfield

Moderator
Staff member
Joined
Jul 18, 2011
Messages
17,711
The images are very small. Can you re-post larger images?
 

tbone999

Seaman
Joined
Jun 8, 2010
Messages
64
hopefully these come out larger, i was hoping to not pull the motor but that dream is dead now. The bilge area is solid but the wood behind it is soaked........this is gonna be a hull up resto!! with the way things are going i have no reason to believe the transom is any better. im hoping to do this job and stay in the 3g area is this realistic??
 

Attachments

  • floors 1.jpg
    floors 1.jpg
    42 KB · Views: 0
  • floors 2.jpg
    floors 2.jpg
    28.2 KB · Views: 0
  • floors 3.jpg
    floors 3.jpg
    38.2 KB · Views: 0

tbone999

Seaman
Joined
Jun 8, 2010
Messages
64
this is the boat for better reference.... love the look of the old girl!
 

Attachments

  • fish witch 1.jpg
    fish witch 1.jpg
    105.8 KB · Views: 0
  • fish witch 2.jpg
    fish witch 2.jpg
    96.7 KB · Views: 0

tpenfield

Moderator
Staff member
Joined
Jul 18, 2011
Messages
17,711
The boat does look nice . . . on the outside.

So, it looks like you will be doing the 'cut & gut' full restoration on the insides to get it looking good there too. :thumb:
 

tbone999

Seaman
Joined
Jun 8, 2010
Messages
64
Ok first question, I have started demo and I need to bring the boat down to my friends shop to lift the motor out, I'm worried since I've removed most of the floor that it won't have structure anymore, I've left the bulk head in. Am I safe to move the boat like this?
 

Woodonglass

Supreme Mariner
Joined
Dec 29, 2009
Messages
25,924
How far and what kind of roads? Unless they're Oklahoma "Cow Pasture" roads I'm thinkin you should be fine!!!;)
The bulkies and the top cap should be adequate support!:nod:
 
Last edited:

DeepBlue2010

Lieutenant
Joined
Aug 19, 2010
Messages
1,304
Are you still under the impression that your transom is solid. I noticed you came to this conclusion during installing trims. Trims are usually far away to the sides of the boat and may or may not give you a good indicator for the rest of the transom specially in the middle area of the boat where the rigidity of the transom is most required. Since you will be taking the engine off anyway, I would verify the status of the transom also with core samples behind the engine near the bottom of the transom
 
Last edited:

tbone999

Seaman
Joined
Jun 8, 2010
Messages
64
I am planning on replacing the transom as well, the stringers are so bad that I think I'd be a fool to think the transom would be any better, since I'm pulling the engine away I'm planning on fixing everything all at once
 

tbone999

Seaman
Joined
Jun 8, 2010
Messages
64
Question.... When it's time to put the new floors down I hear not to use any screws. What is the best way to set the floors for glassing? Im a few weeks from this. I'll add some pics tomorrow made some pretty good headway, floors and foam are mostly up tanks,batts and wires are removed and engine should be ready to pull in a few days, next week the sanding is gonna start
 

DeepBlue2010

Lieutenant
Joined
Aug 19, 2010
Messages
1,304
IMHO, The problem is not the use of screws, it is how you install them. I am OK with screws and I use them all the time but each and every one of them needs to be sealed. I squeeze a pulp of 5200 and roll the screws threads in them before I drive them in. It could be a little messy but it is a sure way the moisture is not going through the screws.

I also never screw to the stringers/bulkheads. I use a cleat board that is attached to them and drive the screws into these boards instead.
 

Woodonglass

Supreme Mariner
Joined
Dec 29, 2009
Messages
25,924
Yup to this^^^ Pre- Drilling and Coating the hardware IS the key!! A bit messy...TRUE but...If you do this, and do it well, then you WON'T have any issues...EVER!!!!:encouragement: You can also just use your resin to coat the holes and the hardware it'll work just fine as well. Use a toothpick to poke it down into the holes to ensure good penetration.
 
Last edited:
Top