1976 Volunte 14' Trihull Repair/Rebuild

Nottaclue

Seaman
Joined
Jun 28, 2015
Messages
58
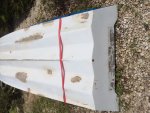
That was not easy! I had to go back to the grinder in spots and then used 150 grit over everything. Should I quit while I'm ahead or try one more thinner coat to fill in the last bits? Either way it is far from perfect, but the holes are covered and filled.
 

Attachments

  • image.jpg
    image.jpg
    107 KB · Views: 0
Last edited:

Woodonglass

Supreme Mariner
Joined
Dec 29, 2009
Messages
25,924
It all depends how "Anal" you are. I spent a LOT of time "Fairing" the bottom of my boat an I still didn't get it perfect. In retrospect I wish I hand'nt cuz I realize now that in the big scheme of things it doesn't matter all that much. If you want it "Perfect" then shoot the repairs with some rattle can primer and see what they look like. If you feel like they need more work, sand em down and use some 3M Premium Marine filler an thin it with some Acetone to make it runnier and easier to work with. It sands MUCH easier and will fill the smaller imperfections an smooth out the hull. The longer of a sanding pad you use the better it will be.
 

Nottaclue

Seaman
Joined
Jun 28, 2015
Messages
58
Thanks, having the boat a couple hours away and not right out in the backyard kinda forces me to plan out things a little more. I know I won't be able to get it 'perfect', but I can probably get it a little better than it is right now. I still have some pretty big humps and bumps in at least one spot that I am not happy with..maybe a belt sander will work better on that. I have a couple more days to think about it.
 

Woodonglass

Supreme Mariner
Joined
Dec 29, 2009
Messages
25,924
Belt sander would work, or as previously stated a 4 1/2" grinder with 24 grit resin coat discs should make short work of any humps. Just be careful and go easy. The fairing material and a broad knife will fill in any low spots left behind. That's the beauty of working with fiberglass.;)
 

gm280

Supreme Mariner
Joined
Jun 26, 2011
Messages
14,592
Belt sander would work, or as previously stated a 4 1/2" grinder with 24 grit resin coat discs should make short work of any humps. Just be careful and go easy. The fairing material and a broad knife will fill in any low spots left behind. That's the beauty of working with fiberglass.;)

If you are going to use a belt sander, go slowly with a very aggressive grit because I bought some really high-end belts for mine, and near instantly plugged them up making them useless in a mere minute or two. However, I did notice the longer you wait to sand, the less it plugs the sanding disks. If you can, wait a few days and try it... It seems to get harder the longer it cures... Just my personal experience... :thumb:
 

Nottaclue

Seaman
Joined
Jun 28, 2015
Messages
58
Ok, about that gel coat. What makes it such a PITA? From what I could tell from the video that the fiberglasssite has, it looks like the gel coat is applied in two layers (1st layer is thinned with some acetone and second layer with wax) and its rolled on with a short nap paint roller. Is there way more to it?
 

Nottaclue

Seaman
Joined
Jun 28, 2015
Messages
58
Won't be able to get back to the boat for two more weeks, but when I do get back to it I will have two full weeks to make a big dent in this project! My plan is to go one more round of sanding and then gel coat the bottom. Then I will flip it back over and check out the transom again. I think I do want to add that extra layer to the bottom. Should I go with 1.5 ounce CSM or 1708? How much resin should I make up at a time to add a full layer (about 70 sqft)? Should I try to do it all in one big batch or two or three smaller batches? The small patches I have made so far were easy enough to do all at once, but I have not done a large section yet...
 

gm280

Supreme Mariner
Joined
Jun 26, 2011
Messages
14,592
Won't be able to get back to the boat for two more weeks, but when I do get back to it I will have two full weeks to make a big dent in this project! My plan is to go one more round of sanding and then gel coat the bottom. Then I will flip it back over and check out the transom again. I think I do want to add that extra layer to the bottom. Should I go with 1.5 ounce CSM or 1708? How much resin should I make up at a time to add a full layer (about 70 sqft)? Should I try to do it all in one big batch or two or three smaller batches? The small patches I have made so far were easy enough to do all at once, but I have not done a large section yet...

This is just my opinion. I would never try to cover the entire hull at on time. WHY? Because the amount of time needed to get everything wetted and laid down correctly eats into the kick time of the polyester. So I did mine in about 4 foot sections allowing me to correctly work the section before starting the next. And that worked very well too. Of course you may work faster then I and can keep going without taking a break or worried about the poly kicking before I had everything down. And once it all is down, it is very hard to tell where you sectioned it up. It blends in that smoothly. But that if just me and others may like running one total layup. JMHO!
 

Nottaclue

Seaman
Joined
Jun 28, 2015
Messages
58
I think it sounds like a good idea to break it up into a few 4-5 ft sections. Should I actually cut the sections separately and then overlap them a couple inches or should I just roll out the whole length to keep the fiberglass intact and then apply the resin in 4-5 ft sections?
 

Woodonglass

Supreme Mariner
Joined
Dec 29, 2009
Messages
25,924
Sooo, you're going to grind off ALL the existing gelcoat and then lay down a layer of 1.5oz CSM and then re-coat with 3-4 coats of gelcoat building it back up to 30mils thick with gelcoat and then sand it back down and buff and polish??? I hope you understand the hours and hours of intense labor this entails. IMHO this is NOT the way to go.:eek: If you want to strengthen the hull it should be done from the inside. You should only do cosmetic repairs on the outside and keep them to a minimum. The hull was created in a Mold and you can NEVER create the smooth, uniform finish that the mold creates, doing it manually.
 

Nottaclue

Seaman
Joined
Jun 28, 2015
Messages
58
That isn't what I meant to say...after I finish the sanding and add two layers of gel coat on the underside, I am going to flip it over and add a layer to the inside because I am worried that it is a little too thin and flexible in some sections. Does the gelcoat require sanding and polishing after it is applied šŸ˜±?
 

Woodonglass

Supreme Mariner
Joined
Dec 29, 2009
Messages
25,924
Yes, it sure does. If you spray it on, it Orange Peels really bad. If you roll ir or brush it you'll have the marks to deal with. To get the smooth High lustre finish that you want requires a LOT of sanding starting at 180 grit and working thru 1000 grit and then using a buffer and polishes to finish it off. Applying it IS the easy part. That's why most of the guys Paint their boats
 

Woodonglass

Supreme Mariner
Joined
Dec 29, 2009
Messages
25,924
No sanding required between coats as long as you're in a contaminant free environment.
 

Nottaclue

Seaman
Joined
Jun 28, 2015
Messages
58
After another round of sanding I am still not happy with one section. I am going to try one more time to see if I can get it a little better before going for the gel coat! I will post some more pics soon...the boat pretty much looks the same at this point. Will roughing up the rest of the existing gel coat with 150 grit be enough to get a good bond to the new gel coat?
 

Nottaclue

Seaman
Joined
Jun 28, 2015
Messages
58
Ok, got it close enough! Going to try out the gel coat tomorrow. Will post some pictures. Is the working time similar to resin? I work pretty fast, but not sure if I can do a whole coat in one batch...
 

Nottaclue

Seaman
Joined
Jun 28, 2015
Messages
58
I am planning to roll it on and use a small brush for the edges. I only have 3/8inch nap rollers. I read that it is better to use shorter ones. Can I get away with the 3/8"?
 

Nottaclue

Seaman
Joined
Jun 28, 2015
Messages
58
Before and after shots
 

Attachments

  • image.jpg
    image.jpg
    148.2 KB · Views: 0
  • image.jpg
    image.jpg
    167.3 KB · Views: 0
Top