'88 starcraft resto

Mstoney

Cadet
Joined
May 25, 2015
Messages
6
'89 Starcraft resto

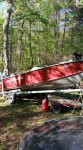
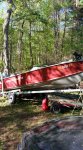
Picked up this 16' Starcraft for $300. Working on replacing the floor now. This is my first boat and resto. Looking for any tips and hints. I have 90% of the floor removed what's the best way to go about removing all the storage compartments and live well? Just drill out the rivets and remove? As far as re riveting do i just put the rivets in or do I need to put some kind of sealer? Sorry if these are stupid questions I'm an auto mechanic 1st time working on a boat and just want to make sure I do everything right. I'll post pics and updates as I go. I appreciate any help you guys can provide.
 

pappy3

Seaman
Joined
Jul 31, 2007
Messages
74
Hello and welcome to the forum!
I have an 86 16 deep-v dc and I habe just started tearing out! This is my second restore on the same model different hull!
The first was a side console this one is a walk thru windshield so there will be a lot to do!
I am going to use treated ply like i did the first time! I fitted it so tight to the hull it spread the gunnels out so they stood straight! They were pulled in without the flooring so make sure to measure the width from gunnel to gunnel at the widest part and then look at the width at the transom! There is a transition from straight to the beginning taper to the front! I turned the wood side ways because I wanted it all one piece to have the most strength from piece to piece!
I used stainlees screws to put the decking down, so there will never be an issue with bieng loose, although i had to pound and force the pieces in!
But you have to if your boat sides tilt inward, they should be vertical !
I plan on putting a coating that will seal it if i can do it cheap enough but if not i will put good quality astro turff, one with a rubber backing!
I tried with out anything and it gets to slick with fish slime, hahahaha!i have had my boat for about 9 yrs and it was kept inside or under a carport till the last 5 years now the floor and carpets are shot! The boat looked like nrw when i got it from a one ownerand it lived in a boat shed all its life!
Take pics inside and out of the before and i will do the same and load mine on my channel & you on yours!
 

Woodonglass

Supreme Mariner
Joined
Dec 29, 2009
Messages
25,924
DO NOT use Treated Plywood on an Aluminum Boat!!!!!! The chemicals in it will Eat your aluminum. Do some research here on the forum and the internet and you will learn very quickly about this fact!!!!!:eek:
 

Tnstratofam

Commander
Joined
Aug 18, 2013
Messages
2,679
Wood is 100% correct you should not use pressure treated wood anywhere on an aluminum boat. Most people here will use a good quality exterior plywood coated with epoxy or spar varnish. Wood has an excellent old timers wood sealer formula that will protect your deck better than most sealers alone. Good luck on your resto, and post up some pics of your project when you can.

Almost forgot :welcome: to iboats and to the Tinsanity.:tinfoil3:
 

jbcurt00

Moderator
Staff member
Joined
Oct 25, 2011
Messages
24,863
I also wouldnt recommend pressure fitting the plywod deck into a fiberglass or aluminum boat.
 

Mstoney

Cadet
Joined
May 25, 2015
Messages
6
Ya I've heard not to use pressure treated before and was planning on using an epoxy or something then covering it with that astro turf. So far I've got the compartments out and floor ripped up. Gonna take a shop vac to it tomorrow to get it all cleaned out. Then gonna start running the new wires. Thinking about using pvc under the floor to run the wires thru. Thought it'd give them a lot more protection. What you guys think?... I'll post pics of where I'm at tomorrow. thanks for the help.
 

Mstoney

Cadet
Joined
May 25, 2015
Messages
6
Hey guys just picked up an '88 16 ft starcraft this week just got the floor ripped up. tomorrow I plan on pulling the motor so I can get the transom out then start to put it all back together. This is my first boat restoration so any tips or hints would be greatly appreciated. I'll try to post pics as I go.
 

Attachments

  • image.jpg
    image.jpg
    101.7 KB · Views: 0
  • photo221940.jpg
    photo221940.jpg
    127.2 KB · Views: 0
Top