MikeCustomBaitPainter
Petty Officer 3rd Class
- Joined
- Feb 10, 2012
- Messages
- 81
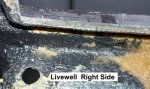
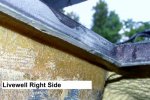
The Pic Posted In Pieces , It's Just Cut Up. As Far As I Can Tell The Livewell Is Plastic ,
The Hatches Are Recessed.
The Hatches Are Recessed.


OK now we're getting somewhere .. The livewell looks to be fiberglass from what I see in the pics . You could either do as I suggested or do as produceguy suggested and install cleats on the on the top inside walls of the livewell leaving it down at the right level so the top of the first layer of 3/4 is even with your cut . Then install another piece of 3/4 ply on top of that to bring everything back to the right level . You would grind down to fresh glass on all areas to receive new glass .. You may or may not need to install some stiffeners on the outside of the livewell for added strength..
What do y'all think ?
")
Isn't that in Canada ?I'm From Western Maryland.
Hey guys..Im kinda late to the party ( just rolled back into town ya know ).
Sure would have worked out a whole lot better if we just scuffed and glassed the under side of this puppy. Thrown in some ply under the ped for good measure. But as they say..hindsight is 20/20.
Well produceguy is right on the track. But if I may give you some suggestions here.
A. Make the deck piece ( on a workbench ) Exactly how its going to be Installed. Wood with fiberglass..both sides. If your going to have 1/4" of fiberglass on top of your wood..better do it now before you install. I would put 4-5 layers of 1708 on the bottom half just to be on the safe side. Resin coat the edges Real good..like until it wont take anymore.
B. Grind your well on both sides down to raw fiberglass ( forwards to back..about 4-5" down from deck level ). Prep/scuff your pre-glassed deck piece on the bottom two sides where it mates with the spots you ground in your well while your at it.
C. Dry fit your deck so it sits Spot on where its going to live. Support the thing with some strips of wood screwed on the top side ( basically its going to just hang there ).
D. Here is the real fun part. Your going to have to reach up inside that sucker and glass tab the deck piece to the sides. So here's what you do. Tape some plastic in the well so you dont make a mess. Now..With the deck out..cut some 1708 fiberglass strips the length of the 'Tab'..and about 10" wide. Call it 5 strips for each side. Mix up about a quart of poly resin. Resin coat the prepped areas on both the bottom deck and the well. Good. Put your piece into place..nice and tight. Weight it down if you have to. Now brush some resin on masking paper or thick plastic ( at least the size of your glass strips ). Put one layer of 1708 MAT SIDE UP on this and coat it with resin. Stack All 1708 strips on this pile, wetting with resin as you go. You need to get out as much air out of the stack as possible ( fiberglass bubble roller..squeegy ..whatever ). Take some scissors and cut the extra paper/plastic off from your stack. Now..unless you have a pair of horse arm length examination gloves handy..make sure your in a grinding suit with the gloves taped to the arms. Ok got this. Great. Grab that stack.. reach up in there and man handle that baby into place. About 5" on both surfaces. Being now that the fabric side of the glass is face out..you can rub your hand and work out any air pocket that are in there. Wasnt that fun? Goood..good. Aw Crap..Now do it again for the other side..
E. Have your better half make you a Smoothie. If you dont have a better half..well..screw it. Pop a suds or grab some Tropicana.
F. When thats all kicked off..go reach up in that channel or lip or whatever thats on the back end ( where the hatch lip is ) with some 36 grit or something. Yup..you guessed it..time to cut up some glass for that edge now. Do the same thing there..but with obvious different size glass cuts. Oh..and more than 3 layers might be too much to jam up in there.
G. The front edge of the deck piece. Hmm..well you might have to resort to using some angle alum and some screws on the underside there. Unless you can reach it..and If you actually Want to glass it..then have at it.
I guess you could do the wooden cleat thing. You are doing the same basic thing..but in glass.
On the outside of this..well there isnt really any room or place that you can glass tab, now that its all cut out and all. You would have to start getting into where your lids mate up. Real PITA. At this point..its not going anywhere. So you might just have to gap fill with some 5200 or something where the carpet is. Where the glass is cracked at the lids and exposed when opened. Hmm..might have to resort to repairing the outside and spray painting it ( the inside is already glassed from step F ). I dunno..lemme think about that. Just get to that bridge first
Oh..and there are several different ways to do this repair. This is just how I would personally do it...
Yack Doctor did you miss post #45