Replacing the wood Rub Rail

jermelger

Cadet
Joined
Apr 10, 2009
Messages
16
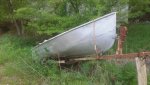
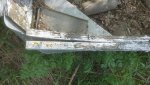
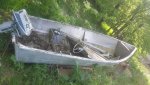
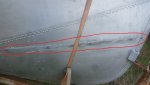
I have done some searching amongst the topics and am not finding a subject already here for this. I am looking to learn the proper way (if I don't know already) to replace the wooden rub rail on my 12 foot aluminum boat. This boat is stripped, it has a hood that bolts to the top front with a dash that holds the steering wheel, controls,etc and a windshield. I know how I would do this but I am wanting to make sure I am on the right path.

I would cut thin strips of wood and place them on the gunwale with clamps about every four inches gluing each strip one at a time using gorilla glue. Once thickness (not sure what thickness it should be) is achieved I would then use sanding/shaping tools to shape the rub rail how I think it should be then seal it with a good marine sealer.

Thank you for your assistance and time. I can provide pictures if needed. I have had the boat for about 5 years now wanting to make a project out of it, but an illness has set me back on all of my projects.
 
Last edited:

Scott Danforth

Grumpy Vintage Moderator still playing with boats
Staff member
Joined
Jul 23, 2011
Messages
47,478
post a pic.

if it is anything like a good friends '59 Larson crestliner, the wood rub rail is the top of the gunwale. we cut new strips from white ash, steam formed them to match the old wood, and varnished the snot out of them prior to screwing to the aluminum.
 

jermelger

Cadet
Joined
Apr 10, 2009
Messages
16
I will get a pic tomorrow after work. I will also try to find any identifying information. Maybe on the registration there is something. Unfortunately that is in a box and I am not sure where that is at the moment after the recent move.
 

jermelger

Cadet
Joined
Apr 10, 2009
Messages
16
No Title

Here are some photos with descriptions. Thank you for your help with this. I am excited to finally get started on my project. I would like to do a good job at it, but I am not planning on a show quality job, (I have many other projects that need to be show quality), just something that looks good shows good workmanship and is functional.
 

Attachments

  • photo220244.jpg
    photo220244.jpg
    149.7 KB · Views: 0
  • photo220245.jpg
    photo220245.jpg
    124.5 KB · Views: 0
  • photo220246.jpg
    photo220246.jpg
    131.3 KB · Views: 0

jermelger

Cadet
Joined
Apr 10, 2009
Messages
16
Darn the comments I had with the middle picture did not stick, The comments were I can see how the old molding was installed but I have reason to believe it was not the original wood. Bolts were used to install it, I would like to find something other than bolts for fasteners, and when this molding was installed it appears to be stressing the aluminum as can be seen in the picture where the wood ends. This is why I believe thin strips glue together on the aluminum one at a time would be better and shape better.
 

jermelger

Cadet
Joined
Apr 10, 2009
Messages
16
No Title

These pictures show molding (ribs) on the side of the boat. Not sure how thick these are suppose to be, but I would guess about 3/4 of an inch. There are fasteners installed where the holes are, but no molding was installed again. Not sure why.
 

Attachments

  • photo220248.jpg
    photo220248.jpg
    123.8 KB · Views: 0
  • photo220249.jpg
    photo220249.jpg
    141.6 KB · Views: 0

jermelger

Cadet
Joined
Apr 10, 2009
Messages
16
darn it, again the comments for the second picture did not stick. As you can see from the second picture the molding from the front ends and a second molding begins and goes all the way to the rear.
 

Scott Danforth

Grumpy Vintage Moderator still playing with boats
Staff member
Joined
Jul 23, 2011
Messages
47,478
looks similar to my buddies boat, both for the rub rails as well as the front strakes. not sure what the original wood was, however as I stated, we used white ash. we shaped it in a steam box to match the originals. I will look tonight for some photos.

you have the exiting gunwale pieces to use as a template. you will have to shape the other rails by trial and fit.


looks like your boat is missing the aft corner moldings that transistion from the gunwale to the transom, as well as the bow point.

here is a quick image I found with a quick google search of a boat similar to my buddies http://i.ytimg.com/vi/Zje731pMSgY/hqdefault.jpg

http://registrydrawing.yolasite.com/resources/Commodore.jpg
 

Woodonglass

Supreme Mariner
Joined
Dec 29, 2009
Messages
25,924
SD is correct but I think he meant White Oak and not Ash. You can use the thin multiple lamination method a well. Totally up to you. Steambending is not hard to do and with a 8' length of Schedule 40 PVC, a hot plate and a Steam Kettle you can be up and running in the back yard pretty quick.
 

Scott Danforth

Grumpy Vintage Moderator still playing with boats
Staff member
Joined
Jul 23, 2011
Messages
47,478
White oak would be better than white ash. We used white ash as we had harvested a bunch of white ash and just had some kiln dried and had it on hand.

we used a large section of old sheet metal duct work with a large hole cut out of the bottom as the steam box, we fed it with a propane turkey frier with water in the pot. 5 minutes of steam, a few minutes to clamp to the hull and we had wood shapped like the hull.
 

64osby

Admiral
Joined
Jul 28, 2009
Messages
6,799
I would say finding new transom caps and a bow cap would be first on the list. You will want to install those right after the new wood goes on.

My guess would be a 50's hull, by whom, no idea.

Have fun.:cool:
 

jermelger

Cadet
Joined
Apr 10, 2009
Messages
16
Thank you for all of the advice, it has been helpful. Woodonglass, do you happen to have any plans for a steam chamber? I was considering making one out of ABS, I would imagine it does not matter, but I was curious how I would maintain the temperature and supply of steam in the tube. Thank you.

I will have to look around inside the boat, maybe they are laying on the floor. I have not noticed them, but I purchased the boat in the condition it is currently in. If I cannot find them I will consider a PM to jbcurt00 for inquiry, Thank you again.
 

jermelger

Cadet
Joined
Apr 10, 2009
Messages
16
Scott, I am trying to picture the ducting sitting above a turkey fryer, only attempting to use a heat source similar as I do not have a turkey fryer, and some ABS/PVC sitting above it. I had even thought of using a water heater element and somehow fixing to a pot of water (I have access to both of those - lol) and fixing my pipe above that.
 

jermelger

Cadet
Joined
Apr 10, 2009
Messages
16
That is awesome, I really like how he has the steam entering in the middle. The most expensive part is the burner, but I can make a burner really easily, I can use my weed burner for that matter. :)
 

Woodonglass

Supreme Mariner
Joined
Dec 29, 2009
Messages
25,924
I modified mine a bit. I only capped one end, and when I slide the wood in, I stuff a towel in on the other end. Make sure and wear HEAVY Gloves cuz the steam will Burn you BAD!!!! You have about 30-45 secs to get the wood out and bend it to shape before it starts to "Set Up".

Good Luck!!!
 

jermelger

Cadet
Joined
Apr 10, 2009
Messages
16
I am in luck, I found the aft corner pieces. Looks like everything is there. I am currently working on a few things, trying to replace motor on my rototiller so I can get my garden in, I have the lower unit off on my 18 foot boat replacing seals and generally rebuilding it. I have to have that going so I at least have a boat for now. :)

Hopefully I will get to the aluminum boat soon, I will post pictures as I go.

I am going to have to be cheap, not sure the price of White Ash, (would love to use the expensive stuff) but any thoughts on cheaper stuff like fur?
 

Scott Danforth

Grumpy Vintage Moderator still playing with boats
Staff member
Joined
Jul 23, 2011
Messages
47,478
white oak would be better than ash for longevity. we used what we had
 

Woodonglass

Supreme Mariner
Joined
Dec 29, 2009
Messages
25,924
You can use Douglas Fir and it will bend...Kinda but you might need to do the thin laminate thing with it. If you use the Old Timers Recipe on it it'll last a good long time.
 
Top