1992 Crownline 196br stringers, transom and the whole bit

steely85

Petty Officer 2nd Class
Joined
Apr 18, 2015
Messages
121
Well. Im home from work and I'm ready to cut the stringers Today when I wake up. The transom looks great AND ready to get er done. :)
 

steely85

Petty Officer 2nd Class
Joined
Apr 18, 2015
Messages
121
UPDATE: :)

I have been working hard at it. I have all the stringers and bulkheads cut out and "mocked" up. I just need to notch one of the bulkheads and stringers to join them together. The transom is completely in and finished. I am still thinking about using one more layer of glass on the transom to get my thickness to where I want it. I currently have have 2 3/4 inch pieces of plywood and 4 layers of 1708 on it. The 3/4 inch plywood is a tad thinner than 3/4 inch so the total thickness of the hull and transom without the fiberglass is just shy of 2". It was way narrower than that from factory so I figure anything close to 2" will be better than stock. Here are some pics.
Here the resin is put on the raw wood.

Here the fillet is put on the wood using a spoon to spread it out.

Here is the finished transom with 4 layers of fiberglass. you will notice the patch on the right where I had to grind out some air bubbles.

I wasn't sure if it was necessary to grind out the air bubbles or not so I did it anyways. Any opinions on air bubbles? Leave them or grind them out? If I can leave small bubbles, how big is too big where they would need to be ground out. Thanks lol... I know it isn't pretty but no one will see it...
 

steely85

Petty Officer 2nd Class
Joined
Apr 18, 2015
Messages
121
It has been way way WAY to hot lately where my "shelter" has not been enough, so I went back down to good ol' harbor freight and bought a bigger tarp to try to keep the sun off myself. The new tarp is 23'x15', it is much better.
 

steely85

Petty Officer 2nd Class
Joined
Apr 18, 2015
Messages
121
Here are my motor mounts completed. I now have them tacked together at the proper spacing and level so tomorrow I will bed them in with PB. I will cut my PVC in half and bed them into the motor mount to allow for anything to drain into the bilge area. I think it will work out good.
 

steely85

Petty Officer 2nd Class
Joined
Apr 18, 2015
Messages
121
Well money is getting tight again between the boat and the wedding and I need more resin and expanding foam so I decided to work on the motorcycle. The gas tank and tail section needs one more coat of pearl before I can put it back on. While putting it together I noticed some spots that could use some peanut butter, so instead of making a batch and wasting a bunch of it, I decided to get my captains chairs out and fillet the crack between the seat and the back of the chair.


steely85

Petty Officer 2nd Class
Joined
Apr 18, 2015
Messages
121
Ooh ya, to all of you that are doing this kind of work, I put an old blanket over the back of the boat and zip tied it to the tow rail on the back. That way you wont end up with resin drops on your swim deck like I did... :( any idea on how to get that crap off other than sanding? It is on the textured part of the swim deck. I also have some resin around the outside of my keyhole that got there when I clamped the transom down. I got as much off as I could with the clamps there but couldn't get it all. Yay, I made more work for myself.(he said sarcastically).
 

steely85

Petty Officer 2nd Class
Joined
Apr 18, 2015
Messages
121
Today I re-measured and re-measured and realized I had cut my motor mounts to the exact height of the old motor mounts. I forgot to take into account that I will be putting 3 or 4 layers of 1708 on top of it, and that I will be adding a bit of foam underneath of them to keep the wood off the hull. I will let it sit over night and cure, then I will take some more measurements and if need be, I can plane or trim the tops a little more. I would rather add a few more layers of glass rather than cut off the top of the finished mount and put more glass on top. I guess I could measure the motor mount adjuster that is on it and find out how much wiggle room I have and cut accordingly??

I have also cut out the drain holes a little big and down at an angle so I can bed my PVC pipe I cut in 2/3rds in more peanut butter so again there should be no way water can touch wood. The question now is how the heck will I make the fiberglass lay down where those steps are and keep out all the bubbles.
 
Last edited:

steely85

Petty Officer 2nd Class
Joined
Apr 18, 2015
Messages
121
I might have to do this in steps:
1. Tab the bottom with my 6" then my 12".
2. Cut a sheet of fiberglass in a rectangle shape,
3. Make cuts where the steps are vertical and just lay fiberglass on the sides and over the top leaving out the vertical portions.
4. Cut a piece to just lay over the top and go 4" down the sides making relief cuts where the vertical portions are.
5. Re-do step 3.
6. Re-do step 4 but go a few inches further down.
7. Tab to hull using step 3.
8. Use peanut butter to fill in gaps and make it presentable.

That would make it so there is 5 layers on top and 4 layers tabbed to the hull. I'm sorry if this is confusing. I'm just brain storming. Any ideas or tips? And please let me know if this is a bad Idea to use so many separate pieces for motor mounts. Thanks.
 

steely85

Petty Officer 2nd Class
Joined
Apr 18, 2015
Messages
121
Well before I came to work I was able to put a couple of oats of paint on the motorcycle and put more fillet onto the motor mounts. Man is it Eating up my materials. I'm trying to fill in my stake next to my motor mount so it will be easier for the fiberglass to make the corner without bubbles. So far I have used about 4 gallons of resin between the transom and motor mounts andcoating my stringers with one coat of thin resin. I think I'm going to need one more 5 gallon bucket just to bed and tab my stringers in.
 

Corjen1

Lieutenant Junior Grade
Joined
Aug 24, 2013
Messages
1,237
Nice boat!! !ve been watching for a 196...Not to bust your bubble....Im 23 gallons in so far on my hull up restore....
 

steely85

Petty Officer 2nd Class
Joined
Apr 18, 2015
Messages
121
Nice boat!! !ve been watching for a 196...Not to bust your bubble....Im 23 gallons in so far on my hull up restore....

Thanks. We love this boat. it is super wide with the 8.6 wide beam. Makes it nice and less crowded.

And 23 gallons? Yikes. I was optimistic with 15 but figured I would need 20. However being less experienced probably 50 gallons be the end. :p. Should have just bought a huge barrel And been done with it.
 

steely85

Petty Officer 2nd Class
Joined
Apr 18, 2015
Messages
121
Well I had two days off and this ol' dog was so pooped I needed a day off sunday, but yesterday and today I was hard at it again. I got my main stringers and bulkheads in, I just need to go through them and finish the peanut butter job. I also opened up my second 5 gallon container of resin today, I'm assuming I will be about 7-10 more gallons before the deck is ready to be put on. I am hoping to have the rest of my stringers and bulkheads in the boat tomorrow, I might even start on fiber glassing the stringers in. :) Here are some pictures.


steely85

Petty Officer 2nd Class
Joined
Apr 18, 2015
Messages
121
Here is a video on my workstation. I have 4 large crates I got from a glass company. Once they are done with them they put them out in their driveway, so on my way to pick up paint I will stop by and grab one or two. They work great. Perfect height, sturdy and best of all... FREE. :)
 

steely85

Petty Officer 2nd Class
Joined
Apr 18, 2015
Messages
121
More progress was made today, I trimmed my bulkheads and fitted my outer stringers in the boat, made more measurements and cut out the rest of my stringer pieces and bulk head sections. I should be all done with cutting til I cut the stringers to height. I have waterproofed one side of everything and will be ready to start gluing it in tomorrow. I'm hoping to have all/most of the stringers and bulkheads glued in tomorrow so I can have all weekend to tab everything to the hull.

I am also wanting to order my expanding foam but I'm not sure how much to order, I really don't feel like re-measuring everything and doing the calculation. But if I must, I must. does anyone have any rough estimates? it is a 20ft boat and I will be using the 2lb kit. Thanks. Scott.
 

steely85

Petty Officer 2nd Class
Joined
Apr 18, 2015
Messages
121
Ok, so here is another question.
I have my motor mounts glued in and I think I am a bit too high after I used the foam spacers and peanut butter to glue them in. I was wondering if there was a guide in order to have the proper height or do I have to attach the gimbal plate and load the motor in the boat each time to measure for proper height? It is a 5.0 mercruiser with alpha one gen 2 stern drive. Thanks, Scott.
 

steely85

Petty Officer 2nd Class
Joined
Apr 18, 2015
Messages
121
Well another day has come and gone for me. This morning when I got home from work I cracked open a nice cold adult beverage and decided to finish waterproofing my stringers and bulkheads. That way when I woke up this afternoon I could just start gluing, and that is exactly what I did. :)
I had forgot earlier but I realized I hadn't test fit my gas tank. LOL.. but I put it in and it fit better and snugger than stock. Exciting news for me.
The second thing I did this afternoon was to glue in my outer stringers I have been warping on purpose the last few days.

Then I realized I was almost out of cabosil and put my order in for my 5 gallons of resin and 4 gallons of cabosil. It should be here in 3-4 days. Then I noticed I still had some time to kill before I had to start getting ready for work so I glued in my ski locker. The original I believe was 15" wide but I tacked and glued these at 16" wide just for a little extra space. I still have to wrap and install my ski locker floor.
 

steely85

Petty Officer 2nd Class
Joined
Apr 18, 2015
Messages
121
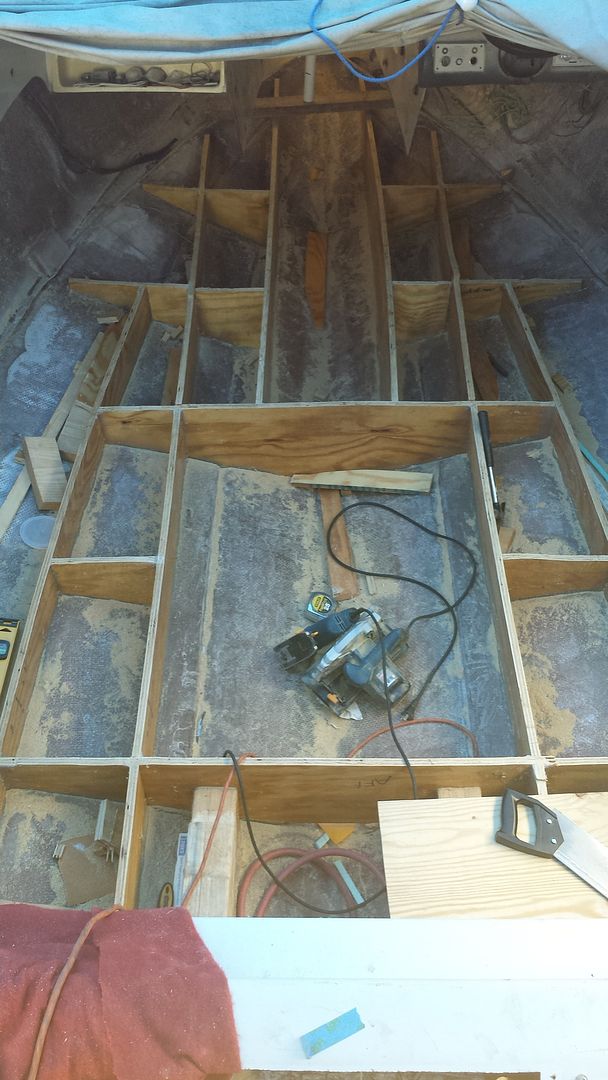
Another productive weekend has come and gone. I have all my bulkheads and stringers glued in and cut to deck height. It was a daunting task and scary making those cuts but no matter what it needed to be done so I measured 100 times and just went ahead and made it happen. I cut most of them right above my marks so I can knock them down with my belt sander and make the transitions section to section a little smoother. It is a little more work but it is better than cutting it too short. My main tools of choice were
1. Circular saw to make my initial cut in the center of the stringers. This gave me a spot to start with my jig saw.
2. Jig saw to cut down my lines.
3. Hand saw from sears. I used It on the corners. The jig saw left about 1.5 inches in the corners, so I took the saw to it and it worked really well.
4. Hammer. I had to hammer the corner pieces off because I had glued them in place with peanut butter. Those are some strong joints. :)


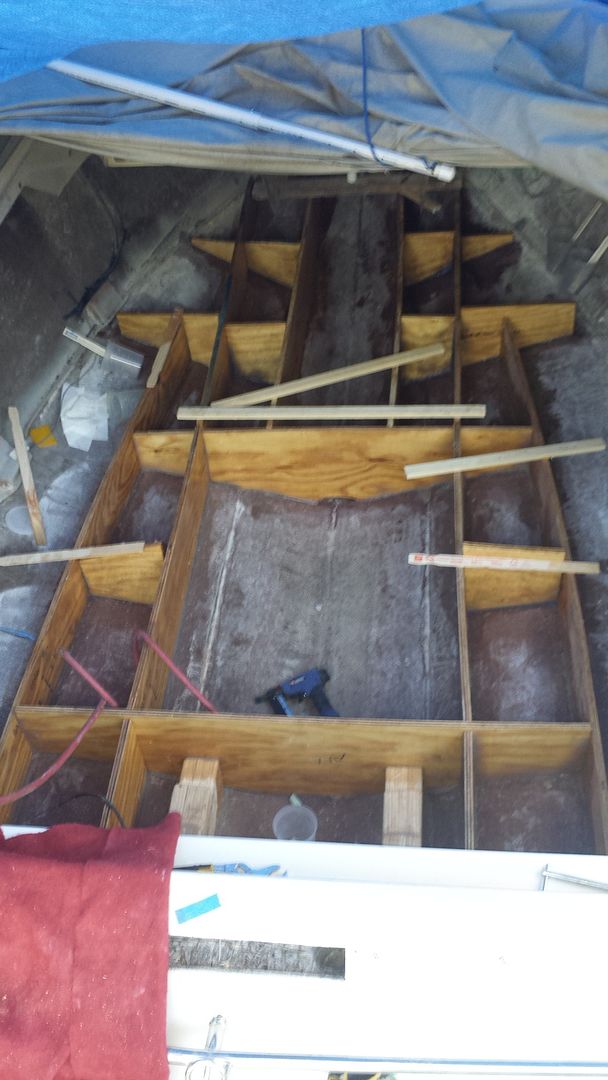
And here we are cut to height.
 

steely85

Petty Officer 2nd Class
Joined
Apr 18, 2015
Messages
121
I also cut out my keyhole and drilled out my gimbal housing plate holes. Most of the sites I read stated 5/8 inch but I found that would hit my gel coat, I used 1/2 inch drill bits using an angle drill tool from harbor freight.


I drilled from the outside in using a wood paddle bit, but when I got to a certain point I stopped and finished with a standard drill bit so I wouldn't ruin my fiberglass work on the inside. Worked like a charm. I still haven't fitted it, but that might be on the agenda tomorrow. I will probably have to widen the holes, not a big deal.
 

steely85

Petty Officer 2nd Class
Joined
Apr 18, 2015
Messages
121
As you can see I used a roto zip to cut out the keyhole, I was worried a jig saw would de-laminate or rip some of the fiberglass on the transom. It made nice cuts that I will have to smooth out with my angle grinder but it was a bit tedious. i also got to re-measure my transom width with the extra layers of fiberglass on it and it is exactly 2". You have no idea how happy that makes me. I believe I used 4 layers of 1708 on it. :)
 
Top