PROJECT SEA RAY

Mr.Stickney

Petty Officer 3rd Class
Joined
Oct 1, 2014
Messages
94
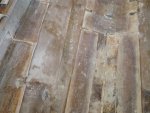
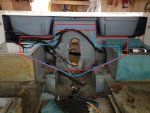
Ok, based on this pic of your transom, I'm assuming the following. The areas in red are the two layers of plywood to be replaced. The areas in blue will be the areas to be ground down and where the new glass tabbings will be applied to secure the new wood transom core in place. This should allow adequate bonding to the hull and secure the transom.


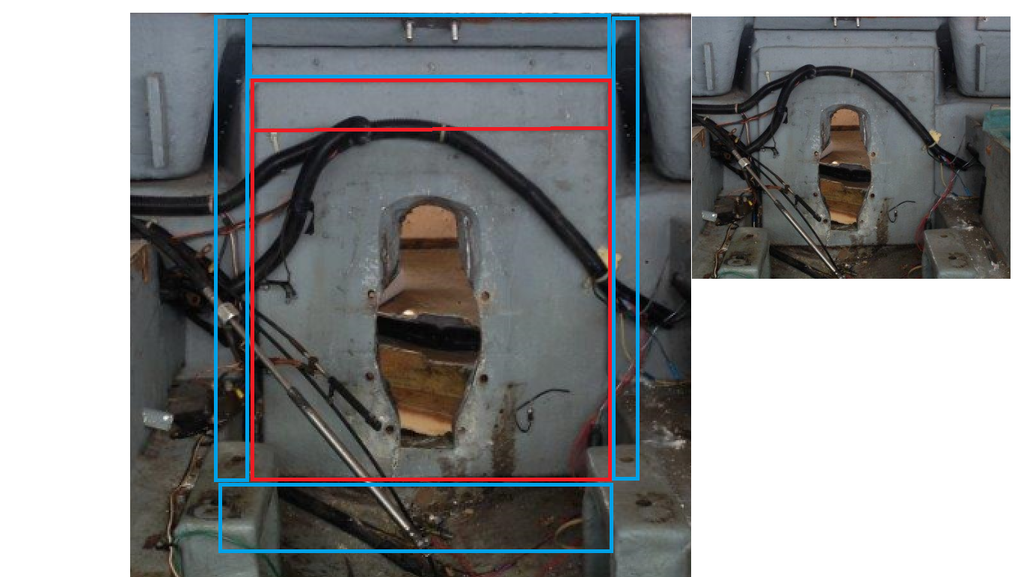
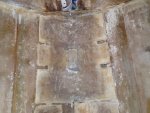
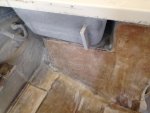
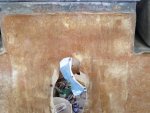
That would be a pretty good assumption. The transom actually extends to port and starboard in behind the jump seats right under the buckets for the swim platform. I have it ground out now but didn't get a chance to clean it so I didn't take any pictures yet. Will try and get some up tonight and get your thoughts on it.
 

Mr.Stickney

Petty Officer 3rd Class
Joined
Oct 1, 2014
Messages
94
semi off topic: I was gifted 4 gallon of long strand reinforced fiberglass filler. I know it tends to get a bad name and would never consider using it structurally, just wondering if anyone has any place that I could use it? Would it work for fillets? Sure would cut down on resin costs if I could use as filleting material.

I promise to get some more pics up in the A.M. still looking for the best Fiberglass source in Canada, if anyone has any suggestions Im open to em!
 

Mr.Stickney

Petty Officer 3rd Class
Joined
Oct 1, 2014
Messages
94
No Title

Well... its coming.... after a couple long days its mostly cleaned out. Some gel-coat still left in some "deep spots" in the glass but i'm thinking that should be fine. Still want to clean up the transom a bit more, mostly at the back and the corners. Hopefully tackle that tonight and start mocking up some wood on the weekend!
 

Attachments

  • photo221249.jpg
    photo221249.jpg
    54 KB · Views: 4
  • photo221250.jpg
    photo221250.jpg
    64.8 KB · Views: 4
  • photo221251.jpg
    photo221251.jpg
    72 KB · Views: 4
  • photo221252.jpg
    photo221252.jpg
    64 KB · Views: 4
  • photo221254.jpg
    photo221254.jpg
    67.9 KB · Views: 4

Woodonglass

Supreme Mariner
Joined
Dec 29, 2009
Messages
25,924
semi off topic: I was gifted 4 gallon of long strand reinforced fiberglass filler. I know it tends to get a bad name and would never consider using it structurally, just wondering if anyone has any place that I could use it? Would it work for fillets? Sure would cut down on resin costs if I could use as filleting material.

I promise to get some more pics up in the A.M. still looking for the best Fiberglass source in Canada, if anyone has any suggestions Im open to em!

The long strand will be fine for filleting and bedding your stringers. Free is good!!!!

For your transom install, I think you still have some work to do. You need to be able to wrap the glass around the edges in order for the tabbings to properly attach to the hull sides and bottom. The red circled areas show where the tabbings need to be able to extend out from the wood onto the surface of the hull. This area needs to be ground down to clean fresh glass so the new glass can adhere properly. What are the " Boxes" or bumped out areas on each side of the transom?
 

Mr.Stickney

Petty Officer 3rd Class
Joined
Oct 1, 2014
Messages
94
Thanks for confirming the filler would be good for filleting and bedding that makes me a very happy man!

I still have to clear the gelcoat from the edges of the transom, top bottom and both sides to adhere the tabbing/glass to. I'm not sure if you meant to upload a picture or not Wood, but I'm not quite sure what "boxes" you are referring to?
 

Mr.Stickney

Petty Officer 3rd Class
Joined
Oct 1, 2014
Messages
94
SWIM.jpg

Those are the swim platform recesses. It has dual buckets if you want to call it that. You can see what I'm talking about in this gem of a picture.

I haven't quite figured out what I'm going to do there yet, whether I can trim the core down to give me my proper tabbing dimensions or fill that gap, worst case It looks like I may have to do what Jacrispy did on his boat and hack the cap out... which I would like not to do for obvious reasons.
 

Woodonglass

Supreme Mariner
Joined
Dec 29, 2009
Messages
25,924
Alrighty then!!! Yeah, tabbing IS gunna be a problem with those in the way. Not sure how to get around that.
 

Mr.Stickney

Petty Officer 3rd Class
Joined
Oct 1, 2014
Messages
94
TRANSOM PLAN.jpg

This is my plan:

Red: OLD
Blue: New

Make the core material slightly smaller to allow 4-6" of tabbing area all the way around but instead of going with the two thicknesses ( one sheet with a smaller square sheet laminate on top, I plan to go with two fullsize cut outs (1-1/2" end to end , top to bottom) to hopefully take care of any strength that I may have removed by shrinking the core material.
 

Attachments

  • TRANSOM PLAN.jpg
    TRANSOM PLAN.jpg
    81.4 KB · Views: 1

Mr.Stickney

Petty Officer 3rd Class
Joined
Oct 1, 2014
Messages
94
Is there a hard and true method to figuring how much thickened resin to mix for adhering the transom? So much per square foot sorta thing?
 

Woodonglass

Supreme Mariner
Joined
Dec 29, 2009
Messages
25,924
Based on what I'm seeing for yours I'd guess-ti-mate about 3000 ml (3 quarts) I'd have 3 quart (1,000ml) containers of resin poured out, 6 quarts of cabosil (1,500ml) and 3 separate 10 ml of MEKP ready to go and then mix up 1000 ml batches as I needed them. That way you won't mix more than you need and pour back any that's not used.
 

Mr.Stickney

Petty Officer 3rd Class
Joined
Oct 1, 2014
Messages
94
Based on what I'm seeing for yours I'd guess-ti-mate about 3000 ml (3 quarts) I'd have 3 quart (1,000ml) containers of resin poured out, 6 quarts of cabosil (1,500ml) and 3 separate 10 ml of MEKP ready to go and then mix up 1000 ml batches as I needed them. That way you won't mix more than you need and pour back any that's not used.


Thanks WOG. Always got my back. That's a great plan.

This weekend might be install weekend for the transom. I have to go swap out my plywood on Friday, a buddy of mine did the wood shopping and wasn't the most diligent in his material selection.
 

Mr.Stickney

Petty Officer 3rd Class
Joined
Oct 1, 2014
Messages
94
Messed around Friday night getting all the wiring sorted out and tearing apart one of the bow seat backs that was rotten. Got the new wood cut out and bent to shape as I waited for a truck to go swap out some plywood. Got one piece cut and almost perfectly fit and then we realized my buddies basement was flooding, where all my interior parts are sitting. So needless to say not as much progress as one would hope.

Boy does she sure look good out in the sun though. Minus the low quality pictures...

IMG_0275.JPGIMG_0280.JPG
 

Attachments

  • IMG_0275.JPG
    IMG_0275.JPG
    111.1 KB · Views: 4
  • IMG_0280.JPG
    IMG_0280.JPG
    146.3 KB · Views: 4

Mr.Stickney

Petty Officer 3rd Class
Joined
Oct 1, 2014
Messages
94
Sorry about the lack of updates to the few that are following. I've been working on getting the gimbal and drive cleaned up (somebody brushed on some rubberized coating and its a mess), and painted as the vast amounts of rain around here have all but drown us. Not much room to work in the garage with the boat in there, certainly not enough room to maneuver the transom plastered with adhesive.

I got thinking about the thickened resin, correct me if I'm wrong, but aren't we essentially just making body filler? but instead of Talc using Cabosil? Just something that popped into my head while sanding..... oh the sanding....

Does anyone know of any adhesives in a tube that would work for installing the transom? I've read some guys using PL, but that scares me a little bit. There has to be an epoxy putty in a can or tube or something.
 

Mr.Stickney

Petty Officer 3rd Class
Joined
Oct 1, 2014
Messages
94
image_233039.jpeg image_233040.jpeg image700.jpeg

I know its been a while since updates but here is where we stand:

Transom is in and glassed - tabbed and two layers of 1708 - had to patch in a spot on the one side as we had some trouble getting it to lay down.

*** JUST NOTICED - it looks like there is some air at the floor on the right side. there isn't though just some discolouration of the filler I used to fill in the strakes, sanding the high spots down lightened it up a little bit, I think it was still a little wet when I took this picture as well.
 
Last edited:

Mr.Stickney

Petty Officer 3rd Class
Joined
Oct 1, 2014
Messages
94
stringers are bedded and the glass work has been started.I also got the false floor under the gas tank installed. I ended up doubling up the stringer width both for the new motor, and it made sense while splicing into the existing wood in the front as you can see in the middle picture.

First layer on the stringers is 1208 x 10" tape which I got for an unbelievable price. Its pretty nice stuff. Followed up with a layer of 1708.


image1100.jpeg . image800.jpeg image900.jpeg
 
Last edited:

Mr.Stickney

Petty Officer 3rd Class
Joined
Oct 1, 2014
Messages
94
had a spare block lying around so mocking up the mounts and bulkheads for the oversized motor has been much easier.
IMG_0366.JPG IMG_0367.JPG
 

Watermann

Starmada Splash of the Year 2014
Joined
Jan 12, 2013
Messages
13,753
Boy does she sure look good out in the sun though. Minus the low quality pictures...

fetch

Hey Mister if you don't mind a question about your trailer. This is the first time I've ever seen the exact same boat trailer as I have right down to the horrible stickers covering it's tubes and fenders. Mine came in the form of a donor boat 1988 19' Chris Craft cuddy. The title that came with the trailer lists it as a generic abbreviated term of being a "special made". What is the brand name your trailer is titled as?
 

Mr.Stickney

Petty Officer 3rd Class
Joined
Oct 1, 2014
Messages
94
Unfortunately I don't have the original title and it has been rebadged and retitled as a "homebuilt" for Ontario registration purposes. Im not sure whether this is the trailer it came with from the factory or whetther someone just got creative with the pin-striping. The three stripes on the trailer are the exact same three that are on the bottom of the boat just flipped upside down.
 
Top