Alumacraft Queen Marrie

woodstockmarine

Seaman Apprentice
Joined
May 6, 2012
Messages
37
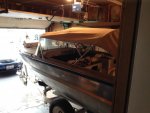
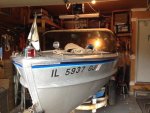
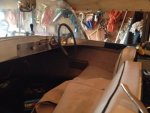
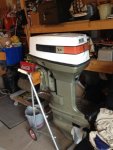
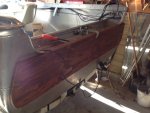
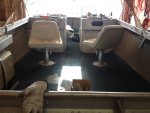
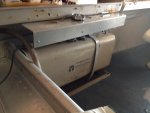
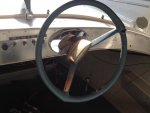
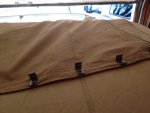
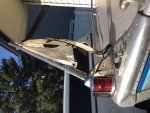
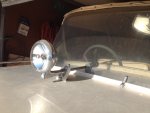
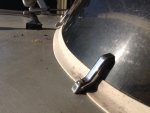
Picked up a 1964 Alumacraft Queen Marrie with a trailer and 50 HP Johnson. It has the original camper Canvas That is like brand new. Windows and cockpit cover also like new. Original seats have a little mouse damage but functional every thing is original on this boat.

The bad is I will probably have problems titling it . I have a signed title but one of the owners has passed and the other has moved to who knows where but I have put in the paper work and have 90 days to use it with the paperwork copy. we will see what happens Illinois is very picky about boat titles.

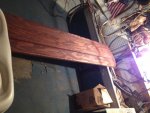
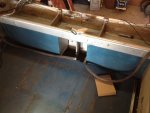
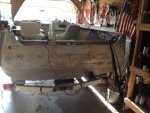
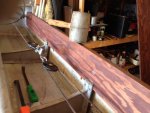
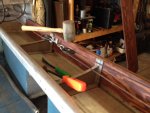
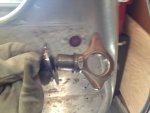
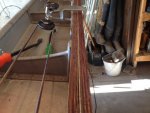
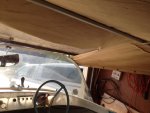
I am replacing the wood on the transom and getting it running. That is about all I have to do to get it functional.
 

Attachments

  • photo219486.jpg
    photo219486.jpg
    111.2 KB · Views: 0

woodstockmarine

Seaman Apprentice
Joined
May 6, 2012
Messages
37
No Title
 

Attachments

  • photo219492.jpeg
    photo219492.jpeg
    88.8 KB · Views: 1
  • photo219493.jpeg
    photo219493.jpeg
    77.1 KB · Views: 1
  • photo219494.jpeg
    photo219494.jpeg
    86.5 KB · Views: 1

woodstockmarine

Seaman Apprentice
Joined
May 6, 2012
Messages
37
The floor is original and sold. a little spring to the center but it is old wood. I an not sure if their was a non skid paint on the floor that was part of the original boat but it is flaking off. Im not really worried about that this year. The interesting thing that I have found is that in the back of the boat on the inside underneath the transom splash gunnel.... their is factory installed flotation foam incased in Aluminum that is riveted to the Transom Gunnel and slips under the floor .....bent at a 90 at the inside edge leaving room in the center for a bilge pump and axis to the drain plug.

When redoing the transom in this boat the added flotation makes it imposable to get to small bolts that are away from the center. Removing this Foam and aluminum casing wold be a huge job. So I took a wood chisel and gouged out enough transom wood to grab the head of the boat with vise grips. I wiggled the bolt back and forth until it broke off.

Took a while but the wood came off and was two separate pieces. the lower 1/4 was a separate rounded piece.

I cut the new wood in one piece using the old wood for a templet out of 3/4 Marine plywood. Yes I know White Oak would look better but I tried to find it locally and I could not. The marine ply wood is strong and will last for years and years.

To put the transom back on. There is on ether side, Two very cool looking chrome rings for pulling skiers that are a 3/4" through bolts above the transom splash gunnel.They go through out side and inside transom wood sandwiching them together on the aluminum.

The Motor bolts go thru also... For the bolts around the outer part of the transom I am going to use 1/4-20 stainless thru bolts with brass Riv nuts.

Because i can't get to the inside of the transom to put a nut on a bolt I have to use Rivets below the splash gunnel. I will drill the clearance hole through the wood and the aluminum transom then remove the wood and open up the hole in the aluminum to the correct size for the rivet. I install the rivets and then line up the holes and bolt it together.


the holes that are no longer used in the transom will be filled with RTV Silicone and I will put a good bead of silicone on the wood around the edges before i put the wood on and screw it together.

I will add some pics later
 
Last edited:

jbcurt00

Moderator
Staff member
Joined
Oct 25, 2011
Messages
24,862
Nice looking Alumacraft.

Look forward to seeing ya work on her
 

Backwaters2

Seaman
Joined
May 25, 2011
Messages
68
I had a 58' Queen Merrie too and the foam in the back with the aluminum surround was not worth tampering with. I used a nice piece of red oak that stained up very well.
Great boats and a great find!
 
Last edited:

woodstockmarine

Seaman Apprentice
Joined
May 6, 2012
Messages
37
Yes definitely not going to mess with the foam in the back. The Riv nuts will work fine.

It is hard to believe how well this boat is put together. I be working on her today. I will post some pics
 

woodstockmarine

Seaman Apprentice
Joined
May 6, 2012
Messages
37
As a side note I wanted to explain that I also sell new boats part time for a local marina. I work the Chicago / McCormick Place boat show and the Lake County show and fill in a few weekends a year. Sales ave been strong this year.

We sell Alumacraft, South Bay, and Monterey. I have checked to every brand of boat on the market that are represented at the shows I work. In the past we have carried Tracker and Crestlinner. and I have driven seen and sold all different brands in used boats.

For what it is worth my opinion is that in NEW Aluminumn? Alumacraft and Lund are superior builds. The prices on the boats ? well just say have fun making the payments for 15 years!!! No kidding?. Most normal boaters go out every weekend when they first get their new boat. that tapers off to 5 or 6 weekends a year and that tapers off to the boat sitting parked in the drive way all year.

The Vintage Alumacraft are really built well. I have had quite a few late 50?s 14 FD models that even though they were very well used had no seeps or leaks what so ever.

I like the vintage to be as close to original as they can be but every one that I have had has ether home made platforms, cheesy carpet, holes drilled where different things have been mounted. It is all fixable and is the first stuff that I tear out when I get one.

This boat had a blue plastic carpet that was wrapped around wood that was bolted to the inside gunnel all the way around the boat.

This boat also has a side 9 gal Long Cruse Gas tank that is built in. It looks like a factory installed item because f the Formed Aluminum top piece that is riveted to the gunnel and the rivets look consistent with the fabrication on the boat.

I pulled the gas tank an it looks rust free inside so I flushed t out and I will re install it today.
 

woodstockmarine

Seaman Apprentice
Joined
May 6, 2012
Messages
37
No Title

Here is the foam Flotation inside of the transom and the transom without wood
 

Attachments

  • photo219630.JPG
    photo219630.JPG
    103.3 KB · Views: 0
  • photo219631.JPG
    photo219631.JPG
    118.1 KB · Views: 0
Last edited:

woodstockmarine

Seaman Apprentice
Joined
May 6, 2012
Messages
37
No Title

have to et the inside transom wood started in the slot and tap it down with a rubber hammer until it pops in.
 

Attachments

  • photo219632.JPG
    photo219632.JPG
    89 KB · Views: 0
  • photo219633.JPG
    photo219633.JPG
    110.8 KB · Views: 0
  • photo219634.JPG
    photo219634.JPG
    112.6 KB · Views: 0
Last edited:

woodstockmarine

Seaman Apprentice
Joined
May 6, 2012
Messages
37
No Title

A pic of the cool looking tow rings next to the 3/4 through hole. I have to get a 3/4 hole saw the smallest i have is 1". played the outside wood on with a clamp just to take a look as to how it fits. looking good
 

Attachments

  • photo219635.JPG
    photo219635.JPG
    81.4 KB · Views: 0
  • photo219636.JPG
    photo219636.JPG
    102.2 KB · Views: 0
  • photo219637.JPG
    photo219637.JPG
    100.5 KB · Views: 0
Last edited:

woodstockmarine

Seaman Apprentice
Joined
May 6, 2012
Messages
37
No Title

Built in Long Cruse Tank. Looks factory? but I am not sure.
 

Attachments

  • photo219638.JPG
    photo219638.JPG
    87.6 KB · Views: 0
  • photo219639.JPG
    photo219639.JPG
    76.4 KB · Views: 0
Last edited:

woodstockmarine

Seaman Apprentice
Joined
May 6, 2012
Messages
37
got the tank reinstalled and the wood is mocked up ready for drilling. I have a wiring problem with the motor. Long story but it will take some learning on my part.
 

woodstockmarine

Seaman Apprentice
Joined
May 6, 2012
Messages
37
No Title

The top un zippers and the middle zips open so you can standup and drive while the tops still up. Uses clips to fasten to the top of the windshield Pretty Cool the way it works.
 

Attachments

  • photo219642.JPG
    photo219642.JPG
    84.4 KB · Views: 0
  • photo219643.JPG
    photo219643.JPG
    101.5 KB · Views: 0
  • photo219644.JPG
    photo219644.JPG
    87.6 KB · Views: 0
Last edited:

woodstockmarine

Seaman Apprentice
Joined
May 6, 2012
Messages
37
No Title

The bow light is awesome with the removable flag pole has a spot light that works and an air horn that needs some attention to get working again.
 

Attachments

  • photo219645.JPG
    photo219645.JPG
    122.7 KB · Views: 0
  • photo219647.JPG
    photo219647.JPG
    91.9 KB · Views: 0
  • photo219648.JPG
    photo219648.JPG
    95.5 KB · Views: 0
Last edited:

woodstockmarine

Seaman Apprentice
Joined
May 6, 2012
Messages
37
Got the motor cranking over now and i put the remote back together. Keeping the ball against the spring and into the lever slot took some trial and error but I figured it out and it is ready to see if the motor will start. More to do next weekend, Drill the holes in the transom wood and install the Riv Nuts and bolt it together. I am going to run the motor on the stand and make sure the water pump is working before installing the motor on the boat. After that I will see if it floats and take it for a spin.
 

Itsogood

Seaman
Joined
Apr 21, 2015
Messages
57
Very cool AlumaCraft.... I am so jealous because I want one of these really bad. Bought my first Alumacraft last summer and have it started and your project is very helpful to me. The transom work is just what I need to get after soon and seeing how you are doing yours is a great thing to see. By the way love the pic of the rubber mallet sitting there to show to use that to knock the piece into place.... got a good laugh at it just sitting there on the cable and piece of wood you were knocking down with it.
 

Itsogood

Seaman
Joined
Apr 21, 2015
Messages
57
Oh by the way mine is an AlumaCraft 1958 Flying C and was in horrible condition when I picked it up from a junk yard. Paint was peeling on inside and out... everything under the sun had been bolted all over the place on it. The bow cover had been hacked off to about 3 feet left. The seats were gone... dash board gone.... it was unrecognizable for the most part. I love the bow light that was on there too. Mine is in horrible shape tho... chrome is all pitted and flaking off... would love to be able to locate one in better shape to mount it back up there when the restore is completed. My thread on the boat shows pix and explains some of the stuff happening to her. Love the lines on these old tinny's AlumaCraft made back then.... the transom is about my fav part of the boat.... Love that Aquaduct transom on them.
 
Top