1983 Starcraft restoration

JerryB1987

Seaman
Joined
Apr 19, 2015
Messages
62
IMG_20150419_154531050_HDR.jpg 
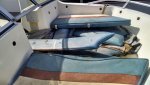
My wife and I just obtained this 1983 StarCraft. We don't know the model as we don't have a manual or the registration yet. The widow of the previous owner is going to get the manual to us later.

The previous owner had pretty much gutted the interior, all the seats are removed, the battery is missing and there is no carpet. IMG_20150419_154608968_HDR.jpg The boat had been untouched and left in the open for over two years. Any ideas on the best way to get started would be greatly appreciated. I have most of the water (which was snow melt) out and stuff is starting to dry but other than having to do a lot of cleaning we are not sure where to start. We want to get the inside put back together then have a local marina check the motor and wiring for us. The more we can do ourselves the better as we enjoy the idea of the project.
 

Tnstratofam

Commander
Joined
Aug 18, 2013
Messages
2,679
:welcome: Looks like the hull is in pretty decent shape. I'm betting the stringers, deck, and transom aren't. Before you get to far into your project you should try and verify the structure of the boat is sound, and that the flotation foam isn't waterlogged. From the pictures you posted at the very least the deck will need redoing. Drill some test holes in the stringers you should be able to reach in the ski locker to see if they are rotted. If the wood shavings are dark brown and or wet then you are probably looking at a total gut and rebuild. If by some chance they come out dry and golden then you will need to move to the transom for further test holes. On the transom drill in about a quarter of an inch ***From The Inside*** starting at the bottom and working across and up to check it as well. If they too come out nice and dry and golden then you can figure a plan of attack at bringing her back to a usable, state.

Post up some pics of your progress and post any questions you might have along the way. You've come to the best place on the webb for bringing an old boat back to life.
 

jbcurt00

Moderator
Staff member
Joined
Oct 25, 2011
Messages
24,871
Only thing i'd add is that I'd recommend drilling 1-1.25" deep holes on the interior of the transom, not 1/4" deep holes. You can make a depth gauge w/ tape on a 1/4" drill bit:
dowel_drill_depth_marking.jpg


Welcome to the dry dock iboats
 

Tnstratofam

Commander
Joined
Aug 18, 2013
Messages
2,679
Thanks jb somehow I dropped the 1 inch off my measurement.:facepalm: My head was saying one thing but my hands typed something different.
 

JerryB1987

Seaman
Joined
Apr 19, 2015
Messages
62
The hull looked good before I agreed to take the boat and the inside was covered with what was left of a tarp and the seats. These were wide pictures to show the general shape the boat is in. It is our first boat so we are total beginners to fixing it up but I can't afford to have the marina do it for me and want the experience anyways :) I'll take more detailed pictures tonight. I'm hoping the water that keeps filling the ski locker will be out soon so the boat can dry out. Since the boat sat outside uncovered for so long I expect everything that can get waterlogged is.

The boat is fiberglass so there is not a lot of plywood visible. In fact so far all I can see is by the gas tank and , to show how new I am, whatever the other tank is :lol:
IMG_20150419_164848673.jpg IMG_20150419_154551678.jpg
 

JerryB1987

Seaman
Joined
Apr 19, 2015
Messages
62
IMG_20150420_193741208.jpg Well, I think the question of the stringers has been confirmed. The black pieces are what is left of the end of the wood where it was accessible near the ski locker, that they are waterlogged is an understatement. So now how do I go about removing the fiberglass floor, so far at lest I haven't found any screws or anything that would have held it to the stringers but I assume there must be under all the gunk someplace.

IMG_20150420_193207598.jpg The floor here just aft of the ski locker is very spongy, we even heard a crack when stepping on it lightly :eek:

IMG_20150420_192018624.jpg There is foam on the port side, the PO had scrapped away the foam on the starboard side where the drivers feet should be. Its really soggy and stinks so I hope I was right in starting to scrape it out:embarassed: it has moss growing in it.


IMG_20150420_192029769.jpg The foam goes up the sides of the boat and you can see the waterline in it where it is soaked. Should I scrape all of the foam out and have it refoamed when the boat is ready to put back together :confused: I don't want to add extra expense so it turns out to be cheaper to buy a new boat before I am done, but I also want to do it right. Thanks for the help :D
 

jbcurt00

Moderator
Staff member
Joined
Oct 25, 2011
Messages
24,871
I'm hoping the water that keeps filling the ski locker will be out soon so the boat can dry out. Since the boat sat outside uncovered for so long I expect everything that can get waterlogged is.
Not likely to actually dry out once waterlogged, the flotation foam below deck is probably compromised and needs to come out.

Drier so it's less funky to work on really isn't likely to happen either.
 

Tnstratofam

Commander
Joined
Aug 18, 2013
Messages
2,679
Okay so it would appear that the boat has sat partially uncovered long enough for water to soak the foam and wood. These are all fixable. The question begins is this the boat you want to spend the time and money to restore. I would take a look at friscoboaters SeaRay rebuild both here and on you tube. It will give you a good idea of what to do, and what's in store.


As far as where to start. I would start by removing the motor. There are instructions on how to build an outboard motor stand here in the forums. You can do a search for them. Then I would get a circular saw and set the blade depth to just past the thickness of the deck. Then cut out the deck in sections leaving approximately 3 inches of deck attached at the sides. You will take this part out later. That will give you access below deck to the stringers and waterlogged flotation foam. All the foam needs to be removed and discarded.


make sure you wear some type of respirator to combat against the fiberglass dust and any mold that has grown in the rotted wood or foam.
 

Tnstratofam

Commander
Joined
Aug 18, 2013
Messages
2,679
Almost forgot the other tank next to your gas tank looks like an oil tank for the gas/oil mix for the motor. Allot of guys do away with this and mix the oil and gas together themselves in the tank. Some newer motors have the oil tank internal on the motor.
 

Chinewalker

Fleet Admiral
Joined
Aug 19, 2001
Messages
8,902
For more Starcraft specific stuff, check my rebuilds (either here or on Share-A-Project). Their construction methods were more or less the same for many years and most models of glassers. In my experience, if an old glass Starcraft has been left uncovered, it WILL be soaked and rotting. They simply didn't build them to last 30 years. The hull layup was generally good. However, the wood was cheap & unsealed. The glass mat for the stringers was poorly saturated where it was made to connect anything to the hull. I've rebuilt three Starcrafts and all had the same issues. That said, when I was done, I was VERY happy with the finished result. That's part of the reason I kept going back to Starcrafts when I was looking for the next project. The hull design was really good, rides well, looks sharp. As noted above, you'll have to decide how much you like the boat and how badly you want it.
 
Last edited:

JerryB1987

Seaman
Joined
Apr 19, 2015
Messages
62
I figured that other tank was oil, I haven't opened it to look as during the week I only have about an hour a day to put into the boat and have been trying to get it ready to open up and start getting the foam out. There is still water building up in the ski locker so there is no doubt in my mind the floor has to come out to get all the waterlogged foam out of the boat. Started to remove the hardware along the top to get ready to take the boat apart so I will be able to get at the flooring under the front seats. Probably be this weekend before I can lift off the motor and get the transom cap off to start removing it
 

JerryB1987

Seaman
Joined
Apr 19, 2015
Messages
62
IMG_20150422_183033895.jpg Only having about an hour a day during the week stinks. Todays goal will be to finish removing the handrails and this bumper strip along with any other screws that I can see that look like they might keep the top from being lifted off. Tomorrow I plan to see if my neighbor has a engine hoist otherwise I will have to buy a come along to lift the motor once I get it disconnected.

IMG_20150422_183105118.jpg Probably not needed but since I hope the bumper is still flexible enough to reuse I marked it then set out to get it out of the track.

IMG_20150422_190542594.jpg Well that was a bit of a pain but look at what I found. a LOT of rivets and some screws and a few holes at least in the metal .... I think someone has been in here before and that scares me a bit since there is no way to know what they did when putting the boat back together if they lifted the top off. If they used an adhesive this could be harder than I was hoping for after reading there usually is none holding the top to the bottom of the hull.
 

Tnstratofam

Commander
Joined
Aug 18, 2013
Messages
2,679
I wouldn't be surprised at the rivets and screws in the rub rail channel. It doesn't necessarily indicate someone has had the top off before. It could have been coming off and a previous owner (po) tried to reattach it. The extra rivets could have been done that way at the factory as well.
 

JerryB1987

Seaman
Joined
Apr 19, 2015
Messages
62
IMG_20150425_144937724.jpg I have to admit I am more nervous about trying to remove the motor than any of the other things that have to be done to get this boat on the water again. I have seen several topics about lifting the motor and putting it on a stand but really nothing about disconnecting it and this has a lot of connections that don't seem to be obvious on how to disconnect them. Here the throttle cables go through this plastic block which has no give to it. I am guessing you take out the bolt that holds the clip both lines are going through and then unhook them from the lever they move then the plastic block would slide up. Is that right?

IMG_20150425_145008883.jpg I am guessing these power the tilt from where whey are mounted. The motor will not turn left or right AT ALL when the steering wheel is turned, and it only turns a little ways before there is too much pressure to continue turning it. Is this normal when there is no power (the battery is missing) or should it be able to turn in which case something is holding the motor from turning. Since I can't turn the motor I can't really see how or where these wires go at the moment.

IMG_20150425_145028530.jpg Here are the other big bundle of wires and I think the gas line (haven't followed it back to be sure that's what it is).

IMG_20150425_145034508.jpg Where that bundle enters the engine compartment, they twist around stuff, some go to the other side of the motor to a terminal block, some go to points on this side of the engine. I should be able to get enough light to see where these go and disconnect them if this is the right way to do it. Or would it likely be easier to disconnect the wires at the panel and pull them through the bulkhead leaving them attached to the motor. That would mean taking the throttle apart and I haven't even looked at what that would involve.

I have already found a couple of wires that don't connect to anything. I was planning to take the boat to the marina to have the motor checked over after I get the floor replaced and put the motor back on so they have the whole thing to fix any wiring issues. It's been years since I did any kind of engine work and don't have the tools or books to use to figure it out so that part will probably be left to the professionals..... don't need a wiring fire because the PO did something funky and in my ignorance I repeat it when reassembling the electronics.

Any guidance on what and how to disconnect the motor prior to lifting it would be greatly appreciated.
 

JerryB1987

Seaman
Joined
Apr 19, 2015
Messages
62
IMG_20150425_160657802.jpg Steering update: I disconnected the green nut from the end of the red rod and the motor will move left and right freely, the rod does not move at all and I would think it should slide in and out of the mount to turn the motor.

IMG_20150425_160710596.jpg This is the steering cable which is the other end of that rod that doesn't move. but with its retaining nut removed the steering wheel and this cable move. When you are standing in the boat looking back the motor appears to be straight ahead but the wheel was FULLY turned left. Once I loosened the retaining nut the wheel could be turned and the cable slides out of the mount, not enough to be fully exposed before running out of revolutions of the steering wheel but enough I should be able to get it out once I lift the motor loose. Am I correct in thinking this cable should be attached somehow to that rod that isn't moving and that I will have to tear the mount apart more to fix it and somehow free the rod up to slide in and out?
 

Woodonglass

Supreme Mariner
Joined
Dec 29, 2009
Messages
25,924
Yup but, getting that cable freed up and working may NOT be feasible. Most people have very little luck in that endeavor. You can get total new systems for $120 bucks.
 

Tnstratofam

Commander
Joined
Aug 18, 2013
Messages
2,679
That's what happens with poor maintenance or lack of any over several years. Cables stick due to rust, floors stringers and transoms rot, fuel lines dry rot, gas turns to varnish in carburetors, generally everything goes to crud. However that's what makes restoring an old boat interesting. You learn how to fix everything making you a much more capable boater. You learn your boat inside and out which makes you the person at the lake with generally the best chances of having a great day of fishing or boating in general.
 

Tnstratofam

Commander
Joined
Aug 18, 2013
Messages
2,679
You may be able to spray penetrating oil down the steering tube to free the rod and cable, but it may be to rusted to free. There may also be allot of hardened grease in the steering tube. Look on the front side of the steering tube for a zerx grease fitting. You may be able to pump a little fresh grease in it to loosen things up a bit.
 

jbcurt00

Moderator
Staff member
Joined
Oct 25, 2011
Messages
24,871
It's supposed to be a smooth stainless steel shaft that moves in and out of the tilt tube, yours has seen better days, so its likely to be difficult to get it working smoothly again.
 
Top