Best foam density for under a floor?

lmuss53

Lieutenant Junior Grade
Joined
Sep 9, 2008
Messages
1,227
What is the best density for under a floor, and how much to fill a 2'x4'x6" void?

I went with the pool noodles and detergent bottles under the floor in my Sea Nymph, but there is a gap in the back where they left out one cross brace in the center console. Because I went to a side console layout the place where the CC was is now part of the open floor. The floor is a little bouncy right there and I want to cut a hole and pour in some foam. I will dig out the pool noodles in that area and put a seat base in where I cut the hole. The crossbraces fore and aft will act as dams to keep the foam in that area. During the build I put the drainage channel back in so the foam will not get down to the keel and interfere with drainage.

I've heard about bowed up floors from pouring too much foam into a void under an already layed floor. Would several smaller pours be the best way? I don't want to pour in too much or too little, so I will go with what the forum suggests. I have two seat bases so I am OK with 2 holes if that would be better. I am also OK with one hole right in the middle and an inspection cover right there if thats the best way, but that would be the least desirable route.
 

Woodonglass

Supreme Mariner
Joined
Dec 29, 2009
Messages
25,924
The 4lb IS a very High Density foam and would work well for this application. You've got about 4 cubic ft to fill.

The most commonly used Pour In foam used in boats is this... and IMHO would work just as well for you. Don't know if there is a "BEST" Pour in foam. Each density has it's purpose.More questions? [Try our Foam FAQ.]
2 LB Density Urethane Foam
(U.S. Coast Guard Compliant Marine Foam)
Common Applications: Our 2LB density marine foam is recommended for void filling in nonstructural applications. This product can be poured underneath decks and inside cavities where a lightweight flotation foam is needed to provide buoyancy. This foam has been tested in accordance with U.S. Coast Guard Regulation # 33 CFR 183.114 . This foam is approximately 95-98% closed cell which resists absorbing water, however continuous water submersion can eventually lead to loss of buoyancy over a period of years. We recommend this product strictly for flotation applications. If looking for a liquid foam for sculpting or casting we recommend using at minimum our 3LB or 4LB density.
Cat No.Kit Size(net weight)Approx. CoveragePrice
FOAM-02044 LB Kit2 Cubic Feet$22.50
FOAM-021616 LB Kit8 Cubic Feet$67.00
FOAM-028080 LB Kit40 Cubic Feet$264.00
5 or more kits of the FOAM-0280$252.00 / Kit
Drum Pricing (Kit Size 1033 LBS)
Coverage: approx. 500 cubic feet
Call for current price
Product Information:
Free Rise Density: 2.0 lbs per cubic ft.
Expansion Rate: Approx. 25-30x Liquid Volume
Buoyancy (flotation): 60 LBs per Cubic Ft.
*Physical Properties:
Parallel Compressive Strength: 40 psi
Tensile Strength: 30 psi
Shear Strength: 30 psi
Flexural Strength: 50 psi

This is a great video on how to do it...

 
Last edited:

gm280

Supreme Mariner
Joined
Jun 26, 2011
Messages
14,590
I agree with WOG. 2lb foam is going in my rebuild. With proper construction, there really isn't much need for the 4lb for support. So why add in the extra weight for nothing. And the 2lb actually floats more weight per cubic foot (by 2 more pounds)... But everybody has to make their own decision for such things. One size may not fit all. JMHO!
 

lmuss53

Lieutenant Junior Grade
Joined
Sep 9, 2008
Messages
1,227
Excellent responses guys, thanks so much.

I think I'll drill 2 holes for the seat bases and pour first one then the other. We have all noodles under this portion of the floor so I'll have to make the holes big enough to fish the noodles out. I got enough 2 lb. to do just over 4 cu.ft, which I won't need considering the cavity is really only 6 inches deep in the middle and tapers up to very little where the floor meets the sides. The holes will be far enough toward the center to allow the seats so rotate completely, so I think a straight down pour will work. I think I'll put one third of the total package down one hole for pour number one. If pour number one appears to fill the cavity more or less than half way I'll adjust the second pour accordingly to try to put the right amount down the holes.

Thanks again for the advice and the video link.

Edit: After a few second thoughts I emailed the supplier and asked to change the order to 3 pound density, a compromise to density and weight.
 
Last edited:

ejs9025

Recruit
Joined
Apr 16, 2015
Messages
1
I have a 1982 COHO 13' 4" (Boston Whaler Clone) the 2lb foam is water logged so I have to cut out the floor to remove foam and replace with 4lb foam. Question is where do I cut?
 

MTboatguy

Fleet Admiral
Joined
Jul 8, 2010
Messages
8,988
Doesn't the COHO have a fiberglass floor in it, I think I remember those are two piece fiberglass boats, the best way to repair it would to be to separate the top and the bottom and then clean out and redo the foam. That is if it is the boat I am thinking of? Does yours look like this boat in this older thread on iboats?

http://forums.iboats.com/forum/boat...pair/637175-my-budget-family-boat-83-coho-134

By the way, you are probably going to be better off, starting your own thread, you will probably get more help, it is always best to start a new one, that to try and tack onto the end of another thread.
 

jigngrub

Fleet Admiral
Joined
Mar 19, 2011
Messages
8,155
1. The heavier the density, the more water resistant the foam will be.

2. 4 lb. foam costs twice as much as 2 lb.

3. 2 part foam needs warm temperatures for good expansion when pouring. 75*F for a minimum for decent expansion, 80*F for good expansion, and 85*F+ for optimum expansion.
 

lmuss53

Lieutenant Junior Grade
Joined
Sep 9, 2008
Messages
1,227
Well I poured this down the center instead because I didn't want to have two seat bases and it firmed that up very much. It didn't migrate out to the sides much at all and they're still pretty bouncy, so I guess I'll roll the carpet back and do two more pours, one on each side. I don't much like any seat base back there and I already have an "oh crap" burn on the carpet back there so I will put the plugs back in the floor, put an epoxy patch over each one and put down a new piece of carpet or vinyl.

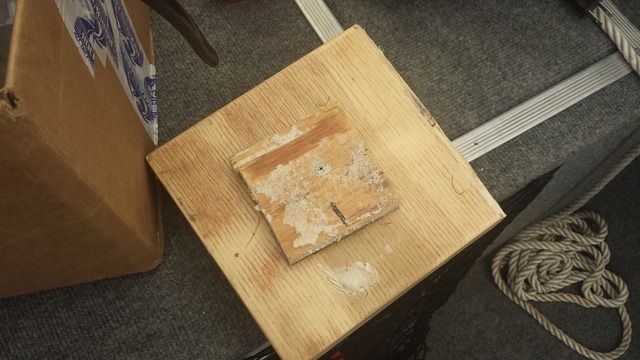
I watched the above video and saw the volcano affect so I saved the cutout from the deck and put it on a block of wood to use as a plug to keep the foam from coming back up out of the hole. I watched as it approached and when it was apparent it was going to overflow I put the plug in and stood on it for 5 minutes.

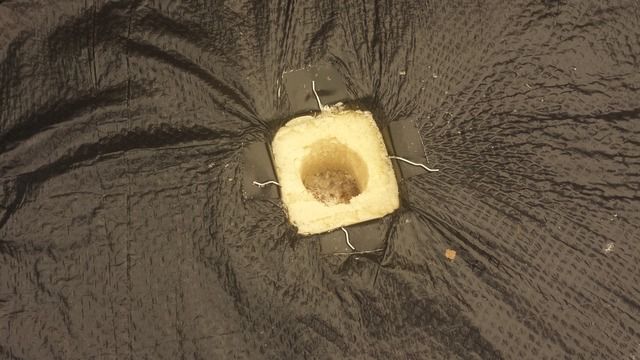
I also put a garbage bag down to isolate the area so if I screwed up I wouldn't have a big mess on the deck.

I have a few pictures but I can't seem to get my photobucket to update now, so I'll clean that up a little and put them up shortly.
 

lmuss53

Lieutenant Junior Grade
Joined
Sep 9, 2008
Messages
1,227


Plug screwed to backing board.


Finished with center hollowed out to accept seat base.


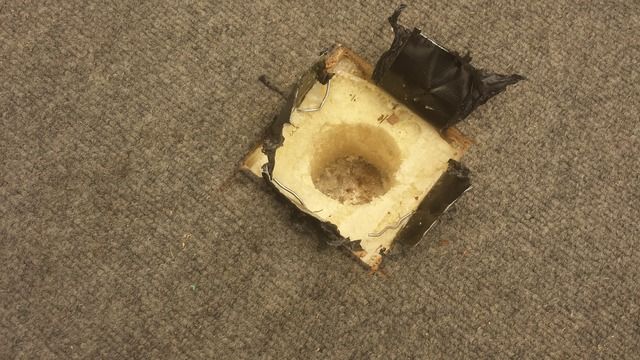
Mostly cleaned up ready for base.

Notice how the foam came right up against the bottom, but didn't come up around the plug I was standing on. You can see the tunnel that Sea Nymph put in to allow for drainage, that was part of my issue, the noodles were packed in, but the tunnel bounced. The foam has sealed the tunnel, hull, and the bottom of the deck all into one block which firmed it up quite a lot. I did this in 3 pours. One straight down which formed a mound right under the hole to about an inch away. I waited until the mound was cool and cured and cut two troughs in it to funnel the mix fore and aft. I then did two quick back to back mixes and pours, the first one was poured toward the bow and getting revved up pretty well when I poured the second one in, stuck the plug in and stood on it. The foam came up to the hole but not out. I waited a while and stepped off the board which stayed put. I felt the floor and it was warm about 24 inches left and right of the hole and fore and aft to the bulkheads in the hull. The drain tunnel is about a foot wide so I figure we straddled it pretty well.

.

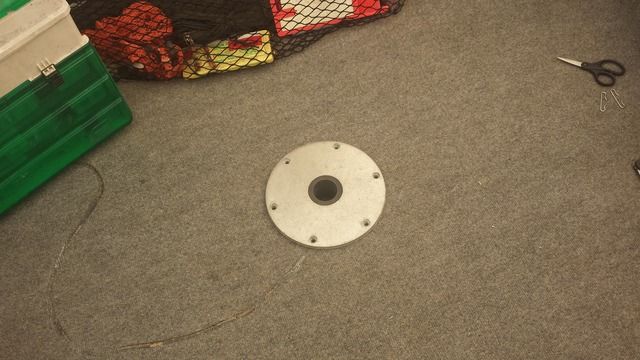
Done accept for the bolts. It's really very firm in the center now, it just gets a little mushy over by the scissors there. Note the snake looking burn mark on the floor from an improperly fused bait tank pump wire that dead shorted. Just about burned the boat up.
 
Last edited:
Top