Replacing a mooring cleat without any access to underneath the fiberglass

Songbill

Recruit
Joined
Apr 8, 2015
Messages
5
An aft chrome 6? mooring cleat on my fiberglass pontoon boat (13? 2004 Escape Cruz - see photo below) completely snapped off during recent extremely strong high winds on the lake. All that?s left are the 4 chrome screws and a little bit of metal underneath each screw head. I haven?t yet attempted to unscrew these remnants from the fiberglass.

Here?s my problem. The Escape Cruz is a 100% enclosed/sealed fiberglass pontoon deck boat, with absolutely no underneath access to where this mooring cleat was located on the aft area. I can easily buy a replacement cleat but attaching it presents some obvious questions and problem. I assume possibly the boat manufacturer attached/screwed down all the cleats and chrome railings before the topside was permanently sealed onto the fiberglass dual pontoon hull, probably using backing plates and lock nuts underneath the fiberglass to firmly hold all the screws. However, I?m not sure that such was the way original installation was accomplished during boat manufacture. Maybe there was an easier way used.

Once I remove the remnant screws, I am concerned that any locking nuts and/or backing plate will simply fall down into the hull. Ugh. Then, what??? A few questions:
1) Has anyone encountered a similar inaccessibility problem and know a way to deal with it?
2) Does anyone know if typically on such boats a backing plate is firmly seated and already has threaded screw holes, so that all I?d have to do is unscrew the old screws and screw in new ones?
3) Google searching made me aware of marine ?well nuts?, to install something in the blind. However, these apparently don?t use backing plates for strength of hold. Has anyone used ?well nuts? to install something such as mooring cleats on a boat? If so, would they be strong enough to securely hold/moor the boat line to my dock and the cleat not be torn out from the boat during winds up to perhaps 30 to 40 MPH?
4) Any other suggestions?
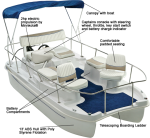
Escpae Cruz.png
 

GA_Boater

Honorary Moderator Emeritus
Joined
May 24, 2011
Messages
49,038
Welcome aboard.

Remove one screw and see if it's a machine screw indicating a backing plate or a pointy wood/sheet metal screw into the glass or a wood backing plate.

In any case, use the removed screw through the new cleat in the proper hole to hold any backing plate, remove the other screws and rotate the cleat into postition and put in the other three screws. That should work. If there a ridge surrounding the cleat, you might have to temporarily use a longer screw for the first one for clearance.
 

jigngrub

Fleet Admiral
Joined
Mar 19, 2011
Messages
8,155
With no interior access, I'd go with a 2" long #14 stainless steel sheet metal screw. The #14 is 1/4" diameter with very aggressive threads for excellent holding power.Mount your cleat with the screws, then remove the screws one at a time and dip them in a good sealant like 3M 5200 fast set or Loc-tite marine epoxy and reinstall. After the adhesive sealant sets you'll be able to pull a skier with that cleat.
 

Bondo

Moderator
Staff member
Joined
Apr 17, 2002
Messages
70,525
Ayuh,..... Welcome Aboard,..... If the ideas above don't work,...

You can always cut a hole, 'n install a hand-hole cover over it,.....
 

gm280

Supreme Mariner
Joined
Jun 26, 2011
Messages
14,593
I agree with all these comments posted to your question. You can easily see with just a few threads backed out of you're dealing with machine threads or wood threads. If wood threads. no big deal. I would simple remove them and if you can't get them to tighten up good and tight again, move up to the next size screw to gain more holding strength. If it is machine screw threads,the take a chance and take one out at a time and position the new cleat on its place and install the screw back in part way. Then do the same gentle with the remaining three. With a little finesse, you could replace it without any problems... Also, if you do have to move up to a large size wood screw, use stainless steel... JMHO
 

Songbill

Recruit
Joined
Apr 8, 2015
Messages
5
Thanks all, for the helpful ideas. Here's an update on where I'm at with a fix:

With the first screw I tried to remove, it just kept turning without coming up. So I used a pair of pliers to turn and pull up on it simultaneously. It is gradually coming out…..but it takes time to coax it out, pulling upwards and turning dozens of times. This tells me that there is a lock nut on the screw and that friction on the nut created by pulling up and turning the screw eventually will make the nut fall off. Also, one of the 4 screws had its head sheared off and the screw body simply dropped down into the hull……more evidence of use of lock nuts and a backing plate. The other two screws also remain, but they too just turn in place so I need to get them out as well.

I think I’'ve found a nice solution, better than well nuts. They are called “snap toggles” and will allow me to insert a steel fastener in the blind. They work with as small as a 1/4"” hole. My current hole is only 1/8”", but I can deal with that. Snap toggles are actually intended for use with drywall but should work just as well with fiberglass. Here’s a 45-seconds YouTube video on how they are installed:

I think now I’ll just use a Dremel to shear off the remaining screw heads and let each small screw body and nut drop into the hull, but not before installing the initial snap toggle. I’ll repeat that as I remove each remaining screw, in order to keep the backing plate in place. I'm really hoping the backing plate is made of wood and not metal. I’ll need to drill each current hole to increase it to 1/4”" diameter. If the backing plate is metal, I may just have to let it fall off into the hull.... which is not a big deal since the hull is foam filled. It's just that I wouldn't have a backing plate reinforcing the cleat and fiberglass. So, here's hoping the plate is made of wood. Also, the new replacement metal cleat has holes that are slightly smaller than 1/4”", but I think the Dremel with a small cone head will allow me to fix that issue.

I’ll post info on how all this turns out, in case anybody else runs into a similar problem. If this solution doesn't work, I've got your suggestions to try next.
 
Last edited:

jigngrub

Fleet Admiral
Joined
Mar 19, 2011
Messages
8,155
You may want to check the installation instructions on those toggles again, from what I see those devices require a 1/2" diameter hole to be drilled to insert the toggle and then a 1/4-20 screw into the toggle after installation. You're going to end up with four 1/2" diameter holes in your transom.
 

kcassells

Fleet Admiral
Joined
Oct 16, 2012
Messages
8,600
Alot of guys now use those toggles to place there captain chairs and other related deck surface objects. I believe they have one of the best pound for pund rating of most other systems out there currently. This is in the new style toggle vs.to lag bolts. They also have specs for pound weight capacity.
Drill out the old bolts to dust since you'll need a larger hole anyway. If something like the nut falls into the area below you may be able to grab it wiht one of those magnetic tollies. They larger holes are easily able to be fiared in and paint/gelcoat match.
I'm not sure though if the one you are demonstrating is exactly that type but looks very similar.
 

Mikeopsycho

Senior Chief Petty Officer
Joined
Feb 6, 2014
Messages
738
I used to use snap toggles all the time to hang large gas meter support brackets on hollow cinder block walls. The ones I used for 1/4" bolt required a 1/2" hole for installation, as Jig said.
I'm not sure using these fasteners in this scenario would work. As Kc said, they have specs for max weight capacity, but even if the toggles can handle the pounding and stress a mooring cleat gets, the fact that there will be room around the bolts for lateral movement could be a concern. Just my 2 cents.
 

Songbill

Recruit
Joined
Apr 8, 2015
Messages
5
OK, I got it fixed. Here's some "lessons learned" from this experience.

1) This 4.5" chrome-plated metal cleat apparently rarely fails. I found no evidence on the web of anyone else experiencing this complete failing/shearing off at the screws holes. I even talked to a boat builder who said he had never heard of one failing before. However, when one does, it's a real pain figuring out how to solve the problem if you don't have access to underneath the backing plate.

2) Ultimately, the hardest part was getting the remnant screws and bits of remaining cleat off without damaging the fiberglass. Patience and careful prying, turning, & pulling with screwdrivers (flat head and Phillips) and pliers, plus a Dremel to cut off screw heads did the trick. The one screw that I got out intact was a #8 1" stainless steel screw that had had a lock nut on it, under the backing plate. (I let the nut fall into the hull.) The metal backing plate clearly was not threaded. I took a chance that the 4 holes in the plate would each be small enough that a #10 SS 1.5" metal screw would self-thread nicely and tightly into each plate hole. Much to my relief, this worked! I was careful to put one new #10 screw into an empty hole and slightly tighten it each time I removed an old screw. This insured that the backing plate didn't fall off before I got all 4 new screws in and tightened down the new cleat. Also, someone suggested first coating the new screws with Locktite Blue threadlocker before installing them and the new cleat, which was a great idea.

3) My "creative" ideas of using well nuts or snap toggles to solve the issue of working "in the bl;ind" initially seemed like good ideas in theory but research proved to be ill-fitting at best and risky to install at worst. I never bought or attempted to install them for that reason.

Thanks to all those who replied to my original post.
 

Scott Danforth

Grumpy Vintage Moderator still playing with boats
Staff member
Joined
Jul 23, 2011
Messages
47,549
hopefully the backing plate is more than simple 12 gauge sheet metal where you only have 2 threads holding it.
 
Top