Steiger craft restoration

johnnybgood

Seaman
Joined
Jun 12, 2012
Messages
72
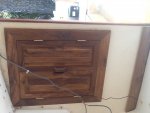
When the inside bracket was attached I sanded the gel coat and mixed an epoxy putty and coated the bracket and original transom then clamped it and screwed it with SS screws, left the SS screws in. The bracket was then coated in epoxy and CSM just too make it water proof. I 'm a little confused now. May be you can clarify for me. When using epoxy resin do you have to remove all the gel coat or just de-wax and sand the gel coat to rough in up. I am about to start putting the deck in if I am going at this the wrong way need to find out now, again I am using epoxy resin and not polyester if that makes a difference. Thanks in advance for your help
 

johnnybgood

Seaman
Joined
Jun 12, 2012
Messages
72
I've just been reading on the web about how to install aluminum gas tank and now confused more than ever paint don't paint, foam don't foam. Read Pascoe he clearly sates don't foam or paint HELP!!!!
 

Yacht Dr.

Vice Admiral
Joined
Feb 26, 2005
Messages
5,581
Does not matter if your using poly or epoxy..it All has to come off. Sure your epoxy stuck Great to the gelcoat..but now the adhesion is exclusively on the gelcoat. If the gelcoat pops off..10 layers of glass pops off with it. ( I know your not using 10..but an example ). When you take it to raw fiberglass..its a mechanical bond to the first layer of glass..which is highly unlikely that It will delam from the rest of the glass ( which is chemically bonded making it basically all One piece ).
 

johnnybgood

Seaman
Joined
Jun 12, 2012
Messages
72
Thanks, glad you caught my mistake before I went too far Live and learn Will be doing a lot more sanding. The outside fiber glass should be OK as that was taken down to the fiber glass doing the 1 to 12 bevel. Hopefully the bracket with the screws will over come the fact I did not remove all the gel coat. Again thansk for catching my mistake.
 

Mikeopsycho

Senior Chief Petty Officer
Joined
Feb 6, 2014
Messages
738
I chose not to foam back in my new aluminum tank. I also did not paint it. I used 5200 to attach plastic strips to the bottom then 5200 on the bottom of the strips and set the tank in place. That's it. I went with Pascoe's method. http://www.yachtsurvey.com/fueltank.htm . I think if you decide to foam you need to get 100% adhesion between the foam and the tank, and this could be very difficult to achieve. You need to pick the method you feel comfortable with and then just go for it.
 

Yacht Dr.

Vice Admiral
Joined
Feb 26, 2005
Messages
5,581
Hey..no problem on the gel removal thing.

Most fuel tanks that Ive dug out had thick rubber strips going around the sides and the bottom ( even the top if there was a metal lashing up there ). They were about 3/8" thick and 2" wide.

I had a fellow glass guy tape shims on the hull ( about 1/4" ) then used a few tubes of fast cure 5200 making thick lines across where the tank sits in the coffin. He taped wax paper to the bottom of the tank and set it in. Let cure for a day..pulled it out. Removing the paper and the shims he had a perfectly formed gasket material on the bottom ( much like the rubber deals I mentioned above ). For the sides I think he spooged in some more 5200 as best he could. Im not sure that was the best method there..but I did like the bottom idea.
 

Woodonglass

Supreme Mariner
Joined
Dec 29, 2009
Messages
25,924
You For sure DON'T want to use rubber with an aluminum tank!!!:eek: Neoprene is what you want OR the 5200 idea or Silicone but NOT Rubber!!! The link posted previously will tell you why!;)
 

johnnybgood

Seaman
Joined
Jun 12, 2012
Messages
72
Took your advice Woodon and ordered some 1/4" neoprene Here is my plan=== Follow Pascoe tank install guide- secure pads on bottom of tank with 5200 the tank was originally screwed to the keel with SS screws on the fore and aft ends (bracket) of tank which I will do. Originally the tank was encased in foam and when I took it out it was full of crevice corrosion where the foam was. My plan is not to use foam but make 1 1/2" x 1 1/2" x 4' marine plywood strips covered in epoxy resin with aluminum L brackets bolt to the end with SS bolts. These will go on top of the tank and get screwed to the stringers. On the top of the tank where the strips come in contact with the tank cut 2" neoprene strips and secure with 5200. My thinking is with the tank secured to the keel and the brackets across the top there is little chance the tank can move and there will be plenty of air flow around the 4' x 4' 60gal tank. Any thoughts on my line of thinking?????
 

johnnybgood

Seaman
Joined
Jun 12, 2012
Messages
72
Thanks for the thumbs up on my plan. Hope to get the tank in tomorrow weather permitting, will post pics when tank is in
 

johnnybgood

Seaman
Joined
Jun 12, 2012
Messages
72
Have the deck in and glassed started painting the deck and sides . Hoped to havre it finished by the end of the month but knee surgery has slowed me down will post pics when new computer arrives
 

johnnybgood

Seaman
Joined
Jun 12, 2012
Messages
72
Need wiring help will be running 2 batteries 1 start 1 house will have bus bar and fuse panel going to the switches for lights, lowrancr 9, running lights, cabin lights, bilge pump, radio, deck lights, wash down pump, live well pump. The run from house battery to wheel house is 12 feet what size wire should I run from battery to bus bar? If I use 12 g wire from bus bar to fuse box and fuse box to switches is that over kill or do I need to calculate the amps for each and run the rated wire. Being lazy thinking using 12g for all would cover all Thanks in advance for help
 

johnnybgood

Seaman
Joined
Jun 12, 2012
Messages
72
No Title

Some more pics
 

Attachments

  • photo226686.jpg
    photo226686.jpg
    147.7 KB · Views: 3
  • photo226689.jpg
    photo226689.jpg
    76.6 KB · Views: 3
  • photo226690.jpg
    photo226690.jpg
    137.6 KB · Views: 3
  • photo226691.jpg
    photo226691.jpg
    144.4 KB · Views: 4
  • photo226693.jpg
    photo226693.jpg
    80 KB · Views: 4
  • photo226694.jpg
    photo226694.jpg
    36.7 KB · Views: 4
  • photo226695.jpg
    photo226695.jpg
    189.3 KB · Views: 4

Mark72233

Ensign
Joined
Jul 11, 2014
Messages
926
johnnybgood, I am loving the work you are doing. Are the seats stock or did you buy them or make them. I would like to do the passenger side on mine like that. Looking good.
 

johnnybgood

Seaman
Joined
Jun 12, 2012
Messages
72
The seats seats came with the boat there 44 inches long and 23 inches wide the passenger seat I used 2 latyers of 3/4 foam board and fiberglass the inside top bottom sides for A fish box\ cooler the driver side is the same size and is for storage may later on make it into a live well. Getting close to finishing big thing now is wiring. Local marine dealer gave me a good deal on a 200 Yamaha so hopefully in the next few weeks that will be installed
 

seadogmike

Seaman Apprentice
Joined
Jun 26, 2015
Messages
42
I must say this is one of the best looking Restores that I have seen. JBG I am an electrical engineer. I'm in Charleston about once a month. I live and work near Charlotte. Would be glad to assist with the wiring.
 

johnnybgood

Seaman
Joined
Jun 12, 2012
Messages
72
Seadogmike thanks for the offer may be I can tell you what I want to do and you can help me out with wire size i was thinking just going with 12g for all bilge pump lights wash down pump trim tabs etc probably over kill. Any help is appreciate
 
Top