Winner Resto

hc43

Cadet
Joined
Aug 19, 2014
Messages
28
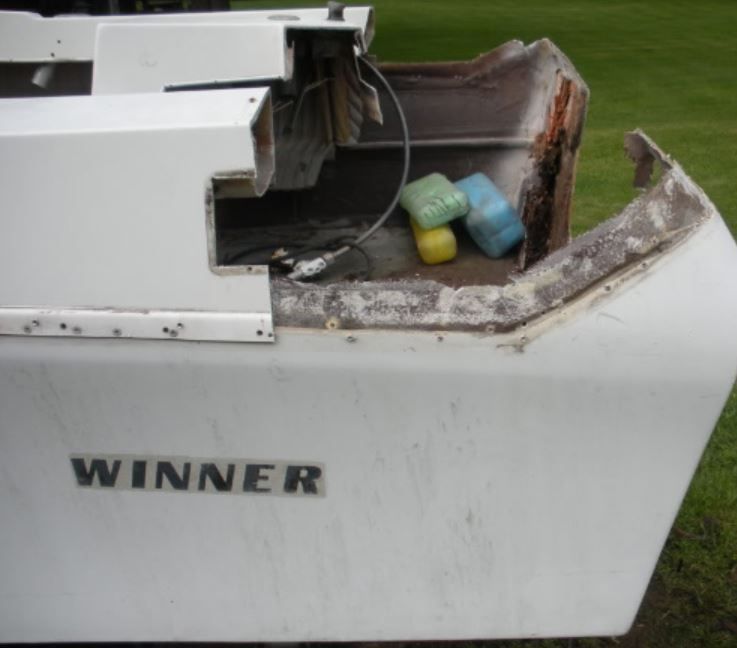
Well I have been reading about every resto thread in here I can find and think I am ready to take the plunge into my own. I purchased a 1979 Winner Something. No idea on model I can not find it on the the ownership and the transom tag has gone MIA. From what I can find on the net ( which isn't much) I believe it to be a Marauder. It is dead on 16feet (sorry my keyboard is screwed at the moment I keep getting ? when I hit feet) and has a 78 inch beam. I bough the boat knowing what I was getting myself into as the PO said the transom was ok but upon seeing the drain plug out and feeling the wood inside I knew I was going to have to replace it and at the time I thought the floor and stringers would go with it. When I brought it home and started to tear into it I had all kinds of surprises. The stringers are all hollow fiberglass and it has no foam. Instead it had these plastic bladders which in my case half were full of water. Now at this point I started to take off the rub rail to begin to remove the cap but ran into a small problem. It seems like one of the POs had the cap off but instead of removing it properly he decided it to the easier to use a sawzall or some other type of saw and cut the top off. He also decided it was best to take the cap and pull it over the bottem lip he had created and put about 60 rivets a side to hold the cap to the hull and fiberglass the crap out of the back. So now I have a problem that I would like some advice. Do I try to remove the cap or do I cut the splash well out of the back?. That's where Im at now as the boat is sitting on a homemade dolly in my garage. I have been waiting for warmer weather to do anymore work as the garage is just big enough to fit the boat into. Another question I had is the boat is rated for 95HP from what I see on the net but I bought a 1979 Johnson 100HP. Now to me I think I was a bit ambitious and the motor is to big for my boat as specs state it weights in around 300lbs but would like some adive on what you guys run. I want this to be a family boat as I have a wife and 2 year old child. This will be a slow resto by the way as my wife and I work separate shifts. Now its time for the pics as I am getting very tired and feeling like I am just rambling on.


Under the rub rail.


Some more handy Work. I pulled the compass out of this hole which looks like he used a drill to circle out a hole and punch it out.

The Inside Fiberglass on the transom is just peeling off


This is the piece of transom that I showed before I pulled the fiberglass off.

The motor. This thing is a beast and took 4 people to lift it to the stand.


I will post more pictures and update as they happen.
 
Last edited:

gm280

Supreme Mariner
Joined
Jun 26, 2011
Messages
14,592
Well firs things first... :welcome: aboard hc43. Great to have you aboard and with an interesting boat project as well. You sure picked a huge project, but like you stated you've read a lot of project threads and are pretty much familiar with what it is going to take to rebuild your boat. But once finished, that boat will be solid, sound and a boat that will last for a very long time. So let's get started. I looked at all the pictures, and I may add, thanks for supplying them. Most folks usually don't provide pictures and this helps us see what you are dealing with. Not knowing what all has to be removed, I can't say one way or the other about separating the cap. Usually that helps out because you don't have to work around things. But I don't know the extent of removal of rotted and useless things yet. If I were doing it, it would be coming off so I could evaluate everything from top to bottom, but that is just me. I'm sure others will chime in and give you more ideas and you can start you project with guided instructions then. One thing I will say though, is to take a lot of pictures now how it presently sits from every angle you can. And also take tons of measurements as well so down the road you can look back and see how things were initially. I'm sure you know demolition IS your first portion of this project and glass grinding come shortly after that. The grinding IS the dirtiest, nastiest, itchiest job any boat project has to do... So make sure you use the proper PPE equipment and protect yourself... :thumb:
 

hc43

Cadet
Joined
Aug 19, 2014
Messages
28
Thank you for the words of encouragment. I will post more picture up later and will include some of the backside were the hull and cap meet.
 

hc43

Cadet
Joined
Aug 19, 2014
Messages
28
Well its been awhile but I've found some time to work on this boat and I have a few questions. First off I've decided to use epoxy for this project. The sides of the boat look a little thin for my liking so I'm going to put another layer of fiberglass down on the inside but my question is what should I use? I know I've read in other posts to use woven roving but I'm not the quite sure what thickness ,The walls of this boat look to be only a 1/8" thick. Is this thick enough or am I just being paranoid? I've decided instead of decapitating the boat I'm going to cut the splash well out. my reasoning for this is the way the PO fiberglassed the top to the bottem I can't say I'm just cutting the top lose instead of cutting through both. Any helpful words of advice on cutting the splash well? I've always wondered how it could take 6-8 hours to grind out the hull of a boat but after an hour and a half of grinding the inside of the hull I now know that i'll be lucky to be down in 6 hours. Nothing has made beer taste so good as a good grinding session followed by a cold shower followed by a cold beer. Thank you for any advice, now for the pictures.

this is what I'm talking about the PO fiber glassing the top to the bottem.


These are the pieces I'm cutting out of the side of the hull. the bottem of it isn't even sealed. its bare plywood.


This is the I started with after cutting out the floor


After seeing all the dust flying around in all the "hard to reach" spaces and only having a half face respirator with safety glasses on lets just say Ill be upgrading to a full face respirator this weekend.This is after the grinding.


Like I said before any advice is greatly appreciated.
 
Last edited:

hc43

Cadet
Joined
Aug 19, 2014
Messages
28
And one other thing, vacuuming fiberglass dust is #2 on the not so fun things to do list. I had a cheaper sop vac and I went to clean up the dust and it literally ran for 15 seconds then started to make a high pitch whine then died. Ive since then went out and bought a Rigid WD40700 4 Gal 5 hp vacuum from Home depot and this thing is amazing. I managed to vacuum the whole boat and at the very end it started to lose a little suction. When I opened it up this is what I found.
 

zool

Captain
Joined
Aug 19, 2012
Messages
3,432
Yea, the poly dust clogs the filter, and heats up the motor, you need to clean it regularly, or pull it when cleaning the dust......I burned a small one out.

I ran a 19' winner way back when, and have nothing bad to say about them, I ran her 5+- miles offshore routinely, handled the seas good, and I believe the stringers were all glass, even back then, which should save you a lot of work if they are...
 

Mikeopsycho

Senior Chief Petty Officer
Joined
Feb 6, 2014
Messages
738
There are bags available for your vacuum designed for fine dust that work really well for fiberglass dust. They make emptying the vacuum easy and pretty much dust free.
Looks like your getting into her now, grind on......
 

hc43

Cadet
Joined
Aug 19, 2014
Messages
28
Thanks Woodonglass I now have the dust under control. I've decided to make a make shift tent over the boat with a fan and filter at the front like a couple of posts I've read on here, its ingenious but I'm too tired to recall the names but we've all read them lol. I haven't had anymore time yet to do more grinding but I'm trying to think ahead. I do have a couple of questions though. Am I just being paranoid for the sides of the hull to be only 1/8" thick? If not what size of mat should I put down to thicken up? Also I want to build the stringers back up because I've had some glass pull up and now I need to level them. I've put a straight edge down on them and their no where near level. Would it be easier to use 7.5 oz woven and build up a couple of layers and make it level or use 17 oz woven then grind it back down level? I took a picture today of he splash well and where I plan to cut it but forgot to take pictures of the unlevel stringers, I will do that in the next couple of days. I am open to any suggestions on where to cut the splash well. Also don't mind my assistant photo bombing the splash well (father in law) lol. If something here isn't clear just ask like always with a wife that works opposite shifts and a 2 year old son my time is limited and I am usually forced to post these just before I go to sleep. Thanks.


The back of the transom has already delaminating it self from the skin of the fiberglass.


This is a picture looking down at the transom after I took the steel trim off.


pulling the boat off the trailer and onto the dolly to get it into the garage for the winter.
 

gm280

Supreme Mariner
Joined
Jun 26, 2011
Messages
14,592
It is amazing how inventful we can get to solve such problems as they rear their heads when doing jobs like this. I totally understand your questioning about the thin sides. While it would probably be okay, I made my decision that I was going to put a layer down to help thicken the hull up. So I covered everything in a layer of poly and CSM before installing anything else. That actually helped with the side flex as well. I see you made a mobile cradle for your hull. The only thing I would suggest is, if you have plans to remove the cap, you will need more side supports. If not removing the cap. it probably will work out. You just want to make sure as you crawl around inside the hull grinding and installing new parts, that the hull isn't flexing. Especially if you are polying stringers and/or bulkheads back in place. You'll need the hull to be ridged so the installation will not flex as you install things. But the first thing is always the messiest, dirtiest, and itchiest part of any rebuild. That being the grinding of the old glass out. But once that is finished, things look up very nicely and it starts to actually seem worth it again... Hang in there and post your progress. We are behind you all the way... :thumb:
 

Woodonglass

Supreme Mariner
Joined
Dec 29, 2009
Messages
25,924
Cutting the splashwell as pictured, I fear, will not allow the needed access to the transom removal and replacement. You need something more like this...


I know the gunwales have been glassed to the sides of the hull but..With a SawsAll and a flexible blade and careful sawing I know you can cut thru that "Shoe Box" Seam. Others have had the same issue and successfully cut it free. Doing it as shown above will give you all the access you need and the "Go Back" repairs and easily done.;)
 

hc43

Cadet
Joined
Aug 19, 2014
Messages
28
Awesome thanks for the advice WOG. Cutting the back off like that gives a lot more room then the way I had originally planned. I was trying to avoid getting into that mess the PO has made but I knew deep down inside I'd have to deal with it at some point or another lol. I just needed that extra shove to tell me to deal with it. Thanks again guys I will post my progress this weekend.
 

hc43

Cadet
Joined
Aug 19, 2014
Messages
28
First off I want to thank WOG for posting that picture. I had some time to today and almost have my old transom out and it was a lot easier then I thought. Also I sold the Johnson 100HP for a decent profit and bought a 1985 Mercury 50HP 4 cylinder. Now I was told the Merc was missing the bottom carb and that's why it was being sold so cheap ($200). The owner says he had it running last summer but took off the carbs to have his buddy rebuild them and apperantly he ended up losing the bottom carb. Now when I bought the motor he gave me a bag full of odds and ends and I finally opened this bag to see exactly what was in this bag and vola theres the bottom carb. Now I have yet to put the bottom carb on to see if the motor does really run but I thing I already dislike about the Merc is the 3 piece cowel. Is it just me or are they a pain in the a**? Well here is todays progress.


Half the transom is still stuck to the splash well.


Heres the Merc
 

gm280

Supreme Mariner
Joined
Jun 26, 2011
Messages
14,592
Nice progress and great to see you doing the project. Yes it is really messy but that has to happen to get to the end and enjoy a solid transom and boat. So hang in there and keep posting those pictures. As for the three piece cowling, it is what it is and I actually like that series Mercury having own one in the inline 6 years ago. That engine was strong and I had zero problems from mine. I am following your progress... :thumb:
 

Woodonglass

Supreme Mariner
Joined
Dec 29, 2009
Messages
25,924
Congrats on your progress!!! Stay focused and you'll be back on the water before you know it!!
 

sphelps

Supreme Mariner
Joined
Nov 16, 2011
Messages
11,435
Tagging along if there's room ! :joyous:
Cool looking boat with nice lines ! Just a thought ,you were worried about over powering with the 100 hp ,with the rating at 95hp .. Could you be underpowering with the 50hp ?
I guess if the 50 is lacking you could always move up to maybe a 75 ...
The plastic containers under the deck is something I've never seen before ...
 

hc43

Cadet
Joined
Aug 19, 2014
Messages
28
Yea I was thinking it may be underpowered but I got it for a good price. The mounts for the motor seem to match the holes drilled in the transom from the previous motor. Worst case is I but another motor and sell this one. Thanks for the words of encouragement guys and I will make sure to post plenty of pictures because in the next while I will have plenty of questions!
 

hc43

Cadet
Joined
Aug 19, 2014
Messages
28
Well I've been back at it today and there's been some progress. I'm starting to see light at the end of this dust white ichy cloud. I've managed to grind down the front half of the inside of the hull and my stringers and remove the rest of the transom but like always with progress there's more questions. Now that the transom mulch has been scraped from the inside skin I noticed I won't be able to glass the bottom on my transom with the stringers the way they are.

Now what I think I'm going to have to do it cut my stringer grid about 6 inches from the back and pull it out so I can grind the inside transom skin at the bottom and so I can tab my new transom in. Does this seem like a good idea to anyone else or am I just going crazy? I can't seem to think of a way around it so I ask you Iboats, is there a better way to do this?
 
Last edited:

Woodonglass

Supreme Mariner
Joined
Dec 29, 2009
Messages
25,924
I'd recommend 12" to ensure plenty of room. It's an easy "Go Back" so No Worries!!!!
 

hc43

Cadet
Joined
Aug 19, 2014
Messages
28
Fine WOG you talked me into it. I'm going to take the stringer grid right out so I can get a good look at the keel because there's some damage there a I was going to repair on the outside but It would give me piece of mind to see it from the inside to repair it properly. I mean I've come so far now I might as well do it right so when I get older I can pass this boat to my boy and buy a bigger boat aha !! Lol
 
Top