1984 Wellcraft 248 Sporstman Restore

Second Chance 248

Petty Officer 2nd Class
Joined
Dec 28, 2014
Messages
113
I have a Galaxy 260 Double cabin, its similar to the 250 Wellcraft. I finally got mine under a carport and will start similar work. I don't know If I will go that far since I don't have gantry equipment to lift the cap off.
Yeah that cap is way heavier then what we thought. Had 7 guys and figured no problem, we would just lift it off and carry it outside, not so much.
I've got so many pictures & videos to upload, I just have no time. I'll get caught up before the splash in a 152 days and counting ;)
 

Second Chance 248

Petty Officer 2nd Class
Joined
Dec 28, 2014
Messages
113
Well it's been awhile since I?ve posted any progress, had another set back.
I'll start by posting the good stuff, it?ll probably help having to relive the bad.
I'm seriously questioning my decision on the coarse I've taken on this project. My biggest hurdle that I'll never get over is the non stop, never ending discrepancies of how to build a boat. If you get 10 different boat builders in a room and tell them to write a glass schedule for a boat, you'll get 10 different glass schedules and methods of approach. Such as the world I guess.
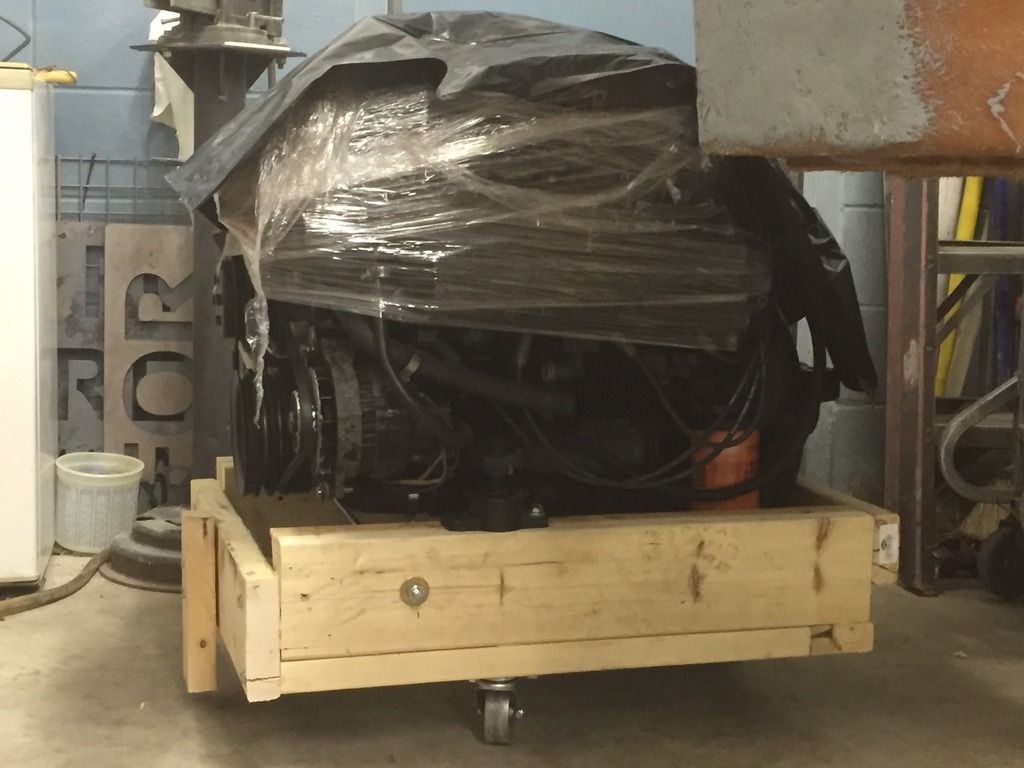
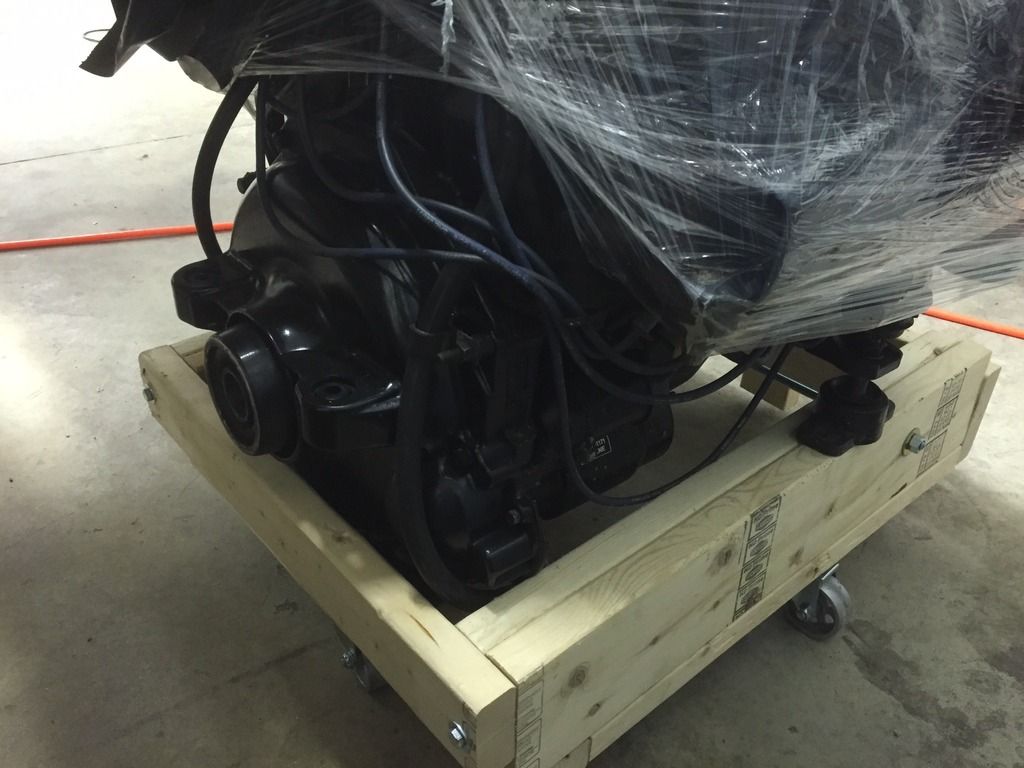
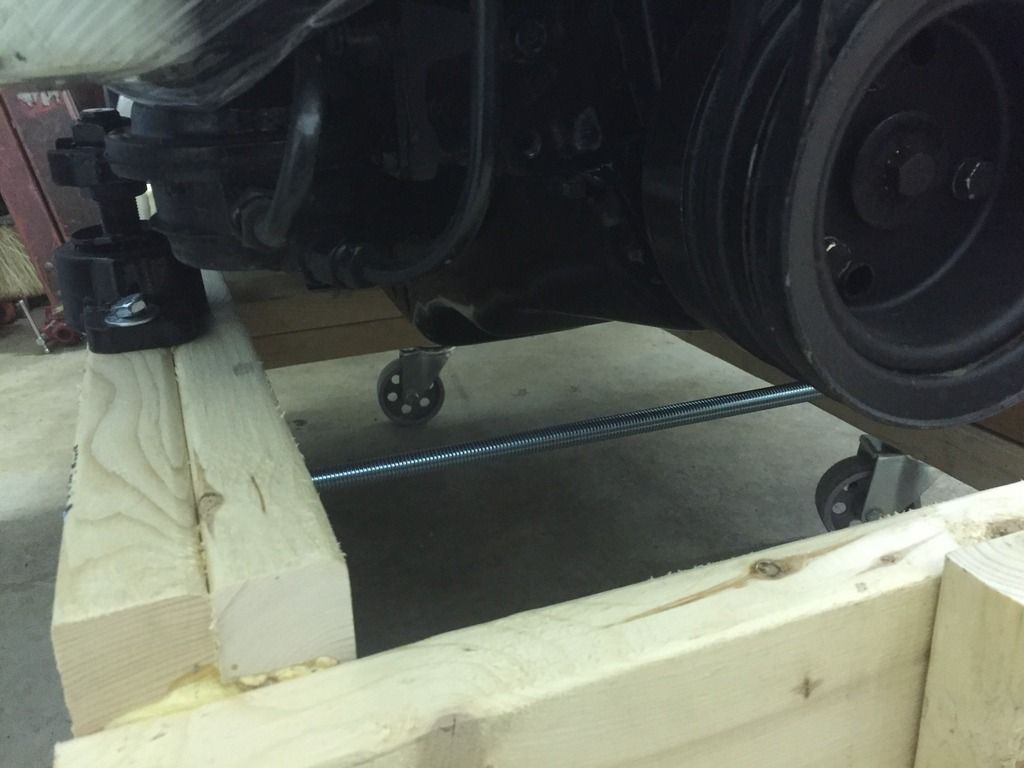
I had to pick up the motor and take it to the shop. I built a little dolly so I could move it around a little easier. I also covered it up with shipping wrap and left the top open so it could breath.
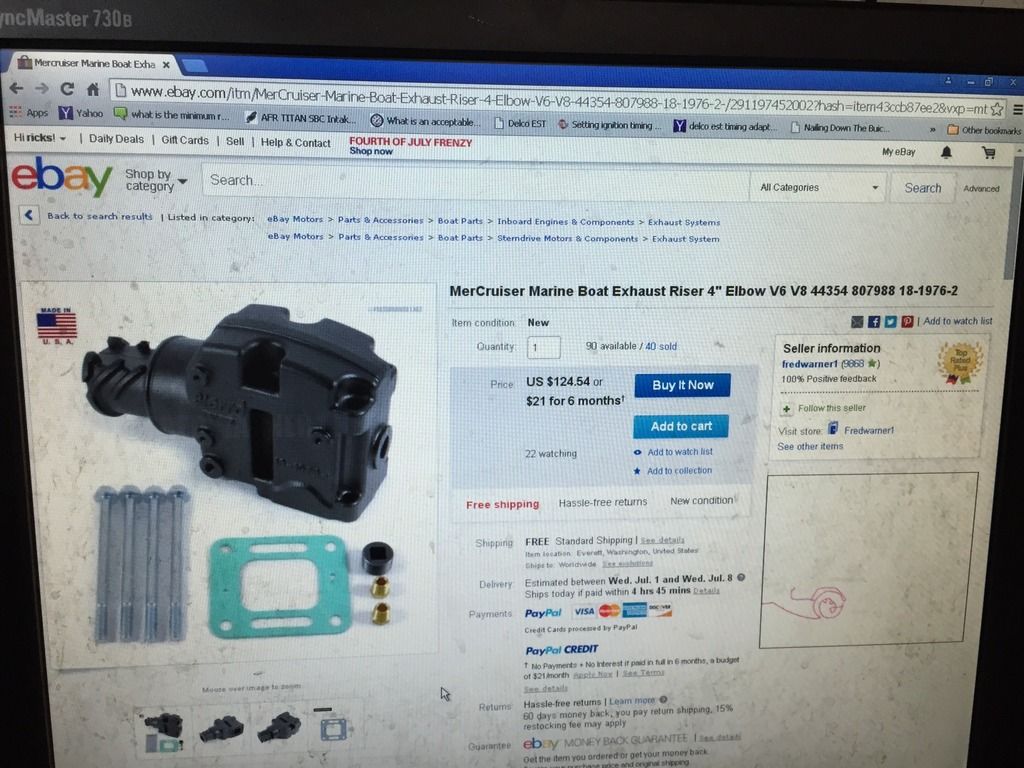
The shop I had it done rebuilt it completely top to bottom. While they were breaking it in, they noticed the motor was reverting water ( Still haven't looked in to what that exactly is ) and the cause was the manifold risers. Back in the 80s they used a few different risers, the ones I had didn't have enough pitch for the water to fully drain and he recommended changing them out to a better style.
Ricks Speedway Performance
46309 Telegraph Rd.
Amherst, Ohio 44001
Did an outstanding top of the line job!!!
And the shop owner is a really cool guy!!


Second Chance 248

Petty Officer 2nd Class
Joined
Dec 28, 2014
Messages
113
Last year I stripped the 248 Sportsman logo off the side because it was in poor shape.
I wanted to put a personal custom touch on it and decided to have it redone in stainless steel to accent the black & stainless look I'm after. My welding buddy had a template made up on a plasma CNC so I could see what it looked like. I then found a company that water jetted so I could get the finish I was after. They suggested using a 304SS material. My intentions are to use a semi translucent Acrylic so it stands out during the day and back lights at night. The company owner suggested I sandblast the back of the Acrylic for even lighting. These guys are TOP NOTCH!! Lightning fast responses and workmanship. Will definitely be using them for a few other ideas I have.
Precision Waterjet Inc.
80 Detroit Street, Unit 105
Cary, Illinois 60013
847-462-9381
http://www.pwjet.com


Second Chance 248

Petty Officer 2nd Class
Joined
Dec 28, 2014
Messages
113
My dash was in horrible shape and was starting to have switch problems. After searching for a place to get a new one I found New Wire Marine. They were GREAT!! to work with and over achieved my expectations. Can't wait to get it installed.
New Wire Marine
945 Wappoo Rd.
Charleston, SC 29407
843-297-8348
www.NewWireMarine.com


Second Chance 248

Petty Officer 2nd Class
Joined
Dec 28, 2014
Messages
113
After reading the horror stories about not getting the cap to fit when reinstalling, I figured to bullet proof myself I should place the cap back on prior to tabbing stringers. Of coarse now I'll have to remove it again to reinstall liner but I feel it was a precaution worth taking. I mocked up the stringers prior to bedding so the boat could be surveyed. The surveyor wanted to sound the hull before I got to far.
In order to get an agreed hull value from insurance company?s on a boat of this age, it must go through an extensive survey to eliminate any loopholes. More less eliminates the small fine print in your policy.
Most people think that because they can save money by adding it to a combined policy, they'll save money and are fully covered, but that's not the case. I'll find the link that explains in great detail about insurance coverage that will explain it better.
Bache Marine Consulting is who I hired to see this project start to finish. It's a good thing I did, it turns out the 2415 was not the way to go. This is a combination of my amateur ability & knowledge. He feels it was a combination of prep & materials. It had to be redone. I'm not the one to point fingers or blame, however in this case I don't have a problem in the world doing it. The guy I hired insisted the 2415 was the way to go, who was I to question someone with 35 years of alleged boat building experience? I showed him the glass schedule I wanted to use recommended by Zool in another post of a boat similar to this size. This was day one when he read it, shook his head and said we're going to build it better & stronger then that. He's the one who put the glass on will call from his supplier for me to pick up and assured me that the mat wasn't a issue and it would be a brick **** house. He's the one who talked me out of pulling the cap and doing the project the way I felt was best. So yes!! I feel he is also the seed reason I am where I am right now. At first I thought it was my total lack of ability until we started checking his work on the transom and engine bay glass. The proof is in the pudding so they say.
All the black circles are voids and as you can see, the dry fibers were never completely saturated.

Bache Marine Consulting
PO Box 756
Sandusky, Oh 44871
www.bachemarinesurvey.com


Second Chance 248

Petty Officer 2nd Class
Joined
Dec 28, 2014
Messages
113
Will get caught up on status in the next few days, I've got to get over to the boat and start cutting stringer tabs and prep for a layup tomorrow.
All of the glass I put in was ground out & redone. I just couldn't see leaving it.
 

kcassells

Fleet Admiral
Joined
Oct 16, 2012
Messages
8,599
Wow... and wow again.. really sorry to hear that the installer was a chump. Great attitude you have about the problem but like they say. "Move on." TYpically.. no most of the time Zool is right on the money. Unlike me. lol.:joyous:
 

Second Chance 248

Petty Officer 2nd Class
Joined
Dec 28, 2014
Messages
113
Was wondering if anyone was willing to share their thoughts on my plan for stiffening up the hull sides, pros & cons?
The sides of the hull are very thin. The bottom near the transom is the thickest part being 5/16" and tapers towards the bow to 3/16"
Also thoughts would be appreciated on the 3 different stiffener patterns.


Mikeopsycho

Senior Chief Petty Officer
Joined
Feb 6, 2014
Messages
738
I'm leaning toward choice #3. I like that there is no wood in this method, so no potential rot. Other I-boater's have stiffened their hulls using similar methods. I have no experience or knowledge in this matter, just giving my uneducated opinion. Whatever method you use I know it'll be done right, judging by your work so far. :)
 

Mark72233

Ensign
Joined
Jul 11, 2014
Messages
926
I'm with Mike of just putting a layer or 2 of 1700 no wood to rot and it's still flexible during those times where's it's rough and your boat needs that flexibility during those times.
 

jbcurt00

Moderator
Staff member
Joined
Oct 25, 2011
Messages
24,871
1st a question:
Why do you want to stiffen the sides of the hull?
 

Second Chance 248

Petty Officer 2nd Class
Joined
Dec 28, 2014
Messages
113
1st a question:
Why do you want to stiffen the sides of the hull?
In David Pascoes Yacht Survey under Hull Design & Defects Part II under Hull Sides
He is pretty much describing my boat to a tee. From the years of excessive panting the hull to deck joint has sheared open the holes through the fiberglass where the screws attach the rub rail. Excessive spider cracking in the deck and It's so thin you can actually push in the side with your hand. I figured there's no better opportunity to improve on the designers short comings. Through all of my research on this model, the reviews from prior owners admitted the hull sides were the major complaint.
 

Shanestan

Seaman Apprentice
Joined
Aug 30, 2015
Messages
45
Just wondering if there is an update? I started my project in January and have finally seperated the hull and removed the main deck, link to my Iboats forum is below. Did you have problems with lining up the top to the hull? Mine is riveted with two lips that I will have to fiberglass out because of damage and poor manufacturing.
 

Second Chance 248

Petty Officer 2nd Class
Joined
Dec 28, 2014
Messages
113
Just wondering if there is an update? I started my project in January and have finally seperated the hull and removed the main deck, link to my Iboats forum is below. Did you have problems with lining up the top to the hull? Mine is riveted with two lips that I will have to fiberglass out because of damage and poor manufacturing.

Just haven't had time to update. It's extremely time consuming to upload pics and give detailed updates. I've literally been working every single day and going to the shop after work. This morning I was up at 6:30 doing paperwork and just walked in the door from a 17 hr. day getting a job done for the customers to move in this weekend.
I've reglassed the entire hull and have completed the stringer system and bulkheads. The fuel tank shelf is done along with the horizontal collision bulkhead.
I'm going to glass the motor beds in tomorrow and then all I'll have left is the longitudinal stringers for the hull sides and cap the hull stringers. I've been going hard at this project for the past 19 months but the work load that funds this project just seems to keep increasing. This week was the first time in 16 years that I've ever turned down a job because I just can't keep up and it's killing me to be missing the boating season.
It's getting closer to start putting back together but there's still a long ways to go.
I vow to finish this thread, I just can't seem to slow the hands of time in order to do it.
 

Second Chance 248

Petty Officer 2nd Class
Joined
Dec 28, 2014
Messages
113
Just wondering if there is an update? I started my project in January and have finally seperated the hull and removed the main deck, link to my Iboats forum is below. Did you have problems with lining up the top to the hull? Mine is riveted with two lips that I will have to fiberglass out because of damage and poor manufacturing.

I didn't have any problems reinstalling the cap, the screw holes lined right up, however the reason why it was effortless was due to the fact of reinstalling the cap prior to glassing in stringers. A lot of work? YES!! But once I remove the cap to reinstall the liner, the cap will again be effortless to reinstall and will line right up.
I honestly couldn't even imagine after the amount of time and money invested into a project like this, the cap not fitting, and forcing the hull sides in because of losing the original shape could actually prove to be dangerous by over stressing the fibers. When the hull sides pant it will only add more stress to a already stressed panel. There are other ways of holding the form, but by the looks of your gantry, reinstalling the cap would be a snap.
 

Shanestan

Seaman Apprentice
Joined
Aug 30, 2015
Messages
45
Thanks for responding so quickly!
I hear you. I work rotating 12 hour shifts and overtime is authorized as we are short on workers being out for sickness and others getting ready to retire. My job also funds my project and I actually turned down overtime so I could at least have 4th of July off to eat a steak and drink a beer or two.
As for what I have to do next, since my work space is near the size of yours, I borrowed a second boat trailer that I going to build scaffolding on so that the top can set down and move it out of the way, to free up the gantry crane, to get the motor out.
I like the idea of using the top but I am hoping my stringers are okay. The cradle I built to get the top off will not work to set it back down, so I will have to come up with a different lifting jig.
 

csasdaddy@msn.com

Petty Officer 2nd Class
Joined
Jul 6, 2016
Messages
109
Ok I figured out how to post now lol . I have a 1982 well craft sportsman . An I would like to say sir you have given me faith to tackle this boat luckily mine isn't as severe as yours . But you have done a awesome job . I was wondering if there is a trick to get the area were pilot seats are out . I need to remove it to replace string hers around the fuel tank
 

Second Chance 248

Petty Officer 2nd Class
Joined
Dec 28, 2014
Messages
113
Ok I figured out how to post now lol . I have a 1982 well craft sportsman . An I would like to say sir you have given me faith to tackle this boat luckily mine isn't as severe as yours . But you have done a awesome job . I was wondering if there is a trick to get the area were pilot seats are out . I need to remove it to replace string hers around the fuel tank

Welcome to the forum, I'm glad this thread has been some help for a few.
I would imagine that your configuration is similar if not identical to mine. Unfortunately, if it is identical to mine, the only way of removing what I call a stepped helm deck, you will have to remove the cabin partition walls, the trim panel that the stairs into the cabin are attached to and remove all the screws from the deck then remove the caulking. If it is sealed with 5200 like mine was you can use a propane torch and HEAT a metal putty knife which will aid you in breaking the caulk seal. The reason I stressed HEAT is you don't want to burn the gel coat by using a cherry red putty knife. From my experience adequate ventilation is a must due to the fumes of the melting 5200, however it surely speeds up the process.
Once the deck is free from the liner however is where I hate to break the bad news. You're not able to remove the step helm without major deconstruction. We were able to remove mine by obtaining a steep enough angle by having the rear floor removed and lowering one side of the piece down to the hull and barely achieving enough room to clear the gunnel. Your best approach is to slide the step helm forward into the cabin as far as possible to provide you with enough room to perform the work, hope it helps.
 
Top