Bayliner Victoria 2750 Command Bridge Removal

electrabishi

Cadet
Joined
Mar 13, 2015
Messages
18
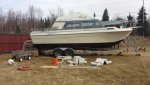
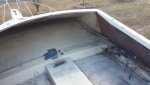
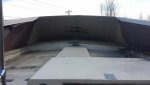
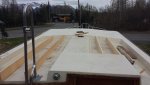
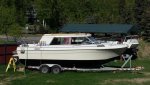
I've had this Bayliner Victoria 2750 for a couple years and don't much like the low speed stability. I've been pondering deleting the command bridge and replacing with a flat hard top. I don't really carry anything up there, not even passengers. Here in Alaska its still pretty chilly to even drive up there anyway. There's got to be at least 200 lbs + to remove from topside which will help with stability. If it weren't for the stability and I wanted to carry my rubber boat up there its hard to find a convenient place with the seats, helm controls and railing. If I remove the command bridge and then put my little boat up there I'll still be down a hundred lbs topside. Has anyone seen this done or can point to another thread discussing it? I've been watching GWPSR thread on "1981 Bayliner Victoria 2750 - Restore or Bust" for a couple years now, I realize now he getting near the end of the hull I wanted to discuss topside work, but his Sunbridge is quite a bit different than my Command Bridge. I'll try to attach a photoshop of what I imagine my will look like after. Any comments?

Thanks

2014-03-31 07.16.57.jpg
 
Last edited:

zool

Captain
Joined
Aug 19, 2012
Messages
3,432
Welcome to drydock, electra ;)

Most anything can be done, but I believe the bridge on those are one piece with the salon ceiling. I don't think its removable for transport, like on some larger models. But I could be wrong.

If it is one piece resting on the window frames, then you would likely have to cut the bridge walls off, leaving the deck, then maybe glass up and encapsulate some ply for reinforcement, tab it all around, fill/fair and either gel or paint. You could add some rails to the top, to support the little boat, to protect the new finish.
 

electrabishi

Cadet
Joined
Mar 13, 2015
Messages
18
You're right, the cabin roof is integrated. My thought was to cut the walls down like you said, then bringing the level walkway deck across level and cut the bridge walls off there. I don't think I really want to get into taking off the whole cabin roof just yet. By bringing the elevated walkway portion of the deck across it will leave some open spaces to slide my fishing rods and boat hooks. The boat hook already lives there and the rods, instead of hanging inside the cabin ceiling will now sit outside, just under the new deck. I have another image I photoshop'd to give the idea.

Well, it won't let me upload. I'll figure another way to get it posted.

(This is not my boat - just a stern shot I found on the internet)
Yellow_Bayliner_3a.GIF
 
Last edited:

zool

Captain
Joined
Aug 19, 2012
Messages
3,432
Use photobucket, upload images, then copy the img code, and paste it in the text here..
 

Mikeopsycho

Senior Chief Petty Officer
Joined
Feb 6, 2014
Messages
738
I'm a fan of flybridge cruisers, but I understand your wanting to shave off a bit of weight, and if you don't pilot your boat from the upper helm that seems like a good place to start. Around these parts I've seen the occasional removal of the lower helm to gain more cabin space, but this is the first time I've heard of someone wanting to do an upper lobotomy. :) Rather than completely removing the entire flybridge, have you considered just stripping it out? Even just removing the seats might give you enough room to store your tender, although I don't know how much weight this would shed. Anyway, good luck with your project, it'll be interesting to follow.
 

electrabishi

Cadet
Joined
Mar 13, 2015
Messages
18
Yeah, once I work up to the decision I'll do that. First strip out all the seats and helm controls and see if I like it. When I got the boat the upper helm controls were inop. I spent a couple weeks getting all the parts I needed to make it functional again. First time out driving from the top I could definitely tell how much stability was given up by just me up top. I allow two kids on the top at a time when cruising, but up on a plane is solid as a rock. But I gotta make sure they're down by the time I drop out of warp speed. Nobody stays up there very long anyway in this cold Alaska water. I really just need it to be a flat deck for the tender. The seats themselves may not save that much topside weight But there is a lot of glass in those walls.I haven't seen it done by anyone either. Thats why I'm asking here. Sounds like I'm the only crazy person to try. I actually did see a boat advertised as a 2750 that had a flat hardtop and no upper helm. I couldn't really tell if it was factory or if the guy cut the bridge off. If he did it was a good job. Unfortunately if was just a for sale ad for the boat and its already sold. The ad is no longer valid but the pics persist out there in the interwebs. What makes me think it was a retro is that he also had what looked like walks around planks hanging of the sides. I'll post them up here if I can find them. But its sounding like I just may be the only crazy one around ;-)
 

Mikeopsycho

Senior Chief Petty Officer
Joined
Feb 6, 2014
Messages
738
I'm surprised at how unstable your boat is with people on the flybridge, who'd a thunk it? Post the pics if you can find them, and post some pics of your boat too.
 

electrabishi

Cadet
Joined
Mar 13, 2015
Messages
18
I couldn't find those pics I thought were still out there on the interwebs. But I did find where I emailed them to myself. These pictures are not of my boat. They were posted on a "Boats for Sale" page. This one was advertised as a Victoria 2750. I think it was located in Canada somewhere. But it was interesting to look at. The ad did not mention any modification to the boat which made me wonder if it came this way, but I've found nothing to indicate Bayliner made a Victoria without either a command Bridge or Sunbridge. This looks like he removed the Command Bridge. Also too it appears he added rails along the outside to allow you to "walk around" the cabin.
OUEHlVnooGxRZt3mkIq0fRV_O1XCRhb1g7Rfx-THx4u4NDULFcRHOzEIkqb4T6VgiY68BlcRl5sVDuqd7s01GujpH8Ncl7tBOQWoQ5fYDJPKWJ__KulzSgJeHQyIyR1-SyGMQXSehVvSdRa-4_LmS4blrLLeJheuYxF-Bdx8=s0-d-e1-ft


3hNDzlAhLqc51nvWWDdV40Lc68YBdwfH9hBFrajpguUIw6gLKZYmSykvEDVf8Dqt02Yug8sr2t4yTVp9yo_SwkTx1n7RkA_lgHSkIGdl36Jr1_w1uFbRd46fB48SULTqDoRlR8uFHmYT6qIknmSRkrUN4njx_JHS_HZCyEAR=s0-d-e1-ft
 

electrabishi

Cadet
Joined
Mar 13, 2015
Messages
18
Here's a thread on The Hull Truth where nadornati starts to do exactly what I'm contemplating to a 26' Pacemaker http://www.thehulltruth.com/boating-forum/387293-pacemaker-26-restoration-11.html However as you follow through I think his project scope changes to the point where he winds up taking the whole cabin off, gutting the inside and turns it into a Center Console..... and then to go another step further, converts it to an outboard. I don't intend to go that far with my Victoria. Just the command Bridge off.

324175d1367102061-pacemaker-26-restoration-img_6758.jpg
 

electrabishi

Cadet
Joined
Mar 13, 2015
Messages
18
Still a little cold here, but I'm starting to work on replacing the bunks on my trailer. While I was out I climbed up inside under the tarp to look at the bridge walls over the windows. It looks like there is a glassed in channel over the tops of the windows all the way around and the upper walls are just glassed onto the outside edges. It looks like I can cut the bridge walls flush with the top of that channel and have a nice 2" wide flat sill to cover over the whole roof. Rear edge of the cabin to the front, just over the windshield, is 12 ft. Looks like the rubber boat will take up 9 ft of the forward portion and leave 3 ft on the aft of the cabin roof for something, maybe a fishing tackle locker or box of sorts. As soon as I get the tarp off for the summer I'll start snapping some pics.

Thanks to all those who take the time to posts about their own DIY projects. Its quite inspirational.
 

Mikeopsycho

Senior Chief Petty Officer
Joined
Feb 6, 2014
Messages
738
It'll be interesting to see how you progress. I'll be watching :peep:.
 

electrabishi

Cadet
Joined
Mar 13, 2015
Messages
18
A couple weeks ago I got the new bunks on my trailer. While it was up I got some paint on the hull. While it was in the 50's here this weekend I got to the real task at hand. Cleared out all the seats, railing, hardware, wiring and cut the upper helm dash board out. 180 lbs removed and the walls are still up. I was debating whether to keep them and just stuff the rubber boat up there. But it won't fit far enough up under the front of the command bridge to keep from sticking over the aft of the cabin. SO I'm going to go ahead with plan A and cut the whole thing off. It appears the roof of the cabin is all 1 piece and sealed except for all the holes the PO put in it to mount things to the ceiling of the cabin, and those that Bayliner put in there to secure the seats.The Command Bridge walls slip fit and is glued to the edges of the roof. So I should be able to make a cut about 1/2" from the top edge of the roof. The plan is to either deck with plywood or get fancy and strip plank it then either glass or otherwise seal it. Whereas the seat area of the upper deck is pretty sturdy because of the vertical molded ribs, the front is pretty flimsy. Whichever way I chose to cover it I think I'll glue strips down across the front part of the roof to help give the covering some support. Any ideas on how that should go? I'm going to try to leave a 1/2" of the Command Bridge walls and meet them with the covering skin, then trim flush.

With the 180 lbs already removed (the dash itself with the steering wheel was 40 lbs) the walls may still weigh in around 70 lbs (I'm hoping) for a total weight removal of 250 lbs which is more than I expected. I only weighed the things I wasn't putting back on. The antennas, horn, lights will eventually make it back topside.

Here are a few photo's. Any comments are welcome.
 

Attachments

  • 20150418_140541.jpg
    20150418_140541.jpg
    40.4 KB · Views: 3
  • 20150419_150335.jpg
    20150419_150335.jpg
    30.4 KB · Views: 3
  • 20150419_150344.jpg
    20150419_150344.jpg
    21.5 KB · Views: 3

electrabishi

Cadet
Joined
Mar 13, 2015
Messages
18
Now this is what it looks like today :-(
 

Attachments

  • image_219195.jpg
    image_219195.jpg
    47.8 KB · Views: 3
Last edited:

Mikeopsycho

Senior Chief Petty Officer
Joined
Feb 6, 2014
Messages
738
Yikes, the dreaded white cold stuff :eek:, and it's not grinding dust....yet :facepalm:.
 

electrabishi

Cadet
Joined
Mar 13, 2015
Messages
18
It has warmed up the last few days so I went ahead past the point of no return. Cut the top right off.

From an earlier report I removed 184 lbs total of seats, railing, hardware and dash with the steering and throttle controls.
Well the bridge walls themselves weighed in at 125 lbs (this is less the dash with controls that I cut out earlier).
So now I'm 309 lbs lighter, all weight that was above the roof line.

I'm going to try to minimize the weight I put back on for decking on the roof and whatever minimal chocks I'll need for landing my rubber dinghy on.

Here are some photos.

20150422_181055.jpg 20150422_181517.jpg 20150422_181914.jpg 20150422_181927.jpg
 

Mikeopsycho

Senior Chief Petty Officer
Joined
Feb 6, 2014
Messages
738
Are you planning to level off the entire roof somehow or just filling and sealing where needed? Sure looks a lot different now!
 

electrabishi

Cadet
Joined
Mar 13, 2015
Messages
18
No Title

I was considering just leaving the roof like it is. But the forward side that is cambered is just too flimsy. I will be walking on it to move the little boat up and down so I want it a little stronger. The plan is to glue down some topside stringers in the floor of the FB. Then glue 1" wide furring strips of plywood all the way across every 6" to 8" or so. Then as others have mentioned build up some thin ply skin over the entire top and then coat with glass. Somewhere along the way I'll glue down some good anchor points for the rubber boat chocks. Also as other have mentioned I'll definitely run some shorty hand rails across the sides. The gunnels (if you will) over the tops of the window frames (about 6" wide on each side of the cabin roof) is about 1/2" thick glass ply and is plenty strong for anchoring rails too. I'll even have 1/4" to 5/16" built up over top of that before I'm done. I only got to work a couple hours today but I did get the topside stringers cut and fit.
 

Attachments

  • photo220242.jpg
    photo220242.jpg
    75.1 KB · Views: 3

electrabishi

Cadet
Joined
Mar 13, 2015
Messages
18
No Title

photo221397.jpg photo221399.jpg photo221398.jpg photo221400.jpg photo221401.jpg photo221403.jpg photo221404.jpg photo221402.jpg I took a week of of work last month to try to get this done and wound up being sick the whole week. So a couple hours after work each day I've just about got it done. I decided not to run the 1" furring strips and glued the plywood right to the deck. I used 3/8" ply though and it is plenty strong. Working now on filling the valley along the edges where the stub of the flying bridge wall sticks up. I got a pretty even cut with the cordless circular saw and its pretty even with the top of the new plywood. There's still a few voids I have to fill that drained through. The top is whetted and now I'm trying to decide whether to even glass it or not. What do you guys think? There is a pretty substantial amount of epoxy in the corners all the way around the edges and the ply over the forward part does not even flex when I walk on it. Is there any other reason for putting the glass down than adding strength? I supposed it would give some protection from dings getting all the way to the wood. I have all the glass cloth. Because I missed that whole week of work I also missed being able to run the boat this memorial day weekend. So here I am still working.
 

Attachments

  • 20150522_175343.jpg
    20150522_175343.jpg
    76.1 KB · Views: 2
Last edited:

electrabishi

Cadet
Joined
Mar 13, 2015
Messages
18
This may not be the best place to start this question, but it has to do with the upper bridge removal and all the wiring that I mined out. Since all the controls and indicators are parallel between the upper and lower stations for now I just taped the ends of the upper wires that I knew what they were and rolled them up under the gunnel for now. I wanted to test that everything still works and it does except for the tilt control and the starter. There are two Yellow/Red Stripe wires that are the key start lines. Apparently those are supposed to run through a Neutral Safety switch to prevent starting in other than neutral. However I do not see a switch on either of the controls. There are/were no wires running into either of them so I don't think its hidden. I read in another thread they are typically on the upper one. But I have neither. I am presuming that because there were two wires going to the top start switch, one of them must be the start line coming from the bottom station to the top station and the other is from the top station to the starter relay. I tried just twisting those two together as I have read in other threads on this subject but still no joy on the starter. Also tried moving the gear select (the one thats left) slowly forward to reverse to see if for some reason it would clear an interlock.

So I have a few questions you guys may know the answer too, or which thread to point me to. The leg is in the raised position and there is no oil in it yet from the de-winterizing process. I just want to make sure the starter circuit kicks the engine over.

1. Could it be the neutral safety switch be aft near the shift mechanism on the outdrive?

2. Will the engine start with the leg in the all the way up position?

3. Will the engine try to start with no oil in the leg?

Just wondering if there are interlocks for those too.
 
Top