New structure for fiberglass floor

cele93

Seaman Apprentice
Joined
Mar 12, 2015
Messages
39
What did you use to sand the gellcoat off with ? In the last picture the area just in front of the paper towel roll is new glass ? I am wondering what the gray part is . Was the gell the blue color or was that paint ... If there aren't any bad grinder swirl marks you may still just be able to patch the holes and fair it . Then shoot more gell coat . If you do decide to glass the whole hull on the outside maybe a layer of some fine veiling cloth will help keep the fairing down to a minimum .Idk ..
Have you ever sprayed gell before ? You will need a good plan when you do . I have never sprayed any gell myself so I really can't give much advice on that ..
Hopefully ondarvr can get you going in the right direction ...Painting it may be easier .. ;)
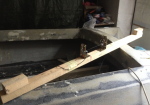
alright, well: we sanded the hull using a grinder of this type:
$(KGrHqIOKjwE08mNPR+0BNcQ2iMGgw~~_35.JPG
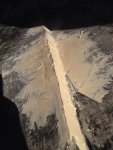
and as you can see we made those bad signs on the bow. the white-grey material that you see is "stucco" (?? idk the right term), however a stuff used for leveling the hull. in any case that photo is too old, now we sanded with a more proper sander:
360299_600_370.png
the actual situation is a smooth hull, only fiberglass. anyway, the blu stuff was paint:)
 

cele93

Seaman Apprentice
Joined
Mar 12, 2015
Messages
39
That patching diagram will work, but I suggest patching the outside only. When you are finished patching the outside cover the entire inside with new cloth and resin (layups) like this guy did to his boat that had a thin hull from too much grinding:
http://forums.iboats.com/forum/boat...8-83-lund-sirius-total-gut-and-rebuild/page11
Look at the next 5 or 6 pages to see how he covers the inside entirely with new fiberglass.
nice post!! i will follow it for the costruction of the structure!
 

kcassells

Fleet Admiral
Joined
Oct 16, 2012
Messages
8,599
If you have already done this type of approach to date for repaires then you need to finish in the technique. In regards to the hull exterior you should complete with sanding, filler and fairing.
In regards to the other areas that you can repair from the inside hull then again this approach is correct except on the outside of the hull place a pc. of foil, tape or other film to prevent the interior work from just falling thru to the outside. When completed then you can remove tape/foil apply filler/pb then fair then make ready for paint.
The concept is like Phelps and others have said. To make the repair inside the hull will eliminate a lot of the exterior sanding that the fiberglass patch on the exterior will make
Also as stated by others the interior work is not as or has to be as pretty as the work on the exterior
By the way your concept is correct in regards to the bevels also so do that. inside the boat. On the exterior remove any delaminated glass. You will end up with more of a interior beveled area and on the exterior a circle/hole that is easier to cosmetically


yabadabdoo-submit.PNG
 

sphelps

Supreme Mariner
Joined
Nov 16, 2011
Messages
11,435
Looking back at the pictures this is really going to be a sweet little boat . I really like he lines of the top cap and hull . Do you know the year and model ?
Do you have a windshield for it ? What kind of color scheme are you planning ?
Just a thought ... On the bow what do you think about the idea of inlayed wood strip planks in the 2 recessed area's ... Then maybe some wood accent pieces inside .. :joyous:
 

cele93

Seaman Apprentice
Joined
Mar 12, 2015
Messages
39
Thanks for the scheme kcassels and for the suggestions :)
Looking back at the pictures this is really going to be a sweet little boat . I really like he lines of the top cap and hull . Do you know the year and model ?
Do you have a windshield for it ? What kind of color scheme are you planning ?
Just a thought ... On the bow what do you think about the idea of inlayed wood strip planks in the 2 recessed area's ... Then maybe some wood accent pieces inside .. :joyous:
idk the model, in italian we call it a modified "lancino", maybe from 70s, it's a boat realized with the mould but internally it was been remade (badly) on the floor and the structure under the top cap. the guy who sold us the boat was trying to restore it but he had not so much time to spend on it, however he cut a sheet of plexiglass for the windshield but we don't know if we will mount it... the inlayes wood strips plank sincerly is too difficult and too hard-working... for the colours we have not yet an idea (probably white and light grey) :)
 

cele93

Seaman Apprentice
Joined
Mar 12, 2015
Messages
39
guys i've got a question: the existing layer of fiberglass is very (really, very) thin, do you suggest to cover only outside, only inside or both? the hull now it's a layer of pure fibreglass, there are no gel, primer, paint ecc, only fiber
 

ondarvr

Supreme Mariner
Joined
Apr 6, 2005
Messages
11,527
Only the inside. Doing the outside is of no real help, it just complicates things more than it is now.
 

cele93

Seaman Apprentice
Joined
Mar 12, 2015
Messages
39
ok, thanks! yesterday we built the structure that hold the boat:
Foto 17-03-15 21 10 52.jpg
Foto 17-03-15 21 10 54.jpg
 

cele93

Seaman Apprentice
Joined
Mar 12, 2015
Messages
39
today we divided the top cap from the hull and we finished to sand the remaining imperfections :) maybe the boat now will not float :)
2.png
3.png
 

sphelps

Supreme Mariner
Joined
Nov 16, 2011
Messages
11,435
Yep you do have a few holes to patch I see .. :D
I would place a few more supports /bunks under the hull . At least 2 in the middle like your outside ones .. .
You need to be careful that the hull does not flex or spread out while your glassing the stringers and deck back in .. If it does you may have a hard time replacing the cap when the time comes ..;)
 

cele93

Seaman Apprentice
Joined
Mar 12, 2015
Messages
39
yeah we're thinking about a structure for avoiding the enlargement of the hull:) and for the 2nd bunks we're working for it!
 

cele93

Seaman Apprentice
Joined
Mar 12, 2015
Messages
39
yesterday we covered up all the external hull with la layer of epoxy resin, today we are Going to repair the leaks externally Foto 27-03-15 18 47 51.jpg
 

cele93

Seaman Apprentice
Joined
Mar 12, 2015
Messages
39
Hi, yesterday we placed a 1-layer patches externally over the holes, only for give to the hull the right lines, then we covered the edges with epoxy based filler product. The next step will be sanding that edges to rebuild the runners and after we will overlay the entire hull with 2 layer of fiberglass. work in progress images
Foto 01-04-15 18 23 59.jpg
Foto 01-04-15 18 24 04.jpg
Foto 01-04-15 18 24 07.jpg
 

Attachments

  • Foto 01-04-15 18 24 04.jpg
    Foto 01-04-15 18 24 04.jpg
    172.4 KB · Views: 0

cele93

Seaman Apprentice
Joined
Mar 12, 2015
Messages
39
hi guys, finally we finished the hull externally, but now we have some air bubbles below the 2 layers of fiberglass, can someone tell me which is the process for repair them? thanks!
 

sphelps

Supreme Mariner
Joined
Nov 16, 2011
Messages
11,435
If the bubbles are large you will need to grind them down and patch like a normal patch . If its like very small like the size of an apple seed . Not much you can do with it . Ok just to leave it I would think ..
 

sphelps

Supreme Mariner
Joined
Nov 16, 2011
Messages
11,435
Yep grind the bubble out and patch in with a few layers of what your working with .... Sand smooth and fair ...Start with small filler pieces the size of the depression
Then the last piece will overlap a bit ...
 

cele93

Seaman Apprentice
Joined
Mar 12, 2015
Messages
39
No Title

Hi guys, some news about our project! we decided to use the extruded polystyrene to make the 3 stringers (1 in the center and 2 on the sides). the material is pretty solid (not like the polystyrene made by little balls) and lighter than wood, we are going to cover it with 3-4 layers of fiberglass for much structure. we glued it on the boat with the polyurethane foam, because it chimically combines with polystyrene:
Immagine.png
fetch


for make it on the same level of the future floor we used a DIY thermocutter: a spring steel wire connected to a variable transformer, result---> a smooth and accurate cut!!!
fetch
fetch


for the floor we bought some 8mm marine plywood ;)
 

Attachments

  • photo221689.png
    photo221689.png
    924.2 KB · Views: 0
  • photo221690.png
    photo221690.png
    684 KB · Views: 0
  • photo221691.png
    photo221691.png
    778.4 KB · Views: 0

Woodonglass

Supreme Mariner
Joined
Dec 29, 2009
Messages
25,924
What weight of fiberglass cloth will you be using to go over the stringers??
 
Top