help to repair through holes that secure deck to hull

PaulHaig123

Cadet
Joined
Aug 13, 2012
Messages
10
Hello all,

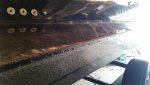
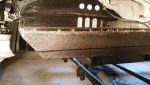
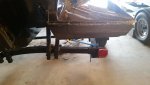
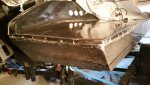
I am looking for help / suggestions to repair my leaking tunnel hull, 21' Seabold Sidewinder.
Please see attached pictures.
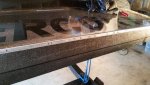
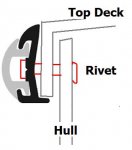
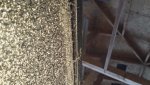
I have found that where the deck joins with the hull there are many places where water is able to penetrate.
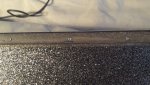
When the rub rail is fastened it joins the deck and the hull with a rivet.

In the past someone has attempted to repair and drilled out the original rivets and replaced with larger rivets (resulting in larger holes through the deck and hull.)

For the repair of existing holes my thoughts where:
-drill out the holes
-clean with acetone
-fill holes (but I am not sure with what product to use here)

To reinstall rubrail and re-fasten the deck and hull my thoughts were:
-first install sealer in the gap between the deck and the hull (not sure what product to use here)
-drill new holes
-join the deck and hull by using screws + sealer (not sure what product to use here)

Any suggestions or guidance to existing posts that cover this topic would be much appreciated.

Paul.
 

Attachments

  • 1.jpg
    1.jpg
    58.4 KB · Views: 1
  • 2.jpg
    2.jpg
    82.7 KB · Views: 1
  • 3.jpg
    3.jpg
    80.2 KB · Views: 1

jakedaawg

Rear Admiral
Joined
Jun 26, 2012
Messages
4,275
Why not use some 3m 4200, and rivets. You could even put a backer strip behind it although I think there already is one. Seebold is still makeing boats. You could give him a call. Tim Seebold, missouri. Prolly find him on Facebook. He builds F1's and such now. Wins alot also.
 
Last edited:

alldodge

Moderator
Staff member
Joined
Mar 8, 2009
Messages
40,751
Might suggest filling the holes with marine tex epoxy. Fill from both sides and keep the epoxy from filling the holes from both sides. Maybe use some wax paper between to keep them apart. You don't want to fill the to layers so the epoxy makes a bond between the two layers, Once filled and cured, drill holes to fit. If you can drill some more holes to add a few more rivets. Putting a thin aluminum strip may help if you can find rivets long enough.

fetch


fetch


fetch
 

PaulHaig123

Cadet
Joined
Aug 13, 2012
Messages
10
thanks for the quick replies so far. Learning already.
I will double check and post pictures, but I do not think I have access to both sides of the joint. Ie: I do not have access from the inside of the hull.

I am curious why rivets over screws? I can not see them being leak resistant over time. Given the pounding / vibrations that occur to the hull?
I suppose if there is an aluminium backer strip on the inside this may help. Again I will have to double check if I can even get access this way.
 

jakedaawg

Rear Admiral
Joined
Jun 26, 2012
Messages
4,275
I would think you would have to be moored quite a bit to get any significant water through there but that buts not made to stand still.
 

Watermann

Starmada Splash of the Year 2014
Joined
Jan 12, 2013
Messages
13,753
What material is that, it looks like bed liner in the pics. Your pictures are so close there isn't any perspective on the location, can you post some more pics with perspective? Is this a glass boat and is that a rub rail on the side of the hull or is it the trim rail that goes over the cap and hull seam?
 

PaulHaig123

Cadet
Joined
Aug 13, 2012
Messages
10
Thank you for the replies. I will work to get some better pictures tonight.
picture showing the larger holes are of the stern (you can just make out the motor in the background of the picture)
this is the section where water is coming in.

jakedawg, HA :) you right the boat typically does not sit in the water long. its usually flying. but when it is it does not take long for too much water to make its way in.
 

jakedaawg

Rear Admiral
Joined
Jun 26, 2012
Messages
4,275
You might get better help with this over on scream and fly. While most of the work posted on here is superb and very educational and proper, this site is not really performance related. I would be surprised to see more than a handful of boats with more than a 28" prop on here.

With that being said, please take the time to post back here also. It nice to see things that don't go fishing every once in awhile.
 

gm280

Supreme Mariner
Joined
Jun 26, 2011
Messages
14,592
You might get better help with this over on scream and fly. While most of the work posted on here is superb and very educational and proper, this site is not really performance related. I would be surprised to see more than a handful of boats with more than a 28" prop on here.

With that being said, please take the time to post back here also. It nice to see things that don't go fishing every once in awhile.

While I know there are many other boating sites and how to's as well. I believe this is the first time I've ever seen a iboat member tell another iboat member to go to another boating site for better info concerning their boat... Now I have seen everything! :tape:
 

Woodonglass

Supreme Mariner
Joined
Dec 29, 2009
Messages
25,924
Uhhhmmm, What's your boat powered with? Is the Cap/Hull joint currently leaking? Are there adequate Rivets/Screws currently in place to secure it? What does the Rub Rail configuration look like? If its only a matter of filling the holes to ensure or stop water penetration then I'd just use some 3M 4200 and be done with it. If you need additional holding power then stainless screws buttered with some 3m 4200 would be ideal.
 

PaulHaig123

Cadet
Joined
Aug 13, 2012
Messages
10
No Title

Thanks for the replies. I did not get back into the shop until this weekend. I have attached more pictures.
  • You can see from my attached picture how the rubrail and deck and hull are secured.
  • Boat is powered by a 2.5L Mercury Off Shore Racing. Its pretty quick and the hull takes a good beating if in the choppy water.
  • I think there are adequate pop/blind rivets/and a few screws holding the rub rail in place. Unfortunately as per the pictures many of the original pop rivets were replaced with larger rivets and many of them are loose or the rivet 'spike/mandrel (part that pulls the rivet and causes compression fit) has fallen out so there is a clear hole right though the rivet into the hull.

Current status:
I have already started to drill out the rivets and removed the aluminum rubrail and cleaned up most of the caulking/adhesive that was attempted to fix this issue in the past from previous owner.

At this point I am thinking I want to refill the holes of the fiberglass deck and hull with some sort of epoxy or product that will harden and be strong enough to allow me to predrill and then use screws to fasten the rubail and securely join the deck to the hull. Most likely I may just predrill new holes where there is untouched fiberglass.
I am looking for any recommendations on what product to use for this step.
I don't think 3M 4200 adhesive/sealant is a product for this (however will be used for filling the gap between the deck and hull)

As per some questions above, I did take a closer look from the inside of the boat. I can only get access to the deck and hull joint at the stern of the boat (actually where most of my problems are). There is no aluminum strip for the blind rivet to mate to. Could not get a good picture as the lighting is pretty poor and no real reference for the viewer.


Thanks in advance for any guidance.
Paul Haig.
 

Attachments

  • photo216625.jpg
    photo216625.jpg
    123.2 KB · Views: 0
  • photo216626.jpg
    photo216626.jpg
    148.7 KB · Views: 0
  • photo216627.jpg
    photo216627.jpg
    102.3 KB · Views: 0
  • photo216628.jpg
    photo216628.jpg
    167.4 KB · Views: 0
  • photo216629.jpg
    photo216629.jpg
    13 KB · Views: 0
  • photo216630.jpg
    photo216630.jpg
    170.9 KB · Views: 0
  • photo216631.jpg
    photo216631.jpg
    156.1 KB · Views: 0
  • photo216632.jpg
    photo216632.jpg
    172.6 KB · Views: 0
Last edited:

PaulHaig123

Cadet
Joined
Aug 13, 2012
Messages
10
Alldodge, thanks for the tip on Marine Tex Epoxy, from their page it seems like very strong epoxy.
I will give that a try and make sure not to bond the top deck and hull together in the process.

Paul
 
Top