77' 16ft Starcraftt ss

64osby

Admiral
Joined
Jul 28, 2009
Messages
6,799
Sand all the paint off around the two areas. Wire brush the recessed areas. Clean with acetone. Fill voids with jb weld and smooth it over. Sand before it fully hardens. Prime any bare aluminum areas with self etching primer. Prime and paint
 

Watermann

Starmada Splash of the Year 2014
Joined
Jan 12, 2013
Messages
13,753
Found this in another post on here from Mark_V......:

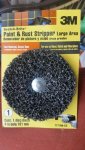
1] scuff sand entire boat with a sanding sponge to ensure it is smooth
2] scrub boat with soap and water and rinse well
3] wipe down THOROUGHLY with white vinegar and let dry
4] paint Rustoleum (thinned out some) with a good natural bristle brush - two coats. Let dry well and then wet sand LIGHTLY with 400 wet and dry paper. Tack off dust etc with a clean cotton rag and paint thinner, then brush on third and final coat with very clean brush

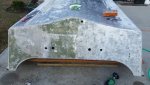
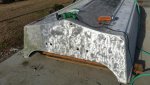
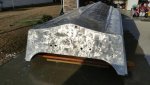
Since this will be a hunting boat and ran into sawgrass/brush and everything else on the water, these are my next steps. the outside of the whole boat is white now, Ill be goin for a green, brown, or tan on the outside. Im hoping to get it off the trailer and start sanding away this weekend. Maybe even today.

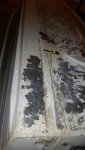
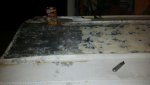
Majority of the white paint is on it pretty good. Only small areas where I can see it is bubbling/peeling. So I will be hitting those areas good and feathering out. Ill probably hit around every rivet good too. Ill post pics if I actually get to it. Two little girls under 3 keep me tied up pretty good on the off days.


Some steps are missing there that I would take on the prep. The reasons for vinegar is not only to clean but get the AL ready to take primer by neutralizing the alkaline effect of oxidation. So the step missing is using SE primer on the bare AL spots.

It look's to me like your hull has a 2nd paint job over the original right? That almost always requires a full strip job to bare.

Sanding fresh paint between coats?. Put the second coat on before the first one cures is all you have to do and 3 coats, no way not for me only 2. I can't brush or roll paint on a boat hull, so I had to pop for an HVLP spray gun.


This is the vinegar stuff I use...

k2-_21e21495-c5c0-483c-b31b-65669c6104a9.v1.jpg
 

g0nef1sshn

Lieutenant
Joined
Feb 24, 2015
Messages
1,291
Hows this back transom look? Is that what you call pitting? I pick up these supplies up today. will these jb weld products work on these corrosion spots on the transom also? Opinions welcome. Also picked up these primer spray cans and 2 qrts of camo brown paint. I would have sanded today, but left boat out and its now wet. Also cold and rainy outside still.


20150228_135830_resized.jpg 20150228_135905_resized.jpg 20150228_140131_resized.jpg 20150228_140220_resized.jpg 20150228_140323_resized.jpg
 

Watermann

Starmada Splash of the Year 2014
Joined
Jan 12, 2013
Messages
13,753
I've seen worse and larger pitted transoms that have way more holes. Nothing I see there than looks like a problem.

Check this out and feel lucky!

IMAG1158.jpg
 

g0nef1sshn

Lieutenant
Joined
Feb 24, 2015
Messages
1,291
So I got some sanding done on the hull and the back of the transom.. This work has made me think that I am going to pick up some paint stripper and go that route. Next days off I hope to experiment a little with the stripping process. The two other pics are holes toward the bow right in the keels. There is a whole in each keel. Alittle research and I found that these were intentional for the keels to be able to drain i guess. Any recommendations for these? Leave them vs fill them in?


20150301_171053_resized.jpg 20150301_164105_resized.jpg 20150301_164122_resized.jpg
 

dozerII

Admiral
Joined
Oct 25, 2009
Messages
6,527
Don't fill them in, in fact clean them out with the pressure washer. These allow the keel to drain, if you live in an area that freezes the expanding trapped water will split the keel or open the seam into the boat.
 

g0nef1sshn

Lieutenant
Joined
Feb 24, 2015
Messages
1,291
So im into this paint stripping thing, little work and first time trying it and got good results. Tried posting pics from my phone, ill have to fix it tomorrow.
 

Attachments

  • 2015-03-02 21.59.59.jpg
    2015-03-02 21.59.59.jpg
    9.5 KB · Views: 5
  • 2015-03-02 22.02.39.jpg
    2015-03-02 22.02.39.jpg
    9.1 KB · Views: 5
Last edited:

g0nef1sshn

Lieutenant
Joined
Feb 24, 2015
Messages
1,291
20150302_213538_resized.jpg 20150302_213520_resized.jpg


So the top pic is an area I had not sanded at all yet. With a 15 min. wait time this paint came of with ease. The bottom pic is an area of the hull I had sanded the loose stuff off and only had the paint that was bonded good. That also came off easily after 15 mins. most of the paint around the rivets seemed to have started bubbling off the fastest. I started scraping with a metal puddy knife, but then ended using a plastic one. I need to get some little bristle brushes for around the rivets too for when I cant use the pressure washer I borrowed. I will probably mess around a lil more tonight, then try to have the hull completley done by thurs. We will see.
 

g0nef1sshn

Lieutenant
Joined
Feb 24, 2015
Messages
1,291
Man, I am not even close to having my paint all removed and I am reading up on the painting process. Ive gone cross eyed. I have determed the primer I did get in the pictures I put up is not the best choice. I know this topic can go in circles, but here is where my brain is fried.


1. Do I need zinc chromate and a self etching primer? Or one or the other? I think I have read both and one or the other.

2. Zinc chromate only gets lightly dusted over aluminum and self etching will be a full/light coat?
 

g0nef1sshn

Lieutenant
Joined
Feb 24, 2015
Messages
1,291
Ok, So Im going with a self etching primer and the paint that I have. Im way ahead of myself here. Tomorrow I want to get alot of that stripper down and cover it with plastic. Ill test that out tonight on a small section tonight. Also got a better brush and scotch pads to hit better around the rivets. I used a toothbrush last night, it didnt last to long.
 

jbcurt00

Moderator
Staff member
Joined
Oct 25, 2011
Messages
24,871
Yes, you can use ZincChromate(ZC) OR SelfEtching(SE) as a light dusting coat over bare aluminum

I don't know anything about the camo paint you've chosen, but, IMO, most paint jobs turn out (and hold up) much better if you prime w/ a primer from the same maker as the paint, using what they'd recommend as best under their paint, in as many primer coats as they recommend.

I don't think you can paint prep too much before the ZC/SE or between primer and paint, ALWAYS following the re-coat recommendations for each type of paint: ZC/SE, primer and topcoat paint.
 

g0nef1sshn

Lieutenant
Joined
Feb 24, 2015
Messages
1,291
Yes, you can use ZincChromate(ZC) OR SelfEtching(SE) as a light dusting coat over bare aluminum

I don't know anything about the camo paint you've chosen, but, IMO, most paint jobs turn out (and hold up) much better if you prime w/ a primer from the same maker as the paint, using what they'd recommend as best under their paint, in as many primer coats as they recommend.

I don't think you can paint prep too much before the ZC/SE or between primer and paint, ALWAYS following the re-coat recommendations for each type of paint: ZC/SE, primer and topcoat paint.


I have been reading about following the painters make recommendations. I believe this paint said its one of those that works with a lot of them, but I will recheck that and if I need to Ill return it and go with another. Thanks for the reminder on that though.
 

jbcurt00

Moderator
Staff member
Joined
Oct 25, 2011
Messages
24,871
Make sure you know and follow the recoat window recommendations for both primer and paint too........... How many coats of primer, how long to cure between, proper paint prep before topcoat, whats the window for applying a 2nd coat of topcoat. AND how long it takes to cure really well once you're done.
 

g0nef1sshn

Lieutenant
Joined
Feb 24, 2015
Messages
1,291
The rear half minus my test from last night I did the "cover with plastic" method and I think it worked better then not using it on the half towards the bow. But, I did not pre-sand the bow area so that could be a factor. I sanded the rear half with 8o grit. So on the rest I think I will pre-sand with the 8o and cover in plastic. It was that noticeable. Gave it a good wash with dish soap before throwin it back inside the garage (HOA).


20150304_001207_resized.jpg 20150304_001218_resized.jpg 20150304_001230_resized.jpg 20150304_001251_resized.jpg 20150304_001258_resized.jpg 20150304_001436_resized.jpg 20150304_001445_resized.jpg
 

g0nef1sshn

Lieutenant
Joined
Feb 24, 2015
Messages
1,291
More done tonght
 

Attachments

  • 20150304_143313_resized.jpg
    20150304_143313_resized.jpg
    34.1 KB · Views: 7
  • 20150304_163007_resized.jpg
    20150304_163007_resized.jpg
    30.2 KB · Views: 6
  • 20150304_164200_resized.jpg
    20150304_164200_resized.jpg
    27.8 KB · Views: 6
  • 20150304_170003_resized.jpg
    20150304_170003_resized.jpg
    32.7 KB · Views: 7
  • 20150304_171456_resized.jpg
    20150304_171456_resized.jpg
    33.3 KB · Views: 7

g0nef1sshn

Lieutenant
Joined
Feb 24, 2015
Messages
1,291
This stripper brush works geat!

20150304_143313_resized.jpg

I use the paint stripper first, the the strippper pad to get that old green stuff off.

20150304_163007_resized.jpg

Turned out nice.

20150304_171456_resized_1.jpg
 

Attachments

  • 20150304_143313_resized.jpg
    20150304_143313_resized.jpg
    34.1 KB · Views: 0

g0nef1sshn

Lieutenant
Joined
Feb 24, 2015
Messages
1,291
open.jpg open1.jpg


Here is what I would like to end up with. I am thinking I might want to add some additional knee braces to the transom though? Any others here that opened there up to tiller motor? Ill prabably go with brown carpet and some more seating.
 

Watermann

Starmada Splash of the Year 2014
Joined
Jan 12, 2013
Messages
13,753
That paint stripping chore is going on all over tin land right now. Everyone is always happy as heck when it's over and that actually signals the starting point of the rebuild.
 

g0nef1sshn

Lieutenant
Joined
Feb 24, 2015
Messages
1,291
Plans are arranged to pick this up on Monday. Used find in Clist right where my budget was at. I was actually about to buy a brand new smaller trailer with out a spare that would have cost a few hundred more. Ill probably be moving in Nov. so I had to spend money on a road worthy ready to pull trailer instead of a fixer upper. 18'7 long total.


IMG_20150307_105037_858.jpg IMG_20150307_105012_436.jpg IMG_20150307_105024_628.jpg
 
Top