1971 Starcraft Super Sport Floor Replacement and Such

turtle1173

Chief Petty Officer
Joined
Nov 29, 2001
Messages
437
Hey, thanks for all the great responses. Great idea on the plywood to walk on the inside. That gets uncomfortable very fast, trying to step only on the ribs.

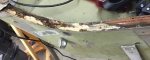
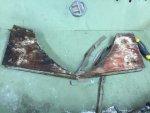
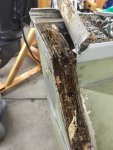
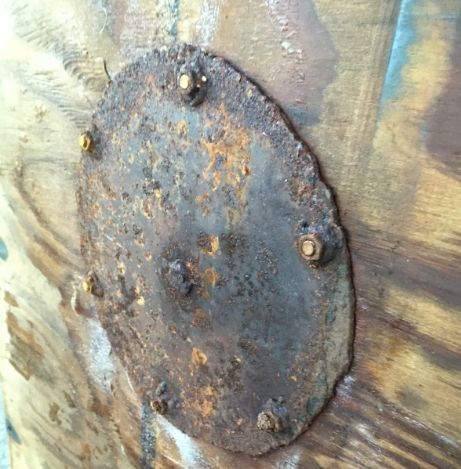
All this has been brought on (I believe) by these steel supports that were placed under the plywood to support pedestal seating. There was 4 of them that were attached to the underside of the plywood and laying right on top of the stringers. Terrible. Surely this was not done at the factory. I really don't know.


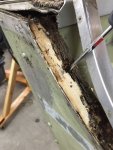
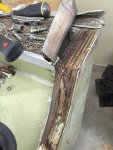
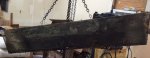
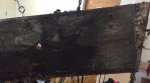
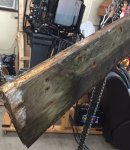
As for the transom, I've gone through it very closely trying to insert a screwdriver into the wood all over. It is solid all over, except for one spot as big around as my pinkie, right where the splashwell meets the transom. I can insert my pinkie finger a small amount. I'm hoping I can fill that in with epoxy and be fine. I've checked all the bolt holes where I pulled the old motor off and all is good there too. So, at this point, I don't plan to replace the transom.
 

Watermann

Starmada Splash of the Year 2014
Joined
Jan 12, 2013
Messages
13,753
^^^ nothing like that should be inside a boat, good lord only a complete dolt would do that. NO way the factory did that.

The transom of an outboard boat takes the brunt of the propulsion forces. Pull it. It's not that expensive to replace, only more of your labor with the end result being peace of mind.
 

turtle1173

Chief Petty Officer
Joined
Nov 29, 2001
Messages
437
Ok, you talked me into it. We will be pulling the transom. Hoping to get some work done on it this week!
 

GA_Boater

Honorary Moderator Emeritus
Joined
May 24, 2011
Messages
49,038
That is a classic PO screw-up, turtle. :doh: Looks like he used pressure treated ply for the flooring too :facepalm:

You made the right choice to re-do the transom. Any soft spot is always worse than it looks. It's the areas you can't get to, like under the flange where the splashwell meets the transom - The place you already found the soft spot.
 

turtle1173

Chief Petty Officer
Joined
Nov 29, 2001
Messages
437
No Title

Well I took the back two caps off and the metal strip that covers the top of the transom. Like you all are talking about, it's worse than I thought. Also the screws at the bottom of the transom came out way too easy. I'm sure that will be rotted when I get the transom out. I'm having trouble getting some of the screws out that go from the splash well to the transom. I sprayed liquid wrench all over the tough ones before calling it a night. Any suggestions on getting them loose?

Here's a few action packed pics!
 

Attachments

  • photo214644.jpg
    photo214644.jpg
    31.6 KB · Views: 3
  • photo214645.jpg
    photo214645.jpg
    91.5 KB · Views: 3
  • photo214646.jpg
    photo214646.jpg
    34.4 KB · Views: 3

dozerII

Admiral
Joined
Oct 25, 2009
Messages
6,527
That looks like pretty well every O/B StarCraft transom I have seen. Pretty much count an a bad transom if the floor is bad. Some of those screws can be a real pain. Will need someone on the inside with a ratchet and socket and a tight fitting Phillips screw driver with a pair of Visegrips locked on, on the outside. If you can break them loose without the screw driver slipping once they will usually come out.
 

Tnstratofam

Commander
Joined
Aug 18, 2013
Messages
2,679
I used a cordless impact drill/driver with a socket and adapter inside the boat while my stepson held a screw driver with vise grips as dozer mentioned on the outside. I used short bursts to help break everything.loose. I also used lots of penetrating oil PB blaster and Aero Kroil.
 

turtle1173

Chief Petty Officer
Joined
Nov 29, 2001
Messages
437
No Title

Well I got quite a bit done this afternoon. All screws/bolts removed from transom. I removed the drainage tubes that go through the transom. Got everything ready to remove it. The 2 side pieces are removed. The left hand side is falling apart.

The question is... How do I get this out? I don't have a floor in the boat, so I'm not sure if I can get the crowbar method to work. Sine the middle of the transom is in good shape, I was thinking of attaching a couple bolts and using my engine hoist to try and lift it out. I'm open to any suggestions.

Thanks for all your help!
 

Attachments

  • photo214748.jpg
    photo214748.jpg
    54.1 KB · Views: 3
  • photo214749.jpg
    photo214749.jpg
    92.6 KB · Views: 3
  • photo214750.jpg
    photo214750.jpg
    95.6 KB · Views: 3

Tnstratofam

Commander
Joined
Aug 18, 2013
Messages
2,679
You could try laying 2x4's across the stringers to use as a base to pry up with. Then add more as you need them to increase the height of your base for prying. The engine hoist method can also work if there is enough good wood left, and if you can keep the boat and or trailer from coming off the ground as you lift.
 

Tnstratofam

Commander
Joined
Aug 18, 2013
Messages
2,679
If you go the route of the 2x4's ( see previous post ) and pry the old transom out I found it best to work from side to side versus just prying in one spot constantly or just in the center.
 
Last edited:

turtle1173

Chief Petty Officer
Joined
Nov 29, 2001
Messages
437
No Title

It's out!! Came out with the hoist with no problem. You all were right. The wood is soft and squeezeable almost all the way around. Especially the bottom and sides. Thanks for talking me into this. Sure would have hated to put my new motor on that! Now the hard part...
 

Attachments

  • photo214767.jpg
    photo214767.jpg
    44.8 KB · Views: 2
  • photo214768.jpg
    photo214768.jpg
    60.2 KB · Views: 2
  • photo214769.jpg
    photo214769.jpg
    117.5 KB · Views: 2

GA_Boater

Honorary Moderator Emeritus
Joined
May 24, 2011
Messages
49,038
Yep - Looks like an another rotted transom. Now aren't you glad we pounded on you until you gave in? :D

Nah, we dfidn't pound too hard, but any soft transom wood is too much. When you're done the motor won't fall off! That's good.
 

byteman

Cadet
Joined
Jul 28, 2009
Messages
8
Those pictures sure do take me back. I would recommend Marine Tex on the corrosion. Did mine that way and still going strong for years now. After Marine Tex I did apply Gluvit.
 

Tnstratofam

Commander
Joined
Aug 18, 2013
Messages
2,679
Congrats on getting that transom out. Hmmm. Seems familiar... Oh wait I know it looks just like the rotten one that came out of my Starcraft.:D Make sure and check the knee brace for cracks as they can happen over time with a bad transom.
 

turtle1173

Chief Petty Officer
Joined
Nov 29, 2001
Messages
437
I've been working over some of the bad corrosion areas with the vinegar and wire wheel. How will I know when it's clean enough. I obviously don't want to dig very hard on the surface.

Also, how do I go about getting the grime off of the rest of the inside of the hull? I'm wondering if filling it back up with water and putting some kind of cleaner in it would do the trick. Any suggestions?
 

turtle1173

Chief Petty Officer
Joined
Nov 29, 2001
Messages
437
Thanks for all the help you all have given me. Today I actually started cutting out the transom. With the help of a skil saw and a jig saw, I got the first layer cut out. I haven't sanded it yet but I put it inside the boat just to check the fit. It fit a tad snug and it might have been slightly too high in the middle. Of course I hadn't cleaned out the aluminum tray that the transom rests in yet either. My son and I scrubbed back behind the transom with some cleaning vinegar. That made a huge difference. We cleaned out the tray too. After that dries I'm going to fit it again. When I get it just right, I'll cut out the other half.


I think I'm going to use that vinegar and scrub the boat throughout, then power wash it. I guess after that I might try some cleaning solution to finish up.
 

dozerII

Admiral
Joined
Oct 25, 2009
Messages
6,527
Scrub it down good with Simple Green or Spray Nine then pressure wash it till your happy with the out come. After your done with the vinegar cleaning you will want to rinse it real good before you move on to filling pits and adding Gluvit.
 

turtle1173

Chief Petty Officer
Joined
Nov 29, 2001
Messages
437
OK, everyone. What should be my next move on the transom? I've got both pieces cut, clamped together and sanded (still a little more sanding to do). Up until last night I had only inserted one piece at a time into the transom to make sure of the fit. Last night i put both pieces in. It was a real tight squeeze. I have a little play on the width but the thickness was tight. Now granted, they aren't epoxied together yet, so maybe that's the reason. But won't the epoxy had a little more thickness?

My plan is to epoxy the two halves together next but then what do I need to do? I will have to insert it to drill the holes, right? I'm nervous I won't be able to get it back out if I get it squeezed in there. Also, how will I get the holes lined up on the very sides to drill it? It has to go through the back hull, the transom and in the support on the front side. There's not much room for a margin of error. I know I'm not the only one to ponder these transom mysteries.

Thanks so much for all your help!


Tnstratofam

Commander
Joined
Aug 18, 2013
Messages
2,679
In my sig line you will see a link to my Starcraft transom replacement. You should find some useful info in it for drilling out all the holes. I would go ahead and epoxy or glue both pieces together, then slide it into place to drill out your holes. I went ahead and varnished mine before drilling my holes (Not sure if that was good, but it worked). Then I resealed the holes I drilled as well as used 3M 5200 sealant on all the screws and bolts to install it.

It is important that the knee brace, and the Z brace the transom wood sits in are both riveted securely to the hull before your final transom alignment for drilling the holes properly. Get yourself a drill bit guide, or make one out of square metal stock to assist with drilling. Your holes should be perpendicular to the outside transom skin for proper alignment.
 
Top