1960 Glasspar Citation

Ourfamof6

Seaman Apprentice
Joined
May 22, 2010
Messages
36
No Title

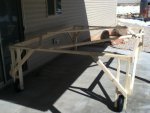
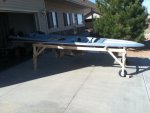
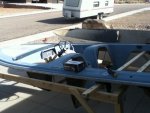
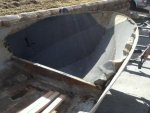
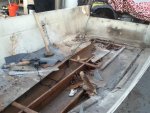
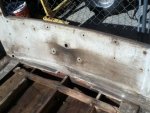
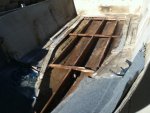
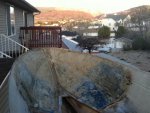
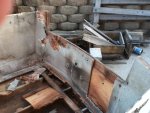
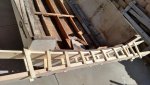
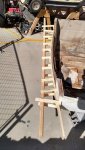
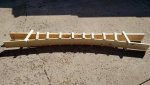
Ok it's been a while. Finally back at it for a short while. Using a rough idea from Andgott, I made a moveable stand for the cap of the boat. I'm not the best carpenter in the world and realize after I've done things what could have been done better. Some days it's all about FFF. Fit Form and Function. Anyway, using two 6 dollar wheels from harbor freight, a couple of bolts and a dozen 2x3s (yes 2x3, they're a little cheaper than the 2x4s and was able to save a little bit and not sacrifice much strength) this is what I came up with.(see pic.) I made it tall enough so the bottom parts of the seats will still be suspended off the ground and will be able to hold it when flipped upside down also. I will also be able to move it around like a wheelbarrow when I need more space in the garage. Soon, I hope soon I'll get the cap off and start some real work.
 

Attachments

  • photo216898.jpg
    photo216898.jpg
    56.3 KB · Views: 0

Ourfamof6

Seaman Apprentice
Joined
May 22, 2010
Messages
36
No Title

Ok. Got a lot done today. Finally moved the cap off the hull and on to the awaiting frame. This thing is going to be a life saver I can already tell. I then put the hull back on the trailer to transport it to my house. Wow does it seem flimsy with out the cap on. I mentioned this before but it's almost scary how thin the hull is. The cap will sit for a while while I work on the hull.
Once I got it home I started the rest of the deck demo. My deck was not as bad as many of he others I've seen. In fact the further toward the bow you go the better it is. The 2x8 that was across he hull was kind of a pain to get out. Ground the glass from the base but still had to use a sledge to nock it loose. Took all the measurements that I needed for the placement of the wood braces on the deck. Then I started cutting. Because of light constraints I didn't get as detailed as I should have. I will trim it up and get it a lot better before I go any further.
When I received the boat it had the blue rubber backed outdoor carpeting on the deck. Most was needing to be torn out so It was. It was also under the bow glued to the hull. A novice at boats I thought this was what you did. So in replacing it I found some grey boating carpet and troweled down the adhesive and made it nice and pretty. Little did I know this would leave me much more work.
What is he best way to get that off? I'm guessing a heat gun and a lot of sticky work. Any other ideas?
As far as the transom and the stringers go they are in pretty good shape. I'm wishing they were in horrible condition so they would come out easier. The stringers I'll actually be able to use as patterns for the replacements. I wish I didn't have to replace the transom. For the most part it's solid! It's only softer at the bottom that was below he deck.
Boy have I got a lot left to go. It's really fun though. I have met people over the years that have dedicated projects to people or causes and thought how neat that would be. Well now it's my turn. As I sat looking at it all yesterday as the sun went down, I reflected about my grandpa and how I wish I could sit and have a conversation with him. About life and choices and family and just a whole host of things. It was kind of surreal. I have the dedication to learn and do with this project things I've never attempted before. I will finish this for my family as a bridge to his generation.
 

Attachments

  • photo217079.jpg
    photo217079.jpg
    194 KB · Views: 0
  • photo217081.jpg
    photo217081.jpg
    75.7 KB · Views: 0
  • photo217082.jpg
    photo217082.jpg
    70.9 KB · Views: 0
  • photo217083.jpg
    photo217083.jpg
    74.5 KB · Views: 0
  • photo217084.jpg
    photo217084.jpg
    69.2 KB · Views: 0
  • photo217085.jpg
    photo217085.jpg
    70.2 KB · Views: 0
  • photo217086.jpg
    photo217086.jpg
    73.9 KB · Views: 0

Ourfamof6

Seaman Apprentice
Joined
May 22, 2010
Messages
36
A thought about hull thickness. I read through nursemans thread on his maiden voyage into boat resto and saw he had put several layers of glass on the sides of the hull. I know this will add a lot of cost and work, but is this something I should consider?
Wow I can't believe I'm really doing this.
My end goal is next summer going to Henry's Lake in Idaho. Got a year and a few months to go. Gives me a timeline to finish.
 

nurseman

Lieutenant Junior Grade
Joined
Jun 2, 2013
Messages
1,045
Hey Ourfamof6, I am soooooo glad that I added those extra layers on my hull. It was super flimsy when I demo'd it, and after I was done, it was super solid! I added 2 layers of 1708, and I would estimate I went through a fiver of resin to do both layers. So when you think about it, it didn't add that much expense, and it gave me a LOT of peace of mind.
On the other hand, it lasted all of those years with the hull as thin as it is, so does it really need to be beefed up? In the end, only you can decide that. Great to see you moving forward!
 

Ourfamof6

Seaman Apprentice
Joined
May 22, 2010
Messages
36
No Title

Got the carpet out using a little help from ole Sol. Left it in the sun long enough to get it a little warmer so the glue was a little more forgiving. Took a wide chisel and pulled then scraped then pulled then scraped. You get the idea. Need to get the glue all gone from the inside of the hull. The inside wall in the bow is not smooth. It's actually rather bumpy but uniformly so. See pic. I don't want to sand it. The hull is thin enough as it is, but am worried if I use some kind of stripper it will degrade the glass and epoxy. Can't just leave it even though its under the bow. Ideas?? Also boy did I catch myself in an almost 'oops'. Started tearing into the transom and set my saw to a good depth and off I went. Then I realized I forgot to make a template of the curvature of the transom. Am planning on screwing a piece of 1x4 against the transom then using 2 2x4 together along with strips from the 2s to the 4s connecting them to give me an outer edge curve template. Back to work for the week. Will start again sometime this weekend.
 

Attachments

  • photo217153.jpg
    photo217153.jpg
    61.1 KB · Views: 0
  • photo217154.jpg
    photo217154.jpg
    74.5 KB · Views: 0
  • photo217155.jpg
    photo217155.jpg
    72.3 KB · Views: 0

Corjen1

Lieutenant Junior Grade
Joined
Aug 24, 2013
Messages
1,237
Great Story, Great boat, mind if I tag along?

If you like, you can get a free photo bucket account, load your pix to it and when you want to show us a picture, copy the "img code" on the right of your picture, paste it directly into your post. It will show up nice and big.....like this...(helps especially when you are wanting some help on something..)

Related to your aluminum restoring question, these are shots of a couple pieces I did with a buffing wheel and some brown rouge..


I cant wait to see this one come together!!
 

Ourfamof6

Seaman Apprentice
Joined
May 22, 2010
Messages
36
Thanks Corjen1. Happy to have you tag along. I need all the help I can get. Glad to see a response related to polishing the "trimmings". Will work on the photo bucket thing this weekend. Then I can use a better camera than just my iPod. Will be workin on the darn flooring glue this weekend, but need a few ideas. Anyone have any? Thanks again for the encouragement and the help.
 

sphelps

Supreme Mariner
Joined
Nov 16, 2011
Messages
11,432
Grinding off is the only thing I can think of ... Maybe soak a rag in acetone and let it sit on it for a bit and see if it loosens up some ..
 

nurseman

Lieutenant Junior Grade
Joined
Jun 2, 2013
Messages
1,045
Looking at those pics, it looks like grinding is your best bet. Like Sam said, try soaking it with some acetone to see if it softens up. You might try a heat gun as well. There are adhesive stripper/removers that work good also, but I don't know what that will do on the glass...
 

Ourfamof6

Seaman Apprentice
Joined
May 22, 2010
Messages
36
Trying this photobucket thing. Hope I can get it to work.
 

Attachments

  • IMG_20150330_161059030_HDR_zps3tssqphi.jpg
    IMG_20150330_161059030_HDR_zps3tssqphi.jpg
    62.1 KB · Views: 0
  • IMG_20150330_161120482_HDR_zpslpr6tjxn.jpg
    IMG_20150330_161120482_HDR_zpslpr6tjxn.jpg
    58.1 KB · Views: 0
  • IMG_20150330_164136114_zpsqy53mpxt.jpg
    IMG_20150330_164136114_zpsqy53mpxt.jpg
    40.4 KB · Views: 0

Ourfamof6

Seaman Apprentice
Joined
May 22, 2010
Messages
36
Well anyway I was able to get the curve of the transom today. Used a 1x4 screwed into the outside of the transom then pieces of 1x2 connecting to a 2x6 that would hold its shape. Then took the screws out and the 1x4 retained the shape it was against the transom. I'm not a carpenter obviously, and it takes me a while to figure things out, but this was the best way I thought I could do this.
 

MTboatguy

Fleet Admiral
Joined
Jul 8, 2010
Messages
8,988
When I rebuilt my '56 Sport Lido, I actually laminated my transom up out of 1/4 in sheets of mahogany plywood, I built a form similar to the one you have in your pictures, but it was the full height of the transom, then I built a top form and laminated all of the sheets together in the forms, worked out quite well. One thing that I had, was a buddy of mine has an old full sheet plywood press that he took out of the plywood plant that he retired from and has it set up in his shop. Him and I have worked on many carpentry projects together, he got a heck of a lot of stuff out of that plywood mill that has come in handy. I still have that 2 piece form that I made up and it fits transoms for the old Glasspar's perfectly.

Those old curved transoms were distinctive, but for the home restorer, they can sure be a pain in the rear!
 
Last edited:

sphelps

Supreme Mariner
Joined
Nov 16, 2011
Messages
11,432
If you click on the IMG code on the box over on the right side of your p/b page it will flash copied . Then just right click and paste it onto your post .

;)
 

MTboatguy

Fleet Admiral
Joined
Jul 8, 2010
Messages
8,988
I just reread my message, I am sorry, we used 6 sheets, not 4 sheets to make the transom, I should learn, don't post messages when your tired and the screen is blurry!

:cool:
 
Top