Cox Craft 85 Gutted and Rebuild.........ing

Barramundi NQ

Petty Officer 1st Class
Joined
Jul 3, 2014
Messages
342
Hello iBoaters.
Well after much research here on the university of all things boating, I too have have joined the "you're joking, right" club of back yard boat restorers.
A little history, this was my uncles boat for the better part of 12 years before I got it. As the pics will tell the sorry tale of many scrapes and a couple of holes (I hit the reef last year and ripped a large hole into the old girl). So after considering putting a chainsaw through her and taking her to the dump, I found friscoboaters on youtube then found this amazing community of like minded (code for crazy) seafarers who would rather Break Out Another Thousand or 2 in order to restore to at least her former glory and for many here the restore goes way past her original glory into the uncharted waters of exceeding the brief and making her stronger, safer, more beautiful even than the original boat builders could have imagined.

It's my hope to imitate those who have gone before me and bring this old and tired girl back to safe and sound, and hopefully something easy on the eye.

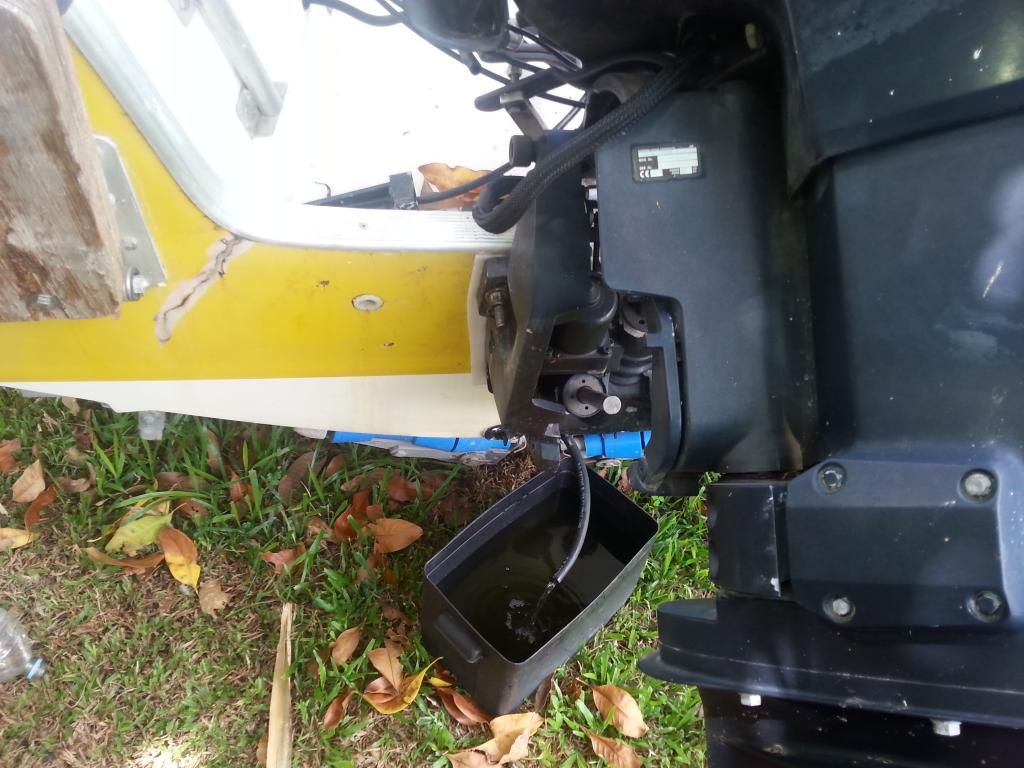
Ok first pic is draining the 100 litre stainless fuel tank of some very old fuel. Mostly water I reckon! Smelled like bad turps and was almost clear.


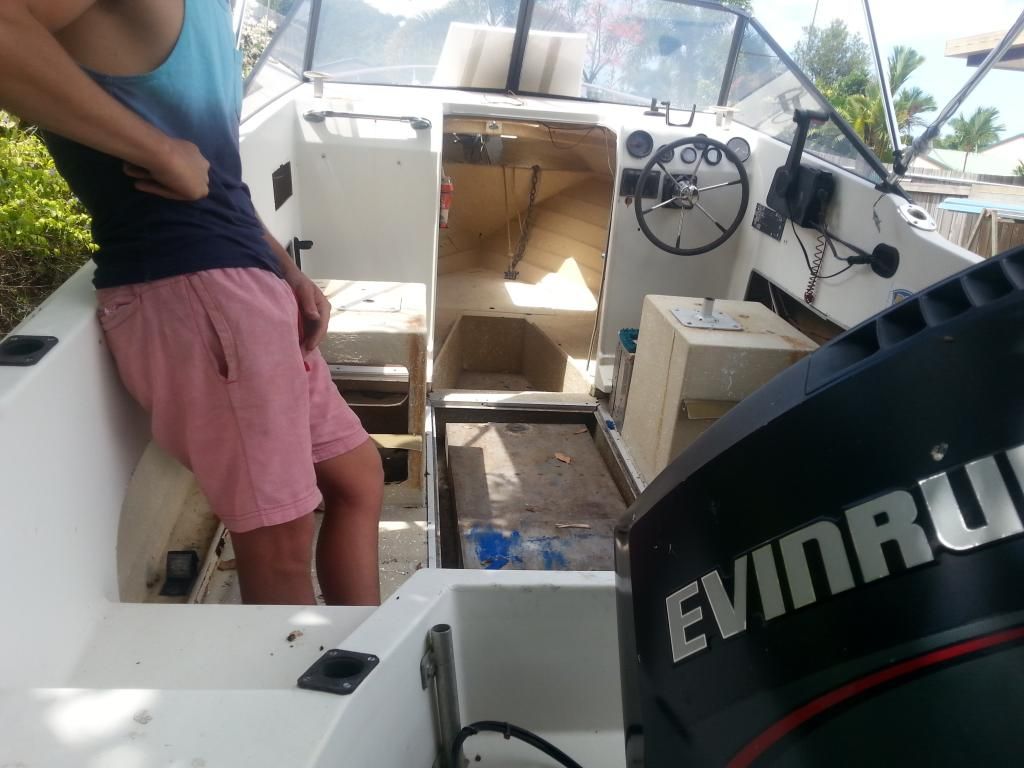
Pic below shows the general layout of the boat. My son helped with motivation and ensuring a beverage was on hand.


Last edited:

gm280

Supreme Mariner
Joined
Jun 26, 2011
Messages
14,592
I'd like to see your project boat and keep up with how it works out. But I can't see any pictures or open them up. Could be my computer setup, but I can see most other pictures in these projects... Just wondering!
 

rickryder

Commander
Joined
Jun 24, 2010
Messages
2,722
Photo bucket account and copy and paste the IMG code( last one on right side page) into the text box on here ;)
 

Barramundi NQ

Petty Officer 1st Class
Joined
Jul 3, 2014
Messages
342
I have a photo bucket account and I have done the IMG code but it shows up like this
 

Barramundi NQ

Petty Officer 1st Class
Joined
Jul 3, 2014
Messages
342
Which on my screen shows up exaxtly as the first post... is there a pic on post #5?
 

Barramundi NQ

Petty Officer 1st Class
Joined
Jul 3, 2014
Messages
342
ok I think I have the photo thing sorted......thanks toneeeeees and rickryder!!!!!

Looking from the transom into the old girl


As you can see, she has seen much better days. Can you see the half cabin bulkhead? Neither can I. It's almost rotten away


Engine off. Only my son and I....bit of a mission. 168kgs of OMC goodness!

 
Last edited:

Barramundi NQ

Petty Officer 1st Class
Joined
Jul 3, 2014
Messages
342
Here is the engine on the engine stand I built using the plans from the sticky in the forum somewhere......I used steel cause I had some lying around. Total cost for the stand .........FREE! my favourite price tag!


Here is under the captains chair box (already removed) clearly the stringers are not that bad????? Wrong.....mulch, soggy and smelly!


Port side floor (sole) almost no ply left at all in a third of the area......what was left was soggy

 
Last edited:

Barramundi NQ

Petty Officer 1st Class
Joined
Jul 3, 2014
Messages
342
Hmmm Yummy!


Here is some pics of the inside of the cabin before I put my saw into it!


Bulkhead from in the cabin


rickryder

Commander
Joined
Jun 24, 2010
Messages
2,722
It's just like Christmas...you open it up and get surprises! Not good ones though... I remember very well the stink of rotten wood... A little at a time and you will get her all cleaned out and ready to be freshen up. The boat will be better than when it was built....we rebuilders take more pride in doing it right....not quick and cheap. ;)

Before you go much further brace up the hull with a cradle so it doesn't twist or flex out of shape especially if you're pulling the cap to get to the transom...
 

Barramundi NQ

Petty Officer 1st Class
Joined
Jul 3, 2014
Messages
342
Close up of the port side bulkhead to floor junction.


Port stringer at the bow


Same stringer little closer to the bulkhead. All the foot well and the front storage box removed.


Starboard stringer at the bow. If you look carefully, you can see a crack line where the glass in no longer attached to the hull. Yes, it scarey for me too


Barramundi NQ

Petty Officer 1st Class
Joined
Jul 3, 2014
Messages
342
This is the storage box cut out and sitting in the fuel tank area


Cabin floor gutted. Foot well and storage box cut out. As they are both all glass in excellent condition, they're being saved and going back in later......if I can re glass them back in......


That represents the first 2.5hrs of my gut and rebuild of my 1982 Cox Craft. Although I've been around fibreglass for roofing insulation and I thought (famous last words!!!) that the itch factor can't be that bad........Holy Carp! It reminds me of the 80's when I first used the old school fibreglass roof insulation........The stuff we use today I dont get itchy at all.

Yesterday here, (I live in tropical North Queensland, Australia) was 34C 93F with a very low humidty of 85%. Yes that's low for us cause it hasn't started raining yet. Our summers are wet and our winters are dry and mild. The lowest temp for the entire year was 12C 53F for around 4 hours then the day time temp goes to 24C 74F. I'm converting to fahrenheit for those of you who can't speak celsius..

I need to buy (borrow) a reciprocating saw. Many on iboats call it a sawzall.....cause that's exactly what it does! Then i can split my cap, which will be fun as it its glassed and attached to the hull at the bulkhead line, I'll have to attach some pics for some advice and direction!

Back in to the fray!

Cheers for looking.:welcome:

Be safe during the silly season.:juggle:
 

rickryder

Commander
Joined
Jun 24, 2010
Messages
2,722
A 4 1/2" angle grinder with cut off blades will be a big help too if you don't have one... I used mine a lot on my resto. The flapper grinding discs will make quick work of grinding all the old glass down so you can layup the new glass ;)
 

Barramundi NQ

Petty Officer 1st Class
Joined
Jul 3, 2014
Messages
342
Thanks rick. I'm assuming you can see all the pics now? I bought a 5 inch grinder yesterday. Flappers rock! What do you mean cutoff wheel? I have a diamond blade and steel cutoff and grinding discs.
 

Corjen1

Lieutenant Junior Grade
Joined
Aug 24, 2013
Messages
1,237
Welcome to "Dry Dock" Cool boat!! Mind if I tag along for the ride?
 

Barramundi NQ

Petty Officer 1st Class
Joined
Jul 3, 2014
Messages
342
Oh and by the way, there was no floatation foam of any kind in the boat.......Aussies built them differently back in the 80's!
 

Barramundi NQ

Petty Officer 1st Class
Joined
Jul 3, 2014
Messages
342
question regarding the cradle rickryder mentioned.....Do I need to support the hull more than the rollers on the trailer?


Barramundi NQ

Petty Officer 1st Class
Joined
Jul 3, 2014
Messages
342
Can you see the aluminium patch under the starboard side? I hit the reef last year. Around here we say there are only 2 types of captains, those who have hit the reef, and those will hit the reef......!
 
Top