Stingray gauge panel refurb

muskyfins

Chief Petty Officer
Joined
Jun 7, 2012
Messages
578
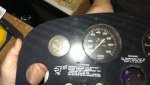
So, it was time to upgrade to a bigger/heavier boat, and I put my Stingray up for sale. I got a lot of activity at first but no real takers. I spent a lot of time telling folks all about the mechanical things I?ve fixed on the boat. Replaced hydraulic fluid and gear oil every year, etc. Then my son tells me, ?dad, you were so busy telling that last guy about gear oil and he doesn?t know what it is, where it goes and looked like he was thinking he didn?t know he would have to shift gears in a boat? And I got a few comments about the radio and the gauges. They all worked but looked like they were through a war. So I set about a little sprucing up and replaced the radio, ordered two new captains chairs from iboats, and decided to do something about the gauges. I waited until the job was finished so I could post it all at once.
 

muskyfins

Chief Petty Officer
Joined
Jun 7, 2012
Messages
578
Anyways, I didn?t get any ?before? pics, but here?s a few of the old gauges.

IMAG0824.jpg

IMAG0825.jpg
 

Attachments

  • IMAG0824.jpg
    IMAG0824.jpg
    100.9 KB · Views: 2

muskyfins

Chief Petty Officer
Joined
Jun 7, 2012
Messages
578
Previous owner epoxied and silicone the gauges to the panel. I guess it did look pretty bad.

IMAG0828.jpg
 

muskyfins

Chief Petty Officer
Joined
Jun 7, 2012
Messages
578
The old gauges were installed from the back, so I was able to get the face plate out and use it for a template.

What we do where I work is a bit complicated but in the end, we build stuff out of plastic, so I got a piece of clear polycarbonate (unbreakable) and made the new plate.

IMAG0455.jpg

I thought about how to finish it. (the original was printed from the back side) and decided to go with this carbon fiber looking vinyl overlay.

IMAG0459.jpg
 

muskyfins

Chief Petty Officer
Joined
Jun 7, 2012
Messages
578
The new gauges go in from the front and have a flat black painted aluminum bezel. I test fitted them but thought it looked boring.

IMAG0463.jpg

So now it turned into a project??..
 

muskyfins

Chief Petty Officer
Joined
Jun 7, 2012
Messages
578
I really like the look of the colored gauge bezels you usually see on high performance boats and wondered how I could get that look. I eventually found an ?anodizing look? paint that you spray over chrome or other shiny metal. So I carefully masked the gauge faces and sprayed them with some really good chrome paint. They took the paint well since they were brand new and after a couple of coats, I thought they were certainly shiny enough to spray the anodizing color over them.

IMAG0465.jpg
 

muskyfins

Chief Petty Officer
Joined
Jun 7, 2012
Messages
578
Somewhere in between all of this, I also found a prismatic type paint, so I decided a side by side test was an order.


IMAG0466.jpg
IMAG0468.jpg
The one on the left is the prismatic and I have to admit, it looked really cool but wasn?t what I was going for. The one on the right is the anodize finish and although it was closer to what I wanted, it wasn?t exact either. But I thought it would have to do. So after spraying all the blue, I figured if I put a few coats of high end clear, maybe it would start to look more like actual anodized aluminum.

But that?s where the wheels fell off the wagon.
 

muskyfins

Chief Petty Officer
Joined
Jun 7, 2012
Messages
578
The clear I bought was lacquer based and the others were enamel that was only a day or so old. Whoops. Wrinkled all my blue paint!!!

IMAG0470.jpg

So, I took the whole thing down to the shop and put it in the forming oven to dry everything out. I set the heat just hot enough to get the enamel to flow and off gas the lacquer. It was a little scary because I was giving off flammable fumes in an oven! So I?d bring the oven up to temp, shut it off and then put the gauges in. The oven held the temp for a few hours and then I?d start over. She only takes about 5 minutes to recover back to 140F. This ultimately got the paint all hardened and cured, but left a rough finish to the paint. So I spent some time with 1000 grit sandpaper to get a new foundation.

IMAG0472.jpg
IMAG0473.jpg

IMAG0474.jpg

While I was at it, I made some individual holders so I could work on one gauge at a time if there were any future problems


IMAG0475.jpg
 

muskyfins

Chief Petty Officer
Joined
Jun 7, 2012
Messages
578
I was starting to run out of time since I had plans to use the boat with friends if she didn?t sell. So after trips to several hardware/hobby shops/home centers/auto supply stores, I finally found an aluminum fleck single stage paint. I really had no other choice, but this stuff was intriguing. So I tested a single gauge and thought it looked pretty good.

IMAG0476.jpg
 

muskyfins

Chief Petty Officer
Joined
Jun 7, 2012
Messages
578
I was getting rushed and frustrated so the pics jump right to the final install. The gauges totally glistened in the sun and ultimately looked better than the original 2 stage paint. I couldn?t get an exact copy of the high performance gauges, but this was closer than I actually though I?d get and looked awesome. Made a few vinyl overlay warning stickers that matched the original and here she is!!!

IMAG0477.jpg


I would definitely do this again in the future. Depending on the style of the boat, I might do an antique copper/bronze or some fluorescent colors on a sport boat. It really was pretty easy once I stopped making mistakes.
 

64osby

Admiral
Joined
Jul 28, 2009
Messages
6,799
Nice work Musky.

I've seen a few other use the carbon wrap. The paint really makes it pop.:encouragement:

Thanks for posting, makes the grey matter kick in,
 

Tnstratofam

Commander
Joined
Aug 18, 2013
Messages
2,679
The gauges turned out nice. Thanks for posting. It certainly shows how you can turn a weathered dash into something that really pops.
 
Top