older ski boat restoration.......and so it begins.

Joined
Dec 10, 2014
Messages
22
Cheers Rick. and thanks for the advice again wood. Only issue is my 12" roll turned out to only be 8". Not sure where I got 12" from to begin with....

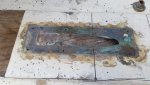
ok got the transom all done yesterday. after PB'ing all the edges and gaps, I put down a layer of 1.5 CSM, then a layer of this weave I have then another 1.5 over the top. I then laid a 1.5 oz over the whole transom to lock it in and seal off the timber. I did put one layer of this weave along the bottom as well. That is where the trim plate will mount to underneath, so now I have to lay some ply there and glass it up when I do the stringers (along with the skeg plate that sits in front of it) This way I figured the transom is solid to the bottom of the hull across there, then the ply goes over which will be glassed in anyway, so strong as.

The weave I bought was out of a bargain bin at my supplier, and it has a pretty dirty the top edge from where it obviously had sat on a shelf for a while, but for $10 I grabbed it. The only thing is it's an 8" wide roll....I thought it was 12" for some reason. Is the tabbing I have done wide enough around the sides? Now's the time to find out!


20141214_175936.jpg


Any guess as to what weight the cloth might be? it's a double bias I think? It has a 45 weave on the other side side too. It's not bad to lay up but it did get a bit tricky in some sections, but managed to get a solid layup.


20141214_114218_000.jpg


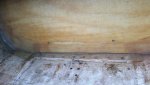
Just a pic showing the bond I got between the new transom and the skin

20141214_105230.jpg
 

Attachments

  • 20141214_175936.jpg
    20141214_175936.jpg
    140.8 KB · Views: 1
Last edited:

Woodonglass

Supreme Mariner
Joined
Dec 29, 2009
Messages
25,924
Strange looking Fabric!!!:eek: 8" of that stuff oughta make that transom a TANK!!!! Your glass work looks really good!!! Nice Job!!!!
 
Joined
Dec 10, 2014
Messages
22
ha! Yeah I figured it was a bit too thick when I saw it in the bargain bin, but for $10 for a full roll I had to grab it! I'm assuming it's what they call a double bias? as it runs the weave like you see in the pic on one side, then 45* on the other side. Cool, if you think that's wide enough for the tabbing, then I'll leave it at that then. I didn't use any of this on the transom itself, only for the tabbing of the transom to the hull.

We have a bit of a situation now as we need to make a trailer for it as the old one is dead. It uses two lengths of timber to support the hull under the stringers, fixed to the trailer by 3 steel brackets each. I noticed that the trailer timbers have a bit of a dip in them, and have had for a while by the looks of the timber, meaning the hull has a small bow at these points under the hull. It's not a lot, but it is there. I understand the hull needs to be set up nice and straight before I proceed with the stringers.


I notice a lot of trailers that use this slide bed (as opposed to rollers like on an alloy trailer) are almost always made from timber. Why is this? Is there a problem making them out of steel using the appropriate teflon slide on the top of course. I have no real problem in using timber for this, but steel support would last forever. Do they use timber as some kind of shock absorbing for the boat? Just trying to work out why. And if I have to use timber what type of timber would be recommended?
 
Last edited:

Woodonglass

Supreme Mariner
Joined
Dec 29, 2009
Messages
25,924
I suppose you could use steel but personally I'd use wood. Better shock absorbtion and if something happened I'd rather have wood hit the hull than steel. Here in the states we use Indoor/Outdoor carpet to cover the wood which allows the boat to slide on really well. Could/would you post some pics of how the hull is misshapen using some sort of a straight edge??
 
Joined
Dec 10, 2014
Messages
22
yeah carpet here too in a lot of trailers, but lately I see more are using the polyurethane/teflon type of skids on top of the timber instead. I'll get some photos this afternoon of the hull. It's not a lot, but you can tell. It looks as though where the engine sat on the stringers was between two of the timber trailer supports, which to me would not be the best idea. I'd have figured to put a support bracket at that point?
 

rickryder

Commander
Joined
Jun 24, 2010
Messages
2,722
No one says you can't use a steel or aluminum angle or square stock with wood over it....then carpet or slides. I would just keep the metal back from all edges of the wood so it could never contact the hull ;)
 
Joined
Dec 10, 2014
Messages
22
small update, not much happening due to xmas and the fact is after lunch in my driveway is full sun till dark so not much fun in the middle of an aussie summer.

We cut out the last of the old ply which is where the prop shaft goes through, filled all the holes in the dash for a refurb. Made a new piece of ply which will be the new skeg mount/prop tunnel ply. This was originally done in three pieces of ply for some reason, but we figured one piece would be easier to make and fit....and probably stronger to boot.

I understand it's compulsory to post at least one photo per update :) so here are a few.

First up: woodonglass asked for a couple of pics of the sagged timber bearers showing (I hope) the sag in the hull. The engine sits right in the middle of the two mounting points (the front one is out of frame left of image) and you can see why it has sagged due to it, esp with the rotten stringers.
This first photo shows how the hull has actually come back up and away from the bearer as the engine has been out for a while now. before we removed the engine it was hard pressed against the timber. There is a urethane type plastic as a slide on top of the timber. New stringers will only go in after it's back on a new trailer and nice and true. And I think that due to the bit closest to the camera had sagged down, it has bowed up on the other side of that rusty bracket as the hull seems to go up at this point. Not much, but you can see it if you look along it's length. So basically an s curve along the bearers length.

I am being told timber is "better" for this type of bearer over steel due to the give in the timber which acts as a damper of sorts.............hmmm. Thing is even a lot of new ski boat trailers I see down at the ramp still use timber for bearers. If I have to use timber I will, but what sort of timber to use? It will be used in salt water as much if not more than fresh if that makes a difference to the timber I need for the new trailer. 20141229_111500.jpg


This pic doesn't really show the bow as well as the first one. 20141229_111517.jpg


The dash was glassed up and is now being finished off. He has decided to paint the whole boat top and bottom. I layed up a couple of layers of 3/4 behind the dash using a cardboard template over the front with a smaller piece that fitted into the holes, that gave me a flat base to laminate from behind. When that set I peeled the cardboard from the front and cut out layers of CSM to fill the holes leaving it a few mm in so it could be finished off with the smallest amount of bog as I could. My son wanted to reposition the gauges and remove some redundant ones and fit a new glovebox so we decided to glass it all up and start from scratch.

btw, if anyone can give me some pointers on laying up inverted glass I'm all ears...... as soon as I raised the brush I had resin dripping back down and all over the place.....what a pain! It came out ok though so that's the main thing. 20141228_135159.jpg


cutting out the last of the ply 20141229_105555.jpg


goneski. This piece basically popped right out with one hit of the chisel. The base is pretty lame, check out the voids in the PB type glue they used. The twin water pick ups you can see are seized so will need to be cut out next time we get back onto it 20141229_111530.jpg


just a pic showing what I mean about it being 3 pieces originally. The red bit in this image was actually 2 pieces of ply split down the middle fore and aft, why? stuffed if I know? It's not as if the hull has a deep V or anything which would force a 2 piece setup, in fact it's pretty much dead flat across the stern.
also the yellow bit is the piece in the pic above and it was also a separate piece of ply. I have made the red and yellow sections all one piece now out of 12mm ply. The original was 13mm (1/2") It has been sealed with 450 gsm (1/2oz) CSM on both sides and is now waiting for the stringers to go in before I glass it back in. The purple piece is still a separate section as the hull steps up at this point to allow for the bolting of the trim plate which mounts flush to the bottom of the hull boat6.jpg


and that's it for now!
 

Attachments

  • 20141229_105555.jpg
    20141229_105555.jpg
    152.9 KB · Views: 0
Last edited:

Woodonglass

Supreme Mariner
Joined
Dec 29, 2009
Messages
25,924
Thanks for the Pics!!! Yeah I can see the bow in the hull. When you're ready to install the stringers, use jacks and props and weights to do the best you can to flatten the hull and glass the stringers in. Once the glass cures they will hold the hull flat. I'd recommend building a sun shelter from a cheap tarp to allow more working time!!! Here's how you do "Inverted" Glassing. Get a piece of heavy plastic. Lay it on your bench. Pre-cut your Csm and Fabric cloth pieces to the shapes required for the patch you're doing. Wet them out on the plastic in reverse order...Last one first, first on last. Use a Roller to roll some resin on the area on the boat. Now Carry the entire patch, Plastic too, to the boat and place it on the area. Use a plastic putty knife, bondo spreader or dry roller and run it over the plastic to smooth out the area but don't press to hard and squeeze out all the resin. When the resin starts to "kick" peel off the plastic. No MESS!!!

Looks like you're making progress and any progress is good!!!!;)
 
Joined
Dec 10, 2014
Messages
22
awesome idea with the plastic! cheers for that tip!! I have to do some more inverted glassing around the ski tow rope fitting on the back so that will def be a trick I will use!

Thanks for another good idea on the loading up to get it true Do you think I'll need to if I can get the boat to sit on a straight trailer? I was hoping that when it's sat flat on a new trailer it will straighten out? Maybe I'll need to weigh the rear section which does appear to be bowed upwards. I guess the only way to find out is to pull my finger out, make the trailer and see what it does. Still trying to find a mig we can borrow. I have a stick welder here but I'd much prefer to mig it, I can mig much neater than with stick.

We will be pulling it off the trailer soon to invert it and tidy up underneath and get it ready for a paint job, It's picked up a few deep scratches where it's hit the trailer, damage along the front of the keel line etc and the gel is gone exposing bare glass. I also have to redo the skeg mount area which is pretty ordinary after removing it peeled off a heap of gelcoat.. I was going to do these repairs with gelcoat and then rub it back smooth to suit. Sound like a plan using glecoat?

As for painting, the idea is to prep and paint the bottom and sides and transom. By then it will have a new trailer to live on, then get back to building the internals, prefit the new dash etc, then one of the last jobs will be to paint the upper section. I think this is the order it should be done?? I'd much rather mask it up at the end to paint than have a lovely painted top and risk scratching it whist we glass and do all the messy building. I'm finding working out the order of construction is just as important as the actual construction, if not more-so!.
 
Last edited:

Woodonglass

Supreme Mariner
Joined
Dec 29, 2009
Messages
25,924
I'd recommend getting the hull straight and true first. I would want that out of the way before I flipped it to do any work on the bottom for repairs and paint. I'd recommend getting a board that's straight and true to use to lay along the length of the hull to verify that the bow is out and then glue the stringers in.;)
 

rickryder

Commander
Joined
Jun 24, 2010
Messages
2,722
Since its not that large of a boat why not build a cradle that would support it where it need to be to keep it straight while installing the stringers... if you screw all the lumber together when you build it you could always repurpose the lumber on rebuilding your trailer... I see no need for any special lumber for your trailer...I would just give it a bunch of coats of good paint exterior of course or maybe even epoxy paint to seal the wood.... The man above ^ will know better than me ! :hail: LOL
 

Woodonglass

Supreme Mariner
Joined
Dec 29, 2009
Messages
25,924
I'm a Wood guy. I just like it!! I would use Douglas Fir and seal it with this. 1 part Tung Oil, 2 parts Mineral Spirits, 1 Part Spar Varnish. Coat the wood until it won't soak up the mixture any more and it pools on the surface. Wipe off the excess and then give it 2 coats of full strength of Spar Varnish. Then let it dry for 3 days and Paint it with 2-3 coats of Oil Based paint. It'll last for Decades!!! Carpet it or use the teflon skids. What ever you like.
 
Joined
Dec 10, 2014
Messages
22
ok, big christmas break so we thought it was time to get back into it. Work on the hull has stopped until we get it sitting on a nice solid trailer so after pricing around we decided to make our own. We worked out that finished we should save around $1000 by doing so from the cheapest quote. And the fact we can say we made it ourselves which as DIY'ers like most of us here already know, that's what it's about. This is my first go at making a trailer btw.

We basically copied the old trailer (but in much stronger steel) and we snuck in another cross piece to help support the timber bed a little better. If you remember earlier this trailer only had 3 points for the timber bed to mount to and that these mounts were positioned in a way that the engine weight was not being supported directly and as both the timber on the trailer and the stringers on the boat were dead, it has allowed the hull to sag, hence the need for a new trailer and a hull "flattening" before the new stringers get glassed in.

it's made from 100*50*3mm box for the rails and drawbar, 50*50*3mm for the cross sections. This is where we are today, I did finish the rear drop piece but didn't get a photo of the finished job before we packed it all up for the day.

We spent a lot of time jigging it all up square so I'm happy to say it's a very true trailer given we had no flat areas of ground to lay it out on. All the critical measurements are within 3mm.......... except for the rear prop cutout section, we didn't take enough measurements before I got into welding it up, so one side is a little low, which put out the lower cross piece (the bit not in the image) skewed from level, so a bit of re-cutting one of the dropper pieces to square it up sorted it out. If you look closely at it in person you can spot it, but when the boat is on you won't be able to tell.


Obviously it's still far from carrying a boat, next up is to make and fit the mounts for the timber slides, I will be welding a couple of inner braces where the side rails are welded together where they angle back into the draw bar (more for my own piece of mind than anything) and then fit all the rest of what makes up a boat trailer, but I thought I'd better update the thread with something as it's been a while!


When it's all done, all required bits are fitted, holes drilled boat sitting on and adjusted, it will be stripped down again to the core so it can go off to be galvanise dipped. They don't allow closed chambers for gal dipping hence all the open sections. The cross pieces have to be drilled as well.

the axle/spring assy we will use is a clamp on system which simply attaches to the rails via u bolts. It's basically a piece of strong angle which has spring mounts already attached, and also has it's own moulded plastic guards which are supported by a hidden steel extension so you can step on both the front and rear of the guards to gain boat access from the side. The big plus is as it's clamp on you can slide fore or aft to correctly balance the ball load, especially helpful with this project as I have no idea how the balance will end up. I used this same setup on my old boat and it worked a treat. Hopefully (fingers crossed) we calced enough leeway in the ability to move the axle point so the cross pieces won't interfere with where the axle will finally need to be.

20150201_134158-1024.jpg

I'm not a welder, and I'm sure a welder would pick many technical flaws in my work, but I'm happy with the majority of welds I did. Some of my verticals won't be shown in public however!!! Strong, but just not very attractive! This was supposed to be my sons job (part of doing a project like this is him learning new skills) but even after a few hours of learningand practicing to stick weld, he said he didn't trust himself to do the whole trailer, so I got him to do the cutting, (he's better at maths and angles etc than I am anyway) and I did the welding.

I did have use of a mig initially, but it died within the first 3 welds, so I knew someone with a real old school stick welder which is really an amazing old machine to use. I have used a few newer (home use) arc welders and this thing eats them for dead. I don't know enough about welders to know why, but I have found older welders just seem to be nicer to weld with, especially for someone who doesn't do it as a job. No fuss, just put the stick in and it goes on it's way, no crazy bonding the stick and making it glow red kind of annoyances that make most people hate stick welding!


20150120_164231-1024.jpg

The one thing we messed up was the right side rear piece, it angles down steeper than the other side, only by a degree or so, but it was enough to make us have to cut out 15mm off the bottom of it...... but anyway it's ok now and the piece that was welded at the bottom to join it is all level now, and with a boat on it you won't be able to tell.

The tail lights are sealed LEDs and will fit flush against the rear pieces nicely. It's all been drilled out now, prefitted and removed until final assembly. Still need to fit a couple of rollers as well so we don't trash driveways and the trailer as these kinds of trailers do sit low at the back.

20150201_134215-1024.jpg
 
Last edited:

sphelps

Supreme Mariner
Joined
Nov 16, 2011
Messages
11,435
Glad you have made some progress ! But your pics aren't showing up ...
 
Joined
Dec 10, 2014
Messages
22
very weird. I can see them both logged in or not.........never had so many dramas uploading pics to a forum......oh well. I just deleted the pics and re uploaded them. see how that goes....... Not that they are all that great, it was just supposed to be a simple update post!

oh and happy new year to everyone!
 
Top