78' Columbian Floor Replacement Brand New Boater

Smtred

Seaman Apprentice
Joined
Dec 6, 2014
Messages
48
To start I would like to note that this boat has been passed onto me, after my grandfather had passed away earlier this year. This project has sentimental value and I want to make sure I do the best job possible. My previous experience with boats is actually with this boat years ago when he would take us fishing and water skiing. However that is all besides the posts I've looked through on this site. I am pretty handy and can figure most things out, however a little direction would go a long way for this project.

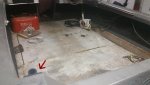
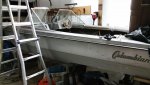
Here is a look at what I'm working on
HZvYAvl.jpg?1.jpeg

The arrow points to this water logged area
ejWGe6s.jpg?1.jpeg
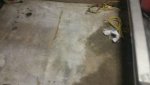
Here is a better picture of the same area at its worst point
gSNmQRj.jpg?1.jpeg

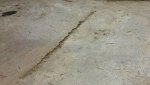
Here is a couple close up of cracks in the floor
vxZRWSS.jpg?1.jpeg
Looks pretty bad...
clgXZDZ.jpg?2.jpeg
After the research I have done it does seem as tho I will need to replace the whole floor. If there is a better solution I am all ears. I'm not to sure where to really start if that is the case there is foam underneath the wood as well. I was able to see it from where I took the seats out. There is much more to be done besides the floor as well but I will worry about that after the fact. The Engine is solid had it checked and tested at a shop. The Transom area is still solid and good as far as I can tell from what I've read. Any help would be much appreciated and I will be uploading some pictures of the whole boat later on to give a better example of what I'm working with.
 

Attachments

  • HZvYAvl.jpg?1.jpeg
    HZvYAvl.jpg?1.jpeg
    78.3 KB · Views: 1
  • HZvYAvl.jpg?1.jpeg
    HZvYAvl.jpg?1.jpeg
    78.3 KB · Views: 1
  • HZvYAvl.jpg?1.jpeg
    HZvYAvl.jpg?1.jpeg
    78.3 KB · Views: 1
  • ejWGe6s.jpg?1.jpeg
    ejWGe6s.jpg?1.jpeg
    57.8 KB · Views: 1
  • clgXZDZ.jpg?2.jpeg
    clgXZDZ.jpg?2.jpeg
    115.8 KB · Views: 0

Triangleboater

Petty Officer 1st Class
Joined
Mar 5, 2013
Messages
207
So go ahead with the floor removal and then you can check things from there.

What I did is took my circ saw and adjusted the blade to just the height of the floor wood. Start shallow and go deeper. Take out the middle first and then work your way to the edges. I then took a dremel and angle grinder to get the sides where it is close to the hull.

Once you have the floor out you can inspect the stringers and transom more closely. You will want to take core samples in several spots to make sure they haven't gotten rot.

Like most people will say here, if the floor is getting soft, the rest of it most likely is too.

We are here for you and boat restoration is what we love!
 

Woodonglass

Supreme Mariner
Joined
Dec 29, 2009
Messages
25,924
Welcome to iBoats!
Be prepared to do a total restoration! I suspect the foam, stringers and transom will all be wet and soggy. We can and will assist you with the entire restoration process. Keep posting your Pics and questions.


Smtred

Seaman Apprentice
Joined
Dec 6, 2014
Messages
48
So go ahead with the floor removal and then you can check things from there.

What I did is took my circ saw and adjusted the blade to just the height of the floor wood. Start shallow and go deeper. Take out the middle first and then work your way to the edges. I then took a dremel and angle grinder to get the sides where it is close to the hull.

Once you have the floor out you can inspect the stringers and transom more closely. You will want to take core samples in several spots to make sure they haven't gotten rot.

Like most people will say here, if the floor is getting soft, the rest of it most likely is too.

We are here for you and boat restoration is what we love!

Well got to do what I got to do. Thanks for the advise that actually doesn't sound as difficult as I was thinking it would be. I'll start on it this Saturday after work (Get off pretty early). Once I get the floor out I'll upload some more pictures and we shall see how bad it really is.
 

Smtred

Seaman Apprentice
Joined
Dec 6, 2014
Messages
48
Welcome to iBoats!
Be prepared to do a total restoration! I suspect the foam, stringers and transom will all be wet and soggy. We can and will assist you with the entire restoration process. Keep posting your Pics and questions.


Thank you! I'm glad you guys are so helpful. I'm prepared to do whatever it takes to get this done. I'll be posting more pictures as soon as I get he floor out. Hopefully this weekend.
 

Smtred

Seaman Apprentice
Joined
Dec 6, 2014
Messages
48
Was able to get a little work done this weekend, it's a little worse that I had previously thought.

In all her beauty. To get a better picture of what I'm working with.
p1L677a.jpg?2.jpeg


This is underneath the steering wheel facing towards the bow. Tons of foam underneath the wood and all soaking wet.
koApk7E.jpg?1.jpeg

Here's another one facing the bow from farther away. You can see the Fiber of the hull on the left side.
INnyIF3.jpg?1.jpeg

Here's a better view of the what I'm pretty sure is the hull of the boat
s0HtzyU.jpg?1.jpeg
This is the facing the rear behind the transom. Its underneath a lip that extends above it. Wasn't to sure how to go about taking it out from there. Or whats underneath that I can screw up.
rpqTgiB.jpg?1.jpeg
You can also see the stringer that goes through the center of the boat it seems a little water worn. How do I determine that it is bad? The lips on the edge of the boat that I have the hammer and the crowbar resting on, will I need to remove that or can I work around it. I don't know its purpose other than maybe adding support to the frame a little.
 

Attachments

  • p1L677a.jpg?2.jpeg
    p1L677a.jpg?2.jpeg
    90.1 KB · Views: 0

jc55

Senior Chief Petty Officer
Joined
Nov 3, 2006
Messages
665
Subscribed...I like the lines of that boat. The windshield distance from the bow is perfect and the hull is long and low. Bet she looks great in the water. +1 for sentimental value:encouragement:
 

rickryder

Commander
Joined
Jun 24, 2010
Messages
2,722
The center stringer would be the keel stringer....to check all stringers and transom for rot is to take a 3/8 drill bit and drill into the stringer and look at the wood chips that come out....white dry chips are a good thing. ...wet moist dark chips means water has gotten between the glass and wood.... read as many resto threads as you can and you will find a wealth of info. We can assist you with what you don't understand. Welcome Aboard!
 

Smtred

Seaman Apprentice
Joined
Dec 6, 2014
Messages
48
After looking through a few restoration threads I see on a few that its possible to lift the upper half of the boat away from the hall. Is this the case on most boats? Dumb question I know but I see it, however no one talks about it or how its done. Can you tell if that is the case with my boat?

Edit: For example http://forums.iboats.com/forum/boat.../8127378-83-lund-sirius-total-gut-and-rebuild. Guess it is called a Cap I believe.
 
Last edited:

Smtred

Seaman Apprentice
Joined
Dec 6, 2014
Messages
48
Subscribed...I like the lines of that boat. The windshield distance from the bow is perfect and the hull is long and low. Bet she looks great in the water. +1 for sentimental value:encouragement:


She is great on the water. It has been nearly a decade but I remember and can't wait to see it again.
 

jc55

Senior Chief Petty Officer
Joined
Nov 3, 2006
Messages
665
Yup, you have a cap too. Everyone is different and has a different approach. I restored my Sportcraft in the pic below last year. It's very similar to your layout. I had the cap on and off a couple of times during the build to check transom to splash pan fit and cap steps to new deck clearance. 2 average people can move that cap but 4 would be better. They aren't that rigid and you can induce extra stress cracks if it bends and warps too much. You might have to remove the windshield to clear your garage ceiling if you do it indoors.

The rub rail is removable. Under it are the screws for the cap, and the aluminum channel. Be gentle with the rubber if it's reuseable....it's expensive to replace but can be cleaned.

I like to have adequate support on all 4 "corners" of the hull while on the trailer, then level the boat from side to side. Having support all the way around helps keep the shape as you remove all the stringers transom and deck. I make marks on the hull every 2 feet and measure the distance from side to side on the hull as the cap is coming off. I run support braces and work around them to hold the shape of the hull when the cap is off. Just 2 or three braces. like i said every one is different. You don't want a skewed build.

You might have screws on the inside of the gunwales going into wood braces port and starboard. Just go slow and easy a little at a time.
 

Smtred

Seaman Apprentice
Joined
Dec 6, 2014
Messages
48
@jc55, @rickryder Thank you guys for the tips. I have the boat at my dads shop so we have a decent amount of room to work with. After work today I headed over there and spent some quality time familiarizing myself with the whole boat. I had done a bit of research the last couple of days. Figuring out a lot of my questions after I had asked them. I I ripped out and stripped the last of the carpet and everything else I could get my hands on. Found out i defiantly can take the Cap off and it has rivets all around under the rubber rail. My next steps are to create a motor mount as well as a pulley system for the cap I think I have enough room in the shop I can just hoist it up and secure it. Idk thinking aloud.....will be taking it slow and easy tho. I did however find a 20 year old Pepsi can behind what I want to call the kick panel(Panel from where the passenger's feet would be). Thought that was neat gotta enjoy the little things :)
 

jc55

Senior Chief Petty Officer
Joined
Nov 3, 2006
Messages
665
That's pretty cool about the Pepsi. I found a super old school first aid kit in mine. My wife is an RN so she had to explain to me what the red dye that got all over everything was.

Look forward to seeing more pics. Is that a stepped hull? Interesting.
 

Smtred

Seaman Apprentice
Joined
Dec 6, 2014
Messages
48
Look forward to seeing more pics. Is that a stepped hull? Interesting.

It just might be. I had to look up what that is :D. I'll take a closer look tonight when I head over there. Going to try and build an engine mount tonight. Found plans on a thread somewhere on this site can't remember where however. I'll try and find the link when I'm back on my home computer.
 

Smtred

Seaman Apprentice
Joined
Dec 6, 2014
Messages
48

Attachments

  • 9YuSxlh.jpg?1.jpeg
    9YuSxlh.jpg?1.jpeg
    91 KB · Views: 0
  • hd7a7cZ.jpg?1.jpeg
    hd7a7cZ.jpg?1.jpeg
    87 KB · Views: 0

Smtred

Seaman Apprentice
Joined
Dec 6, 2014
Messages
48
Look forward to seeing more pics. Is that a stepped hull? Interesting.

I don't believe it is. The sides of the hull(bilge..I think)have that pattern. However the center is just goes strait back.

Might be able to see what I mean here.
Yccd195.jpg?1.jpeg
 

jc55

Senior Chief Petty Officer
Joined
Nov 3, 2006
Messages
665
Nice job on the stand! If you can build a stand, you will have NO PROBLEM doing this "family heirloom" justice.
 

Smtred

Seaman Apprentice
Joined
Dec 6, 2014
Messages
48
Thanks jc. I'll be giving it my best with all the info and help on this site I don't believe I'll have a problem.
 
Top