197? Selco Selstar renovation

Status
Not open for further replies.

Rjn

Seaman Apprentice
Joined
Nov 9, 2014
Messages
42
Got some work done today;

Some grinding, foam and water / wood removal and some more grinding.
I guess 1 more day and the floor is out.

Then more sanding and grinding, before laying fibers and resin to stiffen the hull and then inserting the floor.
 

Attachments

  • image.jpg
    image.jpg
    48.5 KB · Views: 14
  • image.jpg
    image.jpg
    51.9 KB · Views: 18
  • image.jpg
    image.jpg
    40.1 KB · Views: 16
  • image.jpg
    image.jpg
    41.5 KB · Views: 15
Last edited:

kcassells

Fleet Admiral
Joined
Oct 16, 2012
Messages
8,600
use photobucket. Set up a free account then just copy, paste image. It shows up as jibberish but when posted shows up as pics.
 

kcassells

Fleet Admiral
Joined
Oct 16, 2012
Messages
8,600
some inside action:

]
COOL bOAT!!! Good to see you back at it and the pics are better. So whats with/going on in regards to the outside of the boat? Bad paint job, adhesion issues, mold? Just at water line. Ohhhh...No bottom paint maybe and sat too long in da aqua.
Ya?
 

Rjn

Seaman Apprentice
Joined
Nov 9, 2014
Messages
42
Question for the experts over here, since currently there was only foam in there; what is the best option in regard to rebuilding it?

My current idea is grind the floor clean and add glas and resin to restiffin the structure.
But after this;
Add stringers and bulkheads, put the floor in and foam it up or just insert a new floor and foam it up?

Will take some time before i'm ready for this proces, but it is better to have all the plans upfront.
 

Rjn

Seaman Apprentice
Joined
Nov 9, 2014
Messages
42
]
COOL bOAT!!! Good to see you back at it and the pics are better. So whats with/going on in regards to the outside of the boat? Bad paint job, adhesion issues, mold? Just at water line. Ohhhh...No bottom paint maybe and sat too long in da aqua.
Ya?

pics of the damaged keel:
looks like an improper patch up

beschadiging1.jpg

beschadiging2.jpg
image.jpg8_zps1iqbsts9.JPG
 

Rjn

Seaman Apprentice
Joined
Nov 9, 2014
Messages
42
and who can tell me what the purpose of this foam is: it is located on the aft section of the boat, but has no structural function.
is it only for stability or floatasion(?) purpuses.
looks like i have to remove these since the water saturated wood is also under here.

foam1.jpg
 

kcassells

Fleet Admiral
Joined
Oct 16, 2012
Messages
8,600
Looks like you have to clean up that outside area real good. Is their a crack inside the boat too where the keel is. You'll need to remove the keel inside the boat to make observations and replace. Try to keep as much repair work inside the boat. Doesn't have to be as pretty as if on the outside.
So what secured your floor down to the boat? Just foam? and the Keel?
 

Rjn

Seaman Apprentice
Joined
Nov 9, 2014
Messages
42
Looks like you have to clean up that outside area real good. Is their a crack inside the boat too where the keel is. You'll need to remove the keel inside the boat to make observations and replace. Try to keep as much repair work inside the boat. Doesn't have to be as pretty as if on the outside.
So what secured your floor down to the boat? Just foam? and the Keel?


The wooden floor was resting on the foam and fiber glassed to the boat.
Dont think the plywood was treathed with resin.
 

Woodonglass

Supreme Mariner
Joined
Dec 29, 2009
Messages
25,924
Hey RJN, nice looking boat restoration you have going here. Your hull is a foam cored hull and it's structural integrity depends on the foam, It's absolutely imperative that you use the 2 part Pour in foam when you go back. You may want to lay a layer of 1.5 oz CSM on the hull to add a bit of stiffness to the hull or even a layer of 1708 Biax Fabric. That's up to you. As for the hull around the bulkhead it's there as a filler and for support as well. When you do the Pour for the restore all the voids below deck should get filled back in if you do it right. As for the keel, you need to clean the area on the inside and grind it down to good glass. then tape off the outside with some Duct tape and then fill the area on the inside with Thickened resin, what we call Peanut Butter. Mix your resin with Cabosil and some chopped milled glass 1/4" fibers until it's the consistency of Peanut butter. Once it hardens, go on the outside and grind and feather the area to fresh glass and then apply a layer or CSM, a layer of 1708 Biax and 2 more layers of CSM and then grind and sand smooth finishing off with some fairing material until smooth and ready for Gel coat or Paint. I strongly recommend you coat the bottom and top or your plywood with a minimum of 1 layer of CSM .
 

Rjn

Seaman Apprentice
Joined
Nov 9, 2014
Messages
42
H? WOG, thanks for the advice. Think that's the way to go.
Only issue : we had wet snow and hail the last few days and temperure dropped.
Looks like that the wheather will improve soon, so i can continue on this job.
 

Rjn

Seaman Apprentice
Joined
Nov 9, 2014
Messages
42
Not much done lately.
Sanding, sanding and some grinding.
Further made a template for my floor, and ordered materials.

So hopefully next weekend start with the build up of the hull.
 

kcassells

Fleet Admiral
Joined
Oct 16, 2012
Messages
8,600
RJN,
Something done is better than nothing done. It's a project in work. Like a painting. Each stroke of the brush or the sweat equity is gain towards the final goal.
So hey...Looks like you are committed or should be :) for getting the end result.
 

Rjn

Seaman Apprentice
Joined
Nov 9, 2014
Messages
42
Materials arrived and i have started with my first time working with resin and fibers.
Did some small patches first, 2 layers of fiber, no air underneath and hardend out really good.😊

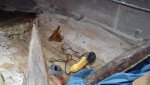
Created some peanut butter mix to fill in gaps upfront, thx WOG for your video on that, and it worked wonders!😃

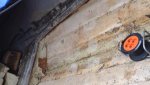
High from my succes i layed a large patch of fiber, and that went wrong 😭
Didn't sanded it down properly, air pockets under the math after it hardend out, so this morning took out the angle grinder and started smoothening it down again.
Now it's raining, so job haltered

Will upload pics later.
 
Status
Not open for further replies.
Top