Formula 27PC Transom Work

Status
Not open for further replies.

Arawak

Chief Petty Officer
Joined
Aug 27, 2010
Messages
486
This is my pole barn on property but it's un-insulated.
Epoxy is a bit more forgiving of temperature, if you can stand the extra $15 a gallon or so. It's also far superior to polyester, although polyester is probably good enough.

But, might be worth considering if you aren't able to keep a high enough temperature for long enough.
 

alldodge

Moderator
Staff member
Joined
Mar 8, 2009
Messages
40,713
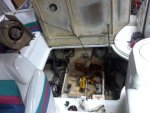
Well took a couple pics but didn't get around to doing anything today. Needed to get in the dump truck and go get a few loads of rock while the weather is good. If I have the whole thing will come pout but I'm pretty sure it would not go back in, in one piece. Looking at the hatch opening and needing to move it around, just don't think it could be done. Not saying I won't try to make a cardboard cut out and see if it will work. Another thing is the transom is 2 inches think, figure that's three 5/8th pieces.

Photo405.jpg

This is the port side. Cable clamps are attached on the top of transom.
Photo407.jpg
 

jc55

Senior Chief Petty Officer
Joined
Nov 3, 2006
Messages
665
Wow, you weren't lying about the access. Thank you for posting those pics. I'm confident that you'll get her.
 

tpenfield

Moderator
Staff member
Joined
Jul 18, 2011
Messages
17,693
Yea, access is worst than my Sun Sport. Probably will be going in with several pieces.

Do you want to check the bulkhead :noidea:
 

zool

Captain
Joined
Aug 19, 2012
Messages
3,432
Yea, you're gonna have to assemble the transom in pieces at the point of install. Probably best to make a few templates out of cardboard from the outside, then cut them up in sizes you can fit thru the opening. You want the seams as close to the sides as possible, and alternate each layer, so the tabbing covers the seams, and ties to the hull sides. You can glue up each later individually, clamp it, then set the next layer and clamp that, using whatever holes you have in the stern.

The 2" thickness includes the inner and outer glass?..or just the wood core?..
 

alldodge

Moderator
Staff member
Joined
Mar 8, 2009
Messages
40,713
Yea, access is worst than my Sun Sport. Probably will be going in with several pieces.

Do you want to check the bulkhead :noidea:

I could check the forward bulkhead but maybe this is one of the times I think I'm OK and therefore I'm not going to check and roll the dice

The 2" thickness includes the inner and outer glass?..or just the wood core?..
No, 2" is just the wood. Think it is a bit under 2 have a pic in a previous post showing about 2 1/4 including glass
 
Last edited:

alldodge

Moderator
Staff member
Joined
Mar 8, 2009
Messages
40,713
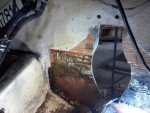
Spent some hours doing some demolition and I have found the top of the rot. It is a bit below my last cut. The black seen is adhesive because I cannot get the wood off with a chisel, going to need to sand it off. Dug into both sides and the rot goes back in behind the stringers. As before the stringers are separately glassed in and should be good. Looking into options from here. I'm thinking I should cut thru the glass next to the stringers and try to keep the blade away from the wood inside. Even if I do cut into it I can add more glass when rebuilding. Probably cut into the boxed in areas on each side to the other side of the main stringers to gain access.

Photo408.jpg

Photo409.jpg

Thoughts?
 

Woodonglass

Supreme Mariner
Joined
Dec 29, 2009
Messages
25,924
Use your multi tool to cut a 1" grid pattern in the wood. You'll be surprised how easy it will chip off the glass then. If the stringers have rot, I'd cut the sides in order to inspect to discover the extent and then be able to determine the best course of action.
 

tpenfield

Moderator
Staff member
Joined
Jul 18, 2011
Messages
17,693
Bummer that the rot did not stop before the stringer. The next outboard stringer will hopefully be a stopping point. Those mounting boxes just outside of the engine stringers won't be too hard to rebuild . . . and taking them out may give you a good look at the engine stringer core :thumb:
 

alldodge

Moderator
Staff member
Joined
Mar 8, 2009
Messages
40,713
Use your multi tool to cut a 1" grid pattern in the wood. You'll be surprised how easy it will chip off the glass then. If the stringers have rot, I'd cut the sides in order to inspect to discover the extent and then be able to determine the best course of action.

Will give that a shot

Bummer that the rot did not stop before the stringer. The next outboard stringer will hopefully be a stopping point. Those mounting boxes just outside of the engine stringers won't be too hard to rebuild . . . and taking them out may give you a good look at the engine stringer core :thumb:

Will do and advise later
 

alldodge

Moderator
Staff member
Joined
Mar 8, 2009
Messages
40,713
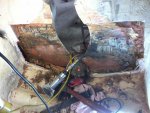
What a lot of work, I'm beat. Cut out the one side and tapper cut the top of the stringer off. Under the boxed section there was a bit of damp plywood. After digging all the foam out that was the only thing damp, everything else is glass coated. Will do some more digging tomorrow.

Photo410.jpg

Photo411.jpg
 

tpenfield

Moderator
Staff member
Joined
Jul 18, 2011
Messages
17,693
What a lot of work, I'm beat.

I have felt your pain . . . :) Looks like you are moving along just fine. Were the stringers glassed on both sides . . . or did you expose some of it when you removed the 'box'?

I think it took me a few days of work to cut out the bulkhead on my 330SS (and I only did the center section). Got to a point where I felt I could shave with the sawzall, since I had used it so much.
 

alldodge

Moderator
Staff member
Joined
Mar 8, 2009
Messages
40,713
I have felt your pain . . . :) Looks like you are moving along just fine. Were the stringers glassed on both sides . . . or did you expose some of it when you removed the 'box'?

I think it took me a few days of work to cut out the bulkhead on my 330SS (and I only did the center section). Got to a point where I felt I could shave with the sawzall, since I had used it so much.

All the stringers are glassed, it takes quite a bit to cut through the glass. The multitool works but is slow, might have something to do with the epoxy resin. Wound up using my sawzall and that worked faster then anything. The wood is still real solid except for some of the center. One thing about the setup is they build them strong. Used my air chisel a bit but don't want to use it much do to possibilities of damaging the outer skin
 

tpenfield

Moderator
Staff member
Joined
Jul 18, 2011
Messages
17,693
BTW - what is that number sign (1107814) attached to the transom all about?
 

alldodge

Moderator
Staff member
Joined
Mar 8, 2009
Messages
40,713
BTW - what is that number sign (1107814) attached to the transom all about?
I documented my boat with the USCG and that is the documentation hull nnumber. It needed to be attached to the hull and the characters are the required size, this was the only place I found to put it.
 

alldodge

Moderator
Staff member
Joined
Mar 8, 2009
Messages
40,713
Haven't done much with the transom, been working on the homes deck, will get back with it soon.

Took an 8ft 2x4 and tried to put it in the engine compartment, this cannot be done. Hatch opening at widest part is 4' 4", at widest angle came to 5ft. Engine stringers are 2' 6" apart. So no matter if I remove the entire transom or part of it, the transom will go back together in pieces. I'm leaning right now for partial replacement.

Photo405_zps378b94eb.jpg
 

alldodge

Moderator
Staff member
Joined
Mar 8, 2009
Messages
40,713
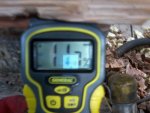
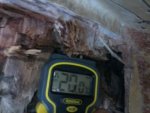
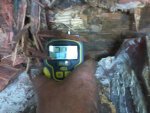
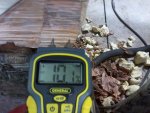
Well it's raining today so stopped work on the deck and back to the boat. Picked up a moisture meter and took some readings.
Starboard side on top
Photo417.jpg

Starboard side in the wood next to the outer skin


Photo418.jpg

Down low port side
Photo419.jpg

Down low starboard side
Photo420.jpg

Need to get some more blades for the multitool and keep digging. As I cut through the plywood I have yet to be able to determine how many sheets Formula used, there has been no separation only deterioration.
 

tpenfield

Moderator
Staff member
Joined
Jul 18, 2011
Messages
17,693
The 10% readings are pretty good for encapsulated wood. You could drill some test holes at the width of the meter probes to do some testing elsewhere on the transom without having to 'skin' it first. In my experience using that same meter . . . 10% is fairly dry . . . 30% is moist . . . 40%+ is soaking wet.

Probably could take a reading on the stringers and bulkhead too . . . or would that be pushing your luck :noidea:
 

alldodge

Moderator
Staff member
Joined
Mar 8, 2009
Messages
40,713
The 10% readings are pretty good for encapsulated wood. You could drill some test holes at the width of the meter probes to do some testing elsewhere on the transom without having to 'skin' it first. In my experience using that same meter . . . 10% is fairly dry . . . 30% is moist . . . 40%+ is soaking wet.

Probably could take a reading on the stringers and bulkhead too . . . or would that be pushing your luck :noidea:

Plan to test the stringers but just going to pass on the forward bulk head. Figured if it does have problems I don't want to know right now. Actually don't think it does. Had my water tank start leaking about 3 years ago. Tore out the aft cabin and ripped the tank out. At the time everything thing looked dry and fully encapsulated. Only water found was on top the glass. Put the new tank in and re-foamed it in.
 
Status
Not open for further replies.
Top