1970 Starcraft 16 ft Super Sport, stripped and ready

Honestsam

Cadet
Joined
Aug 25, 2014
Messages
16
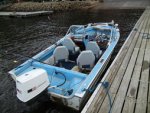
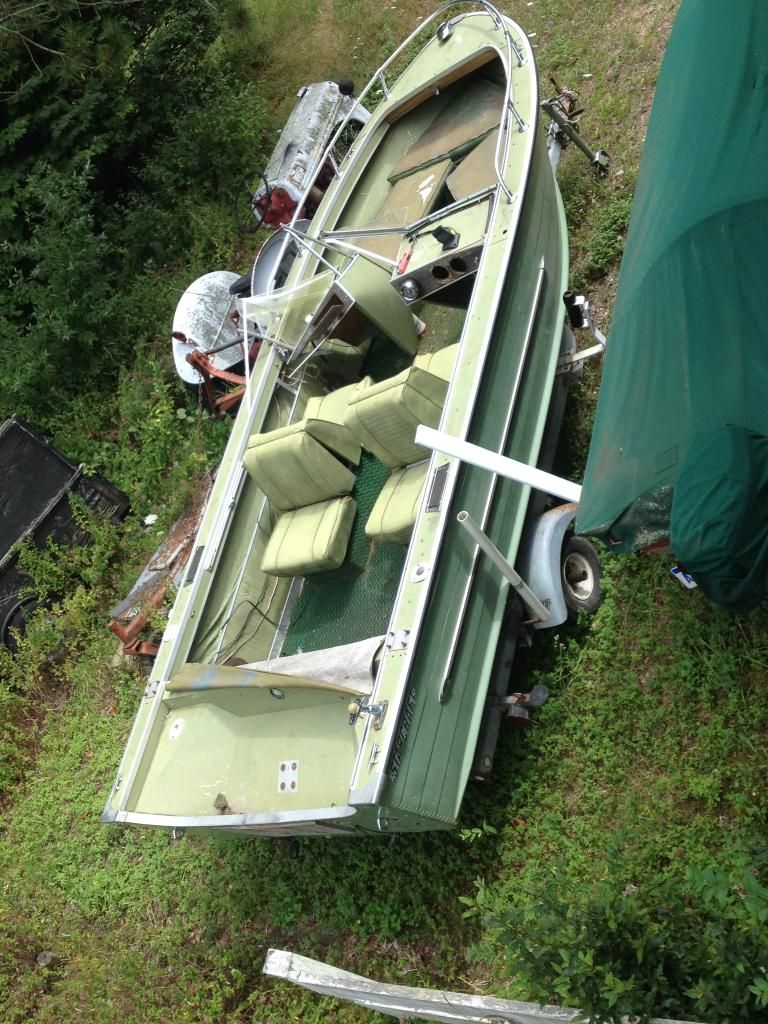
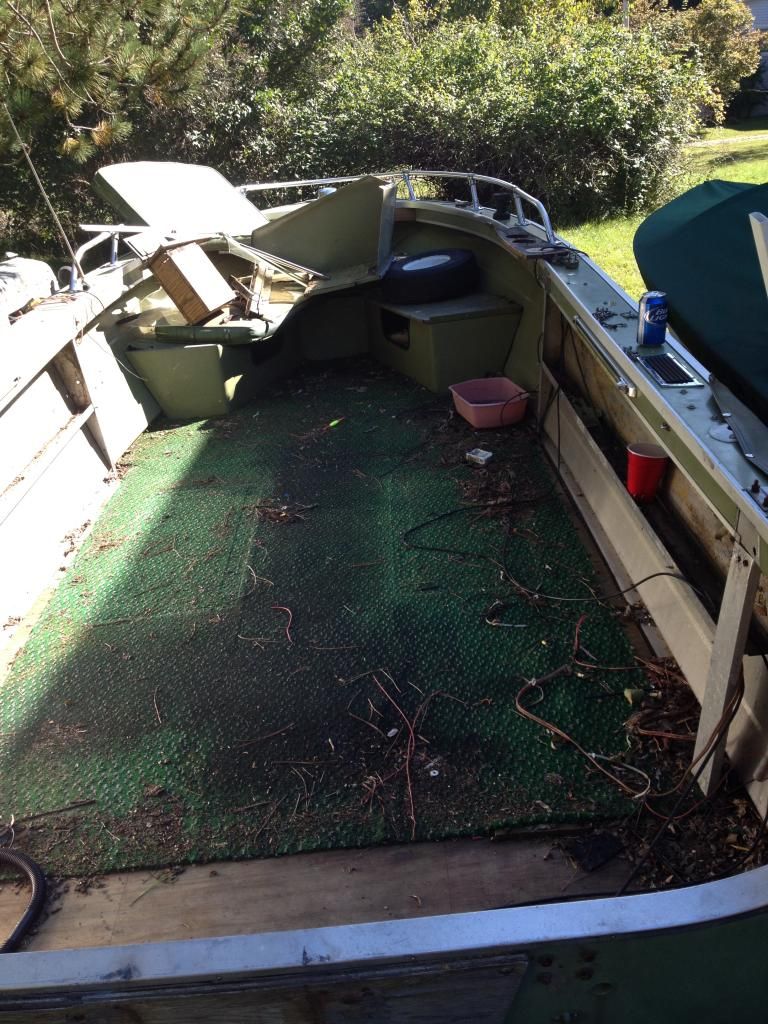
I bought this in the end of the summer for $600. Read a lot on the forum and am ready to water test it then put it away until spring.

It had;
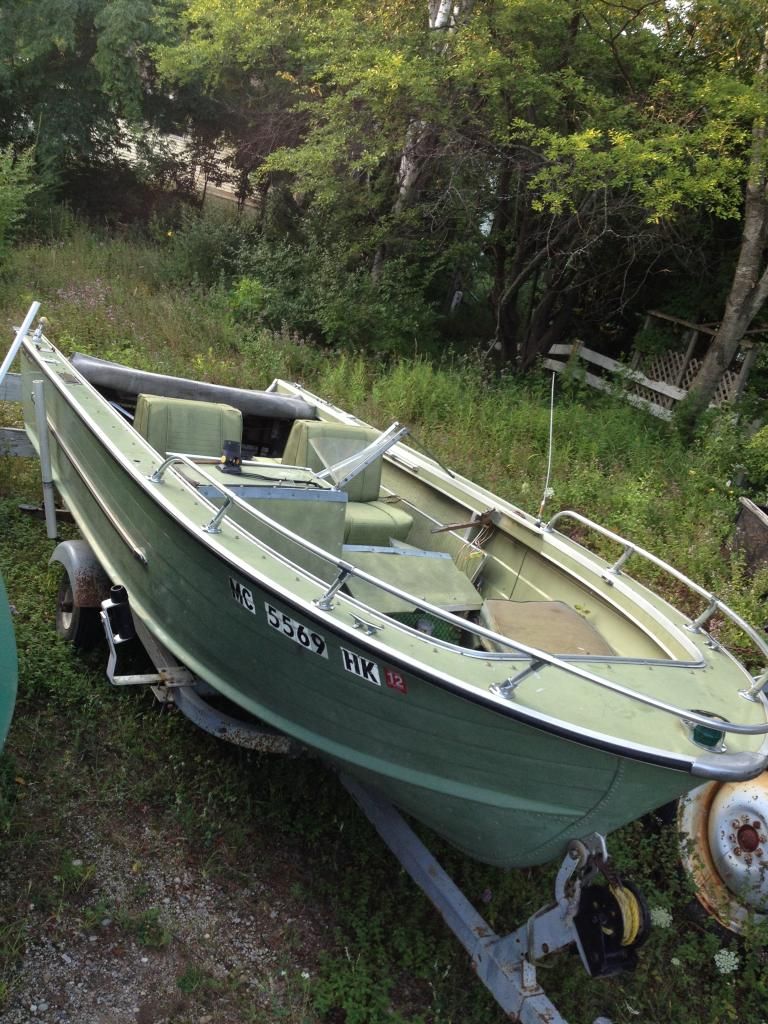
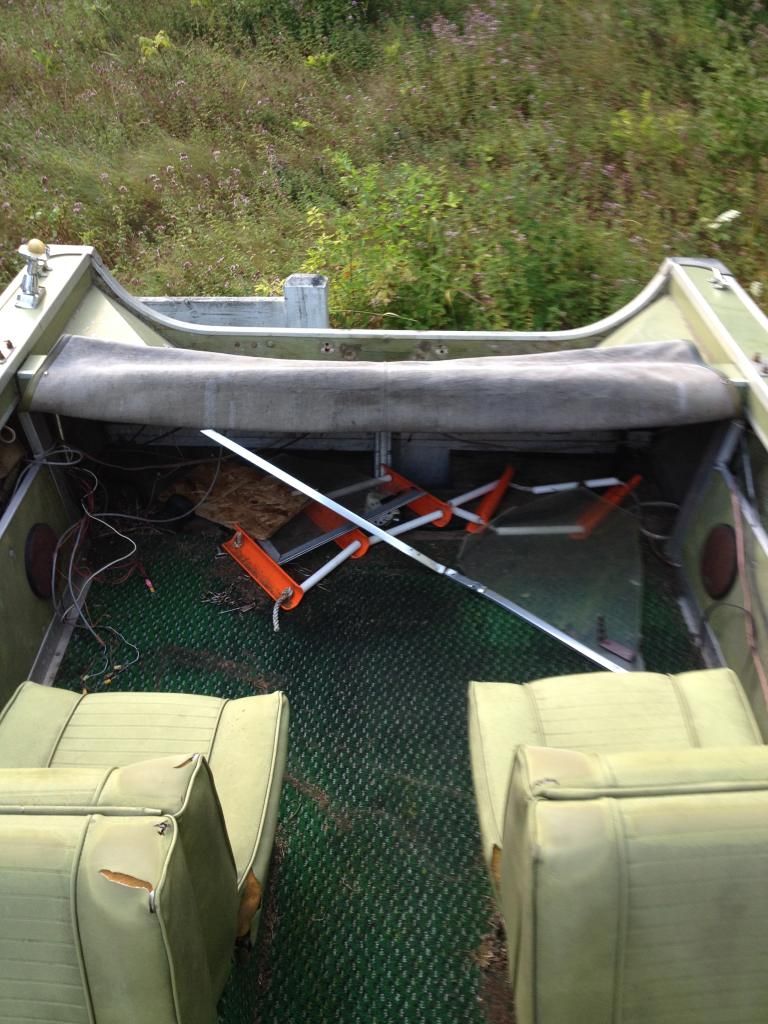
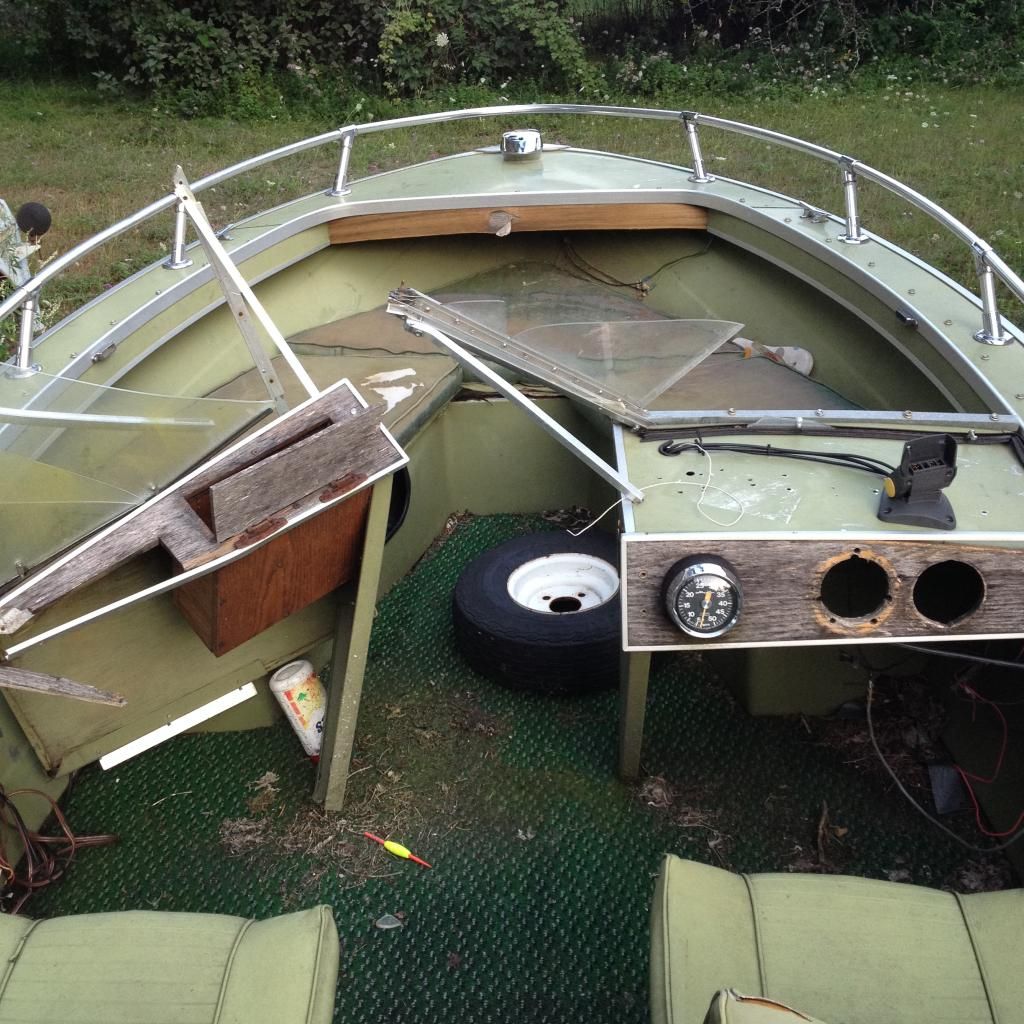
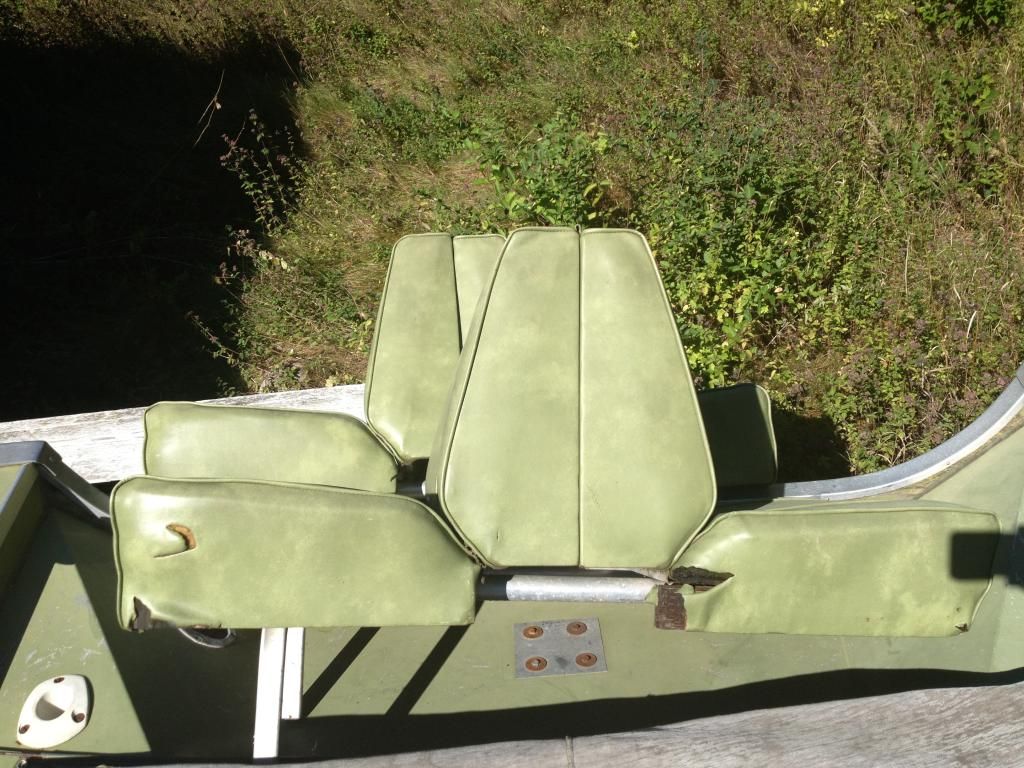
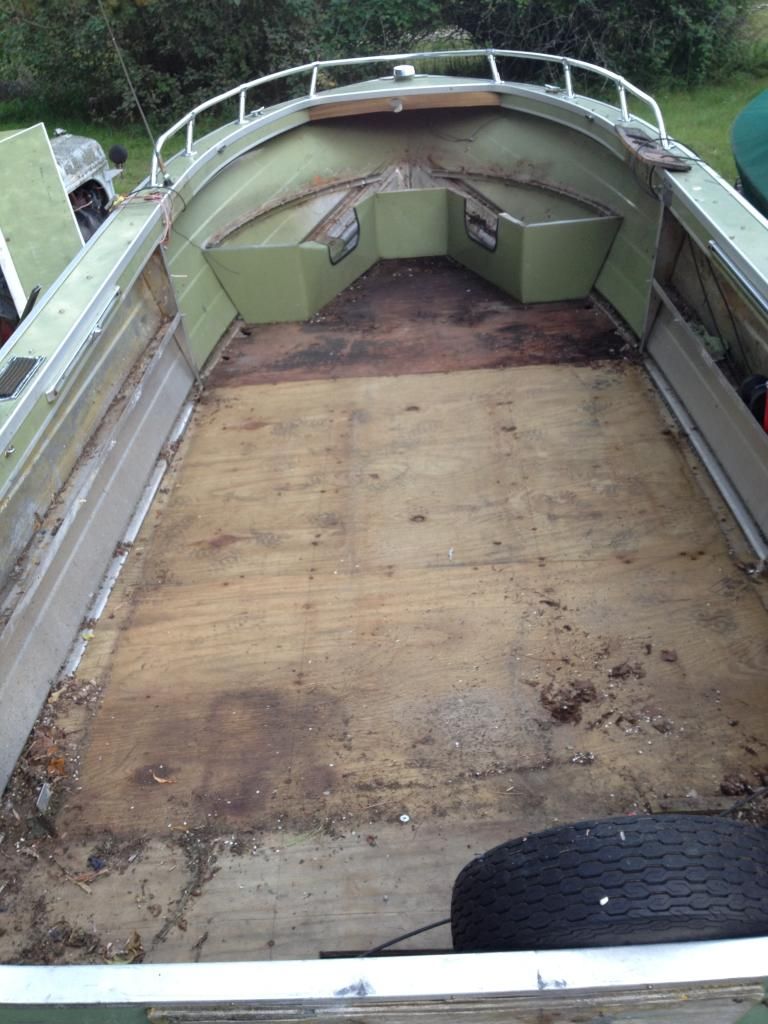
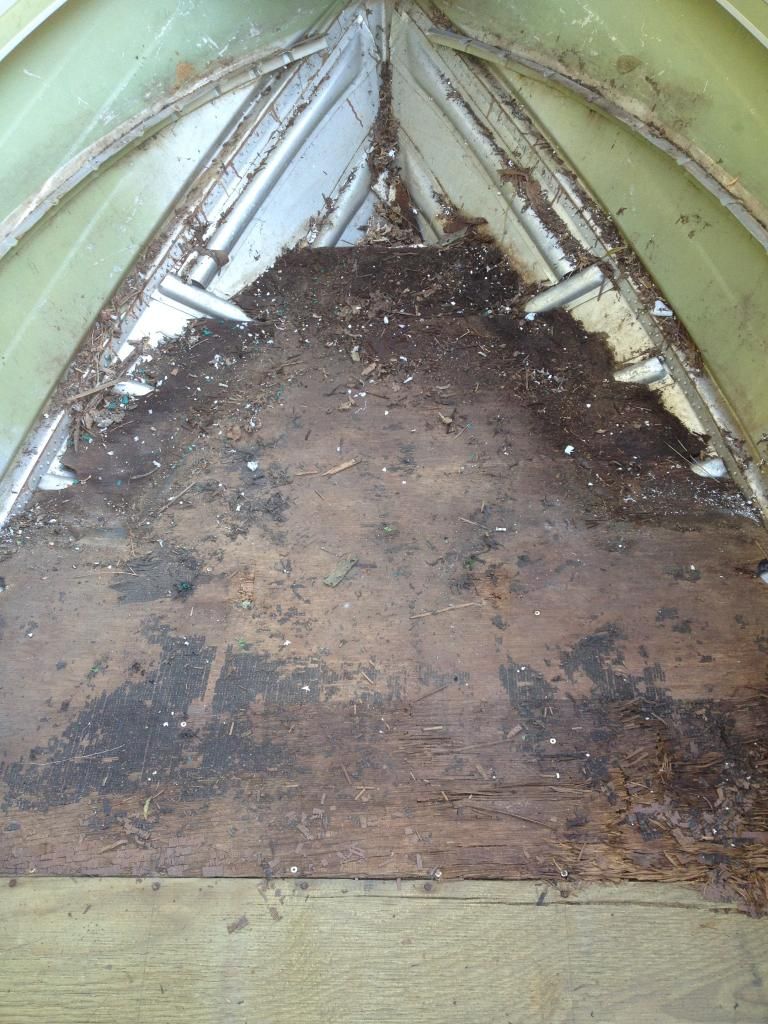
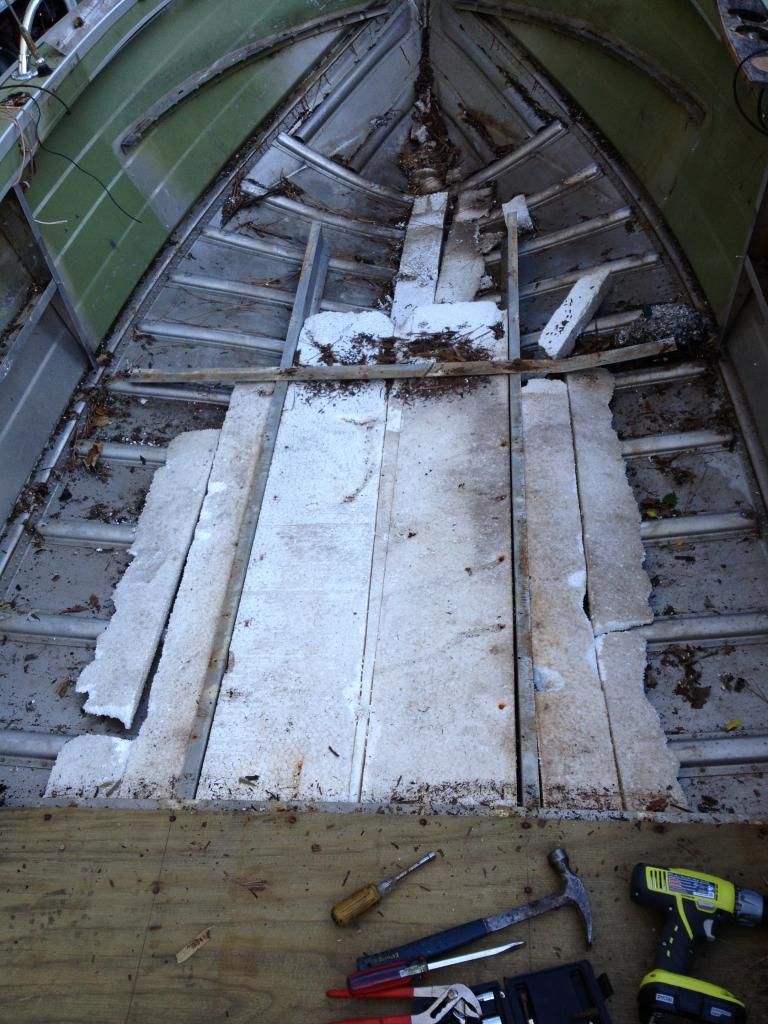
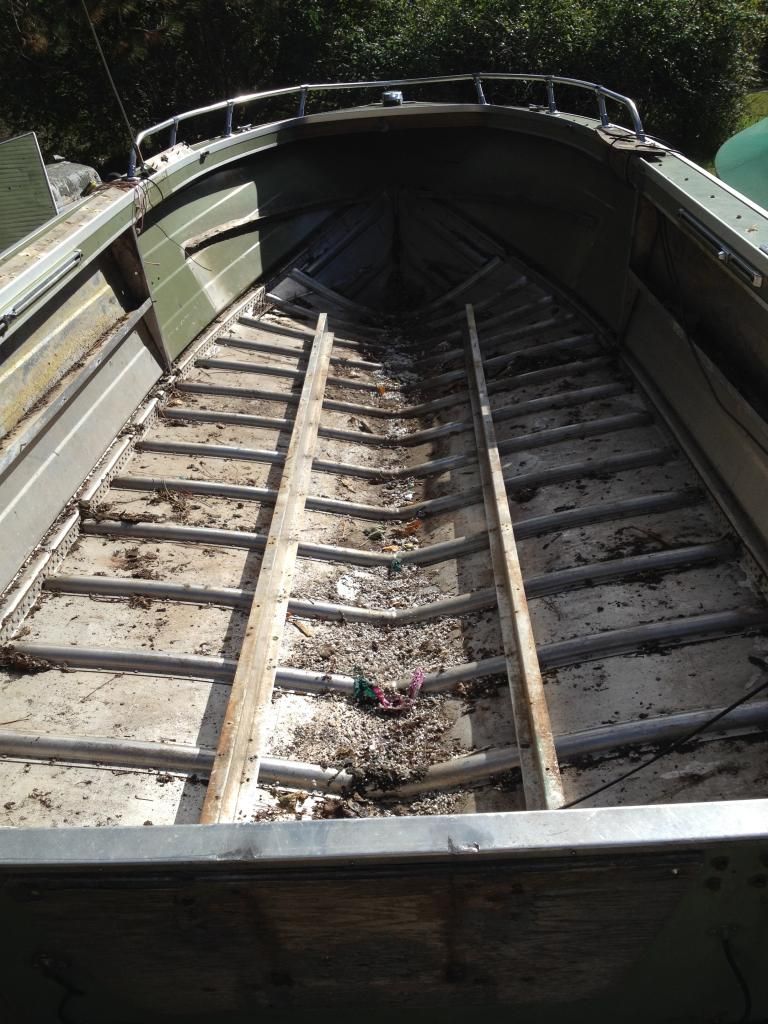
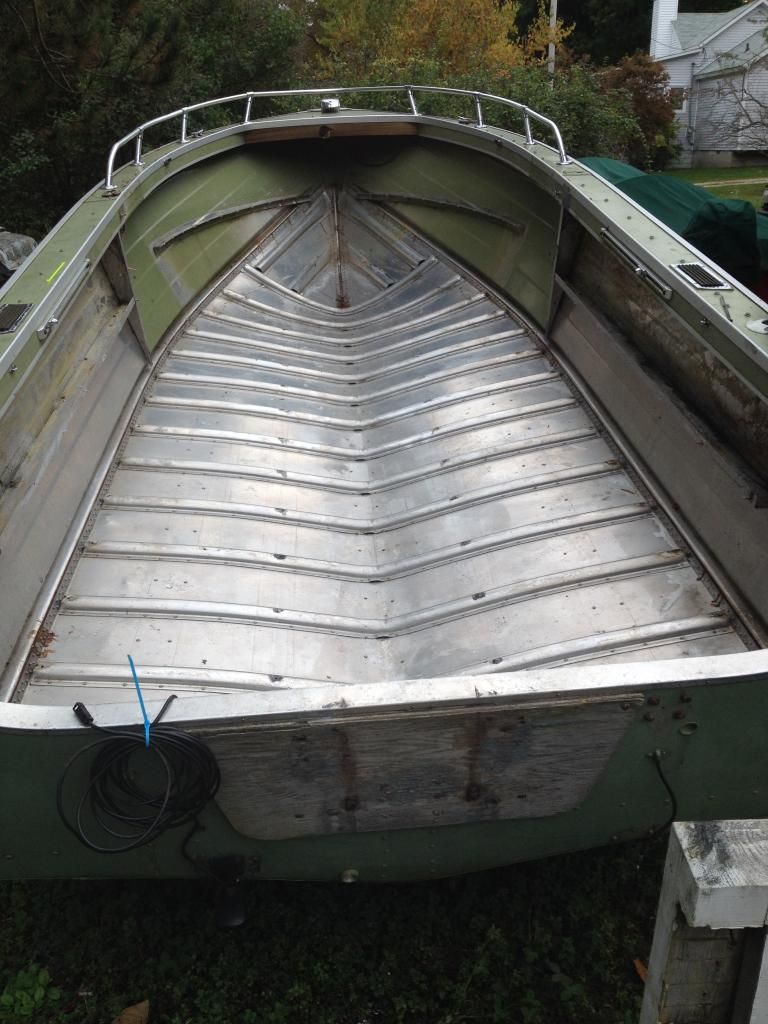
1. 2 sections (8 feet) of replaced floor attached with self tapping screws into the ribs. Bow area was original wood.
2. Z channel had a total of 6 rivets holding it to the ribs.
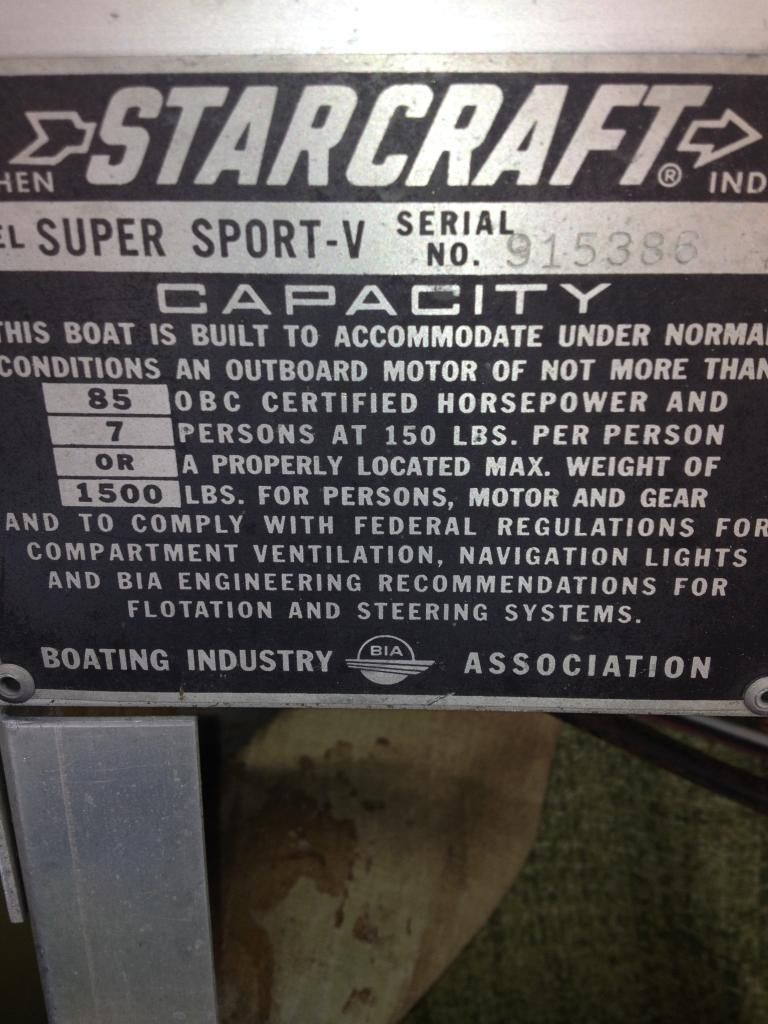
3. Overall looked good, no major dents/damage. Owner said it was a 77, has no HIN. bow rail looks like a 70 based on old brochures, serial number is 915386 so not positive on year.
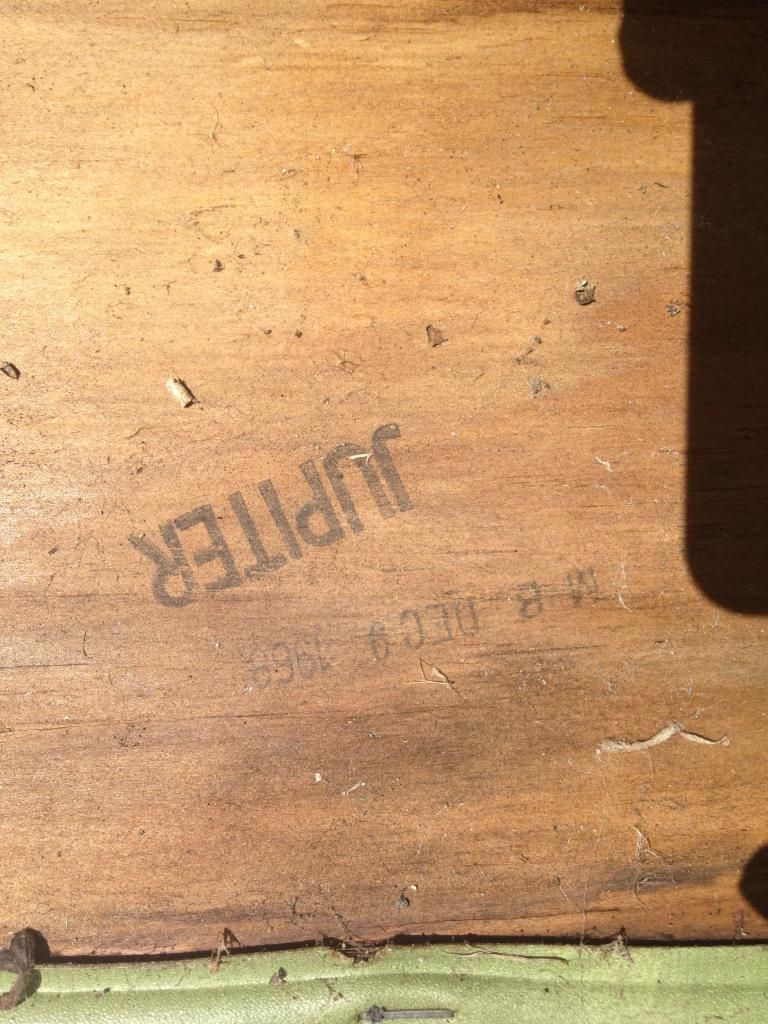
4. Seats that say Jupiter Dec 1968, left overs?

Plans are,so far;
1. Pink foam board under floor.
2. Marine grand 3/4 plywood with probably a exterior floor paint with 'rubber chips' in it.
3. 3 or 4 pedestal mount seats. Tiller style.
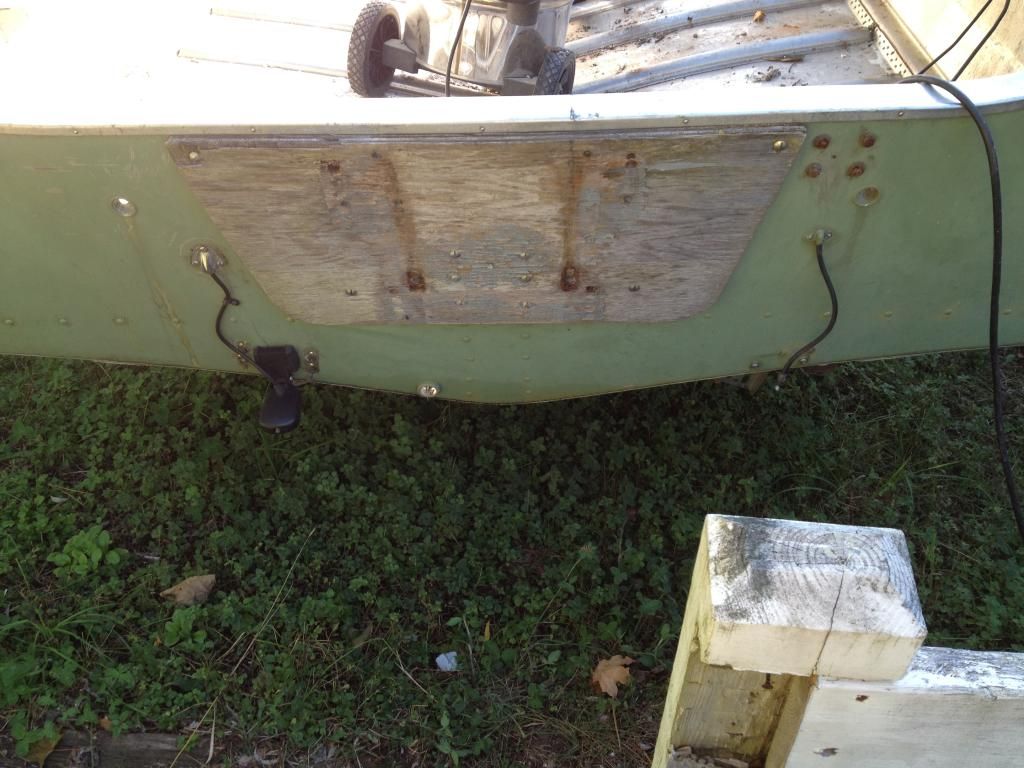
4. New transom.
5. Tiller mount motor, see if my 1982 25hp Evinrude has enough guts. Install bow mount electric troller.

Questions are; (seeking input)
1. Best fastener for mounting Z channel to ribs.
2. Best fastener for wood floor to ribs and Z channel.
3. Is a garage floor type non slip paint adequate.
4. insert opinion / experience here......


bonz_d

Vice Admiral
Joined
Apr 22, 2008
Messages
5,274
That is a fine start and the bottom looks very clean, no staining or bad pitting. Also the hard part is over.
 

hogg

Seaman
Joined
Jul 6, 2013
Messages
72
Is that Bottom/keel welded or Riveted? If it's Riveted, you have some work ahead of you. Do it before you put the Deck down. I had a 57 Marlin. I had that thing all over and it was a good trip. Your boat has a better layout than mind did. You'll enjoy yours more.
 

jbcurt00

Moderator
Staff member
Joined
Oct 25, 2011
Messages
24,871
Is that Bottom/keel welded or Riveted? If it's Riveted, you have some work ahead of you. Do it before you put the Deck down. I had a 57 Marlin. I had that thing all over and it was a good trip. Your boat has a better layout than mind did. You'll enjoy yours more.
What work ahead to you forsee w a riveted keel?
 

STARCRAFT16SS

Petty Officer 1st Class
Joined
Mar 25, 2008
Messages
344
were you able to save any of the floor for a pattern?
 
Last edited:

STARCRAFT16SS

Petty Officer 1st Class
Joined
Mar 25, 2008
Messages
344
No Title

NOT a 77...not with that style front seat support...probably before 1971...plexiglass windshield puts it prior to 1973 and the front bow aluminum seat
support is pre 1971.... your picture of the stern shows STARCRAFT with an arrow through the name...thinking 1968 or 1969....
My Starcraft Supersport is a 1971...the windshield on mine currently is a 1977/1978 windshield...
 

Attachments

  • photo210719.jpg
    photo210719.jpg
    14.6 KB · Views: 6
  • photo210720.jpg
    photo210720.jpg
    17.3 KB · Views: 6

GA_Boater

Honorary Moderator Emeritus
Joined
May 24, 2011
Messages
49,038
Welcome To TinSanity, Sam. You got her cleaned up. I don't think she's a '77. If it was, there would be a HIN plate on the stern. HIN's started about 1972. Did you get paperwork? I don't know for sure, but the styrofoam kinda places her in the late '60s, early '70s. And the windshield or what's left of it, looks like the late '60's/early 70's type too.

One more thing - Is that pressure treated ply for the two new floor pieces? It appears to have the green tint. If it is, don't re-use it. PT and AL don't play nice together.

BTW - The keels on all these is riveted.

Keep up the good work and keep the pics coming.
 

Honestsam

Cadet
Joined
Aug 25, 2014
Messages
16
Thanks for the input. Yes I have enough wood for a floor pattern. The aft 8 foot is a re-do from someone, forward 4 feet or so appears original but able to trace a pattern. Securing Z channel and wood floor, is my next question, after water testing which I hope will be soon.
Arrow through the Starcraft logo I will research, I was focusing on the bow rail, bends, supports,etc. re year made.
 

GA_Boater

Honorary Moderator Emeritus
Joined
May 24, 2011
Messages
49,038
Rivets are best for tying the stringers (Z-Channel) to the ribs. The stringers are real flimsy and wiggle from side to side until the floors tie everything together. Holding the floors down - Some use rivets, some use screws. I screwed mine down and have had no trouble.

Another thing for year ID - It looks like you have the vinyl curtain to cover under the splashwell. Some years had a pair of sliding doors. You might be able to see when one or the other started looking at the brochures.
 

hogg

Seaman
Joined
Jul 6, 2013
Messages
72
"What work ahead to you forsee w a riveted keel? " My boat had a "Keel" which was riveted to both parts of the Bottom...left and right sides. Those Rivets loosened up repeatedly and often. Fortunately I had a 14 yr old Slave Boy (my son) to help me tighten up the Rivets. But eventually I had to buy some sacks full of New Rivets and replace them all, from the front of the keel piece all the way back to the stern strapping. The new Rivets were of better material. It worked, no more leaks. We fixed a lot of Seat braces, etc too. But the biggest improvement I made was to fix the little "L" angles to the sides of the Deck-hi parts of the boats. That way I could screw the deck down, so it didn't float when the boat got water in it. The Insulation/Floatation would just float away when the Floor came up.
 

GA_Boater

Honorary Moderator Emeritus
Joined
May 24, 2011
Messages
49,038
Ya lost me there, hogg. The floor is secured to the stringer(s) and the ends of the ribs. I have no idea what a Marlin is, but in an SS the floor is well secured. It sounds like you had other problems if that much water got into it.
 

jbcurt00

Moderator
Staff member
Joined
Oct 25, 2011
Messages
24,871
Hogg: I'm w GA and completely dont get a good pix of what you are describing.. floating floor? Maybe the previous owner did bad work? Wouldnt be the 1st time.
 

classiccat

"Captain" + Starmada Splash Of The Year 2020
Joined
Dec 20, 2010
Messages
3,405
Welcome to the Starmada Honestsam!!! You got off on the right foot with pictures and teardown!!! Nice liooking hull you found there! :thumb:
 

Honestsam

Cadet
Joined
Aug 25, 2014
Messages
16
Regarding the curtain, I think that may have been done later, possibly when the 2nd floor was put in. There are channels on the under side of the splash well, someone installed snaps through that channel. They are dfferent than the rest of the snaps on the boat, such as the ones for the bimini top I assume? Also 'they' did a decent job doing that make over, possibly where the Jupiter seats came in?

Speaking of snaps, there are like forty tousand of them in the gunwale. I want to remove them, they are the thread in kind, but I wil be left with 40 thousand holes. I was thinking a dab of JB weld or 2 part epoxy / putty type applied from underneath then smoothed over on the top and painted later.


Today, it's more wire wheeling to get that adhesive off the side that held that groovy contact paper / wall treatment.


pckeen

Commander
Joined
Jun 20, 2012
Messages
2,067
Nice tear down - make sure you do a good leak test while it is in that condition - simply fill it to above the waterline with water and see what leaks.

In terms of the HP, the rule of thumb is to power a boat with a motor no less than 70% of the max rated horsepower. You would want at least a 60 horse on that boat. This doesn't mean you cannot put a 25hp on it, but you'll probably find some difficulties getting on plane, particularly if your boat is loaded.
 

GA_Boater

Honorary Moderator Emeritus
Joined
May 24, 2011
Messages
49,038
You're right about the curtain being added during a prior re-do after seeing the track on the splashwwell. You can put doors back on if you want to. You're probably missing the bottom track, but it can be redone.

I Googled Jupiter boat seats and Jupiter may have have been a supplier to Starcraft. I found some hits on Jupiter helm seats, so maybe?
 

Watermann

Starmada Splash of the Year 2014
Joined
Jan 12, 2013
Messages
13,753
Nice 16'r you have to work with there! :thumb:

I would use large flange AL rivets to secure the new decking to the rib ends just like SC did at the factory. You'll find that the side channel holes don't line up with the ends of the ribs, you just have to use SS screws to secure them to the decking once again as SC did when she was built.

If the boat was used in a deteriorated condition be sure to examine the splash rail and the hull at the ends of the ribs for sign of cracks. With the supporting structure of the boat being bad it can cause stress cracks when used by a PO in that condition. In looking through threads, you'll see some of us that had that issue and not only resolved it by patching but added hull stiffeners to help eliminate any future problems.

Keep up the good work!
 

Honestsam

Cadet
Joined
Aug 25, 2014
Messages
16
I assumed Jupiter referred to the SC model 'Jupiter' GA. I guess it would take everyone who still have a lot of original seats to look and see what theirs say.
I do like the look of the retro screen on the doors those boats have.

Thank you Watermann I will inspect those areas for cracks. And I will look for 'Large flange' rivets, never heard of them before. I was surprised how many missing rivets there were when I pulled the flooring up.
 

GA_Boater

Honorary Moderator Emeritus
Joined
May 24, 2011
Messages
49,038
I'm just guessing on the Jupiter seats, Sam. About the only difference in back-to-back seats in these oldies is the height of the base box. The seat is the same. But then again SC may have stenciled the seats to put the right ones in the right boat models. Who knows?
 

Honestsam

Cadet
Joined
Aug 25, 2014
Messages
16
So water test went 90 % okay, there were some minor seam leaks. There was a small amount of water that would come up and bead right on top of the seam but not really spill over and continue to leak. I'm not sure if the factory sealant dries out? Any way I plan on using the GluVit I see discussed on the forums. No leaking rivets were found. Attached are pics.

Question; do you apply and sealant to the bottom? There seams to be a small lip / gap (1-2mm) between the sidewall and the bottom.

 
Top