1990 Crestliner Phantom SST 180

Status
Not open for further replies.

crkranz

Petty Officer 2nd Class
Joined
Jun 1, 2010
Messages
139
Waiting on motor stand to get here so I can pull the motor and then pull all the bolts and transom wood out.
 

Watermann

Starmada Splash of the Year 2014
Joined
Jan 12, 2013
Messages
13,753
Now that is one stout built boat you have there! The SST feature looks like a huge PITA to tear down and replace the wood. It could be a good candidate for the use of sea cast to take the place of ply.

Just to let you know on the terminology I learned, in your drawing of the transom structure the pieces you call "kickers" are what most guys call transom knee braces.
 

crkranz

Petty Officer 2nd Class
Joined
Jun 1, 2010
Messages
139
Now that is one stout built boat you have there! The SST feature looks like a huge PITA to tear down and replace the wood. It could be a good candidate for the use of sea cast to take the place of ply.

Just to let you know on the terminology I learned, in your drawing of the transom structure the pieces you call "kickers" are what most guys call transom knee braces.


The actual rear transom will be easy to replace, but the inner piece of ply is the big problem. I don't know how you would 'seacast' that if that is what you meant. Has anyone done poured transom on a tin boat? The problem with the SST is that they apparently welded a good portion of it together on the boat.

I'm not sure what purpose the ply on the inner transom serves other than a buffer between the knee braces and the SST and maybe to stiffen the aluminum skin on the back. I am considering just replacing the single sheet of ply with 3" strips just behind the braces.
 

crkranz

Petty Officer 2nd Class
Joined
Jun 1, 2010
Messages
139
Popped the cap on the transom and the wood looks pretty good from what I see. I am going to pull all the bolts out of the transom and do some more investigation. Maybe I will get lucky and not need to replace it. I pulled a tape and the wood measures 1-7/8". It looks like I would need 3 lams of 5/8" to get the thickness.
 

crkranz

Petty Officer 2nd Class
Joined
Jun 1, 2010
Messages
139
Installed a lifting plate on the ceiling of my garage for removing motors and lifting whatnot. I rate it at around 400# with a good safety factor.


GA_Boater

Honorary Moderator Emeritus
Joined
May 24, 2011
Messages
49,038
Do you have something backing up the plate on the other side of the ceiling? Sure don't want it to pull out when the motor is hanging.
 

eboat85

Petty Officer 2nd Class
Joined
Sep 1, 2013
Messages
121
Just read your thread and it looks like you are were I was this time last year. My 85 Nordic didn't have the SST but the rest of the construction looks to be about the same.

Crestliner designed the boats to drain water to the bilge and let the pump do the work. So there was little regard to keeping the plywood dry. Mine came out in one piece but had the strength of balsa. A rule of thumb is that if you think it might be bad, it is.

One big help that I had, besides the iboats guys, was to remember that I don't have to do anything the way Crestliner did it.

Looks like your off to a great start!
 

classiccat

"Captain" + Starmada Splash Of The Year 2020
Joined
Dec 20, 2010
Messages
3,405
Do you have something backing up the plate on the other side of the ceiling? Sure don't want it to pull out when the motor is hanging.

There's probably a joist right next to that ceiling light...but make sure you know where the wires are before driving lags home!

Good progress on the boat crk! She's a tank! It will take some creativity to replace all of the wood...but well worth the effort IMO.
 

Watermann

Starmada Splash of the Year 2014
Joined
Jan 12, 2013
Messages
13,753
I strongly suggest you relieve the weight of the motor before removing too many of the bolts. So the transom thickness you're talking about since there are 2 of them is it the OB transom that is 1-7/8" thick? Also we've all seen it before that the transom is always showing more thickness due to delamination and swelling so I wouldn't see that number as the gospel. You will also want to add thickness by sealing and laminating together the new wood.

So if you can remove the old single layer ply in the inner transom which is 3/4" ply? Then why isn't it possible to just replace it? Not sure I would just drop in strips where the bolts go through, that piece of ply would surely add strength and support to the entire transom area.
 

crkranz

Petty Officer 2nd Class
Joined
Jun 1, 2010
Messages
139
Got the gas tank drained, removed and cleaned up. Then pulled the outboard off and mounted on stand. OB Transom doesn't look to bad when I pulled the cap and definitely measures 1-7/8".


Last edited:

crkranz

Petty Officer 2nd Class
Joined
Jun 1, 2010
Messages
139
So if you can remove the old single layer ply in the inner transom which is 3/4" ply? Then why isn't it possible to just replace it? Not sure I would just drop in strips where the bolts go through, that piece of ply would surely add strength and support to the entire transom area.


As far as removing the old single 3/4" ply on the IB transom the problem is that the side sheets of the SST were welded in afterwards and goes over the ply making it impossible to remove/replace in one piece. Since its not structural IMO I am just going to replace it with pieces at each brace.

 
Last edited:

MarkNY

Seaman Apprentice
Joined
Feb 25, 2010
Messages
47
As far as removing the old single 3/4" ply on the IB transom the problem is that the side sheets of the SST were welded in afterwards and goes over the ply making it impossible to remove/replace in one piece. Since its not structural IMO I am just going to replace it with pieces at each brace.

I think your making a big mistake by not replacing that 3/4" ply with a full sized piece. That is definitely structural, hence the 14 bolts that go though it. I have the same setup and have studied it quite a bit. Im sure it adds alot of rigidity which your not going to get with shims. Hope you reconsider. That slot that I had cut out on mine gave me full access to my panel. Swelled wood slowed me down but the new piece should slide in easier. Now hunting season is slowing me down! Good Luck, Mark
 

Woodonglass

Supreme Mariner
Joined
Dec 29, 2009
Messages
25,924
With the "Extended Pod" setup I 100% agree with MarkNY!!! It's imperative for the structural integrity of the boat that the transom fully extend from port to starboard in one solid piece. Whatever it takes to accomplish this needs to be done. The stresses from the extension are a lot greater than on a normal transom and 3/4" ply is minimal structural support at best. Of course, this is just an Old Dumb Okies Opinion.
 

crkranz

Petty Officer 2nd Class
Joined
Jun 1, 2010
Messages
139
It is impossible to replace with a single sheet. The sst side plates are welded in and are notched over that piece of ply.
Mark's slot doesn't solve this as far as I see.

As far as the structural importance, I don't think it has much. It is only a single plywood and in some spots (like by the access holes) there is hardly any cross section making it incapable of transferring any meaningful loads.

The 14 bolts are not tying the sst to the transom but into the floor stringers via the transom braces IMO.
 
Last edited:

crkranz

Petty Officer 2nd Class
Joined
Jun 1, 2010
Messages
139
With the "Extended Pod" setup I 100% agree with MarkNY!!! It's imperative for the structural integrity of the boat that the transom fully extend from port to starboard in one solid piece. Whatever it takes to accomplish this needs to be done. The stresses from the extension are a lot greater than on a normal transom
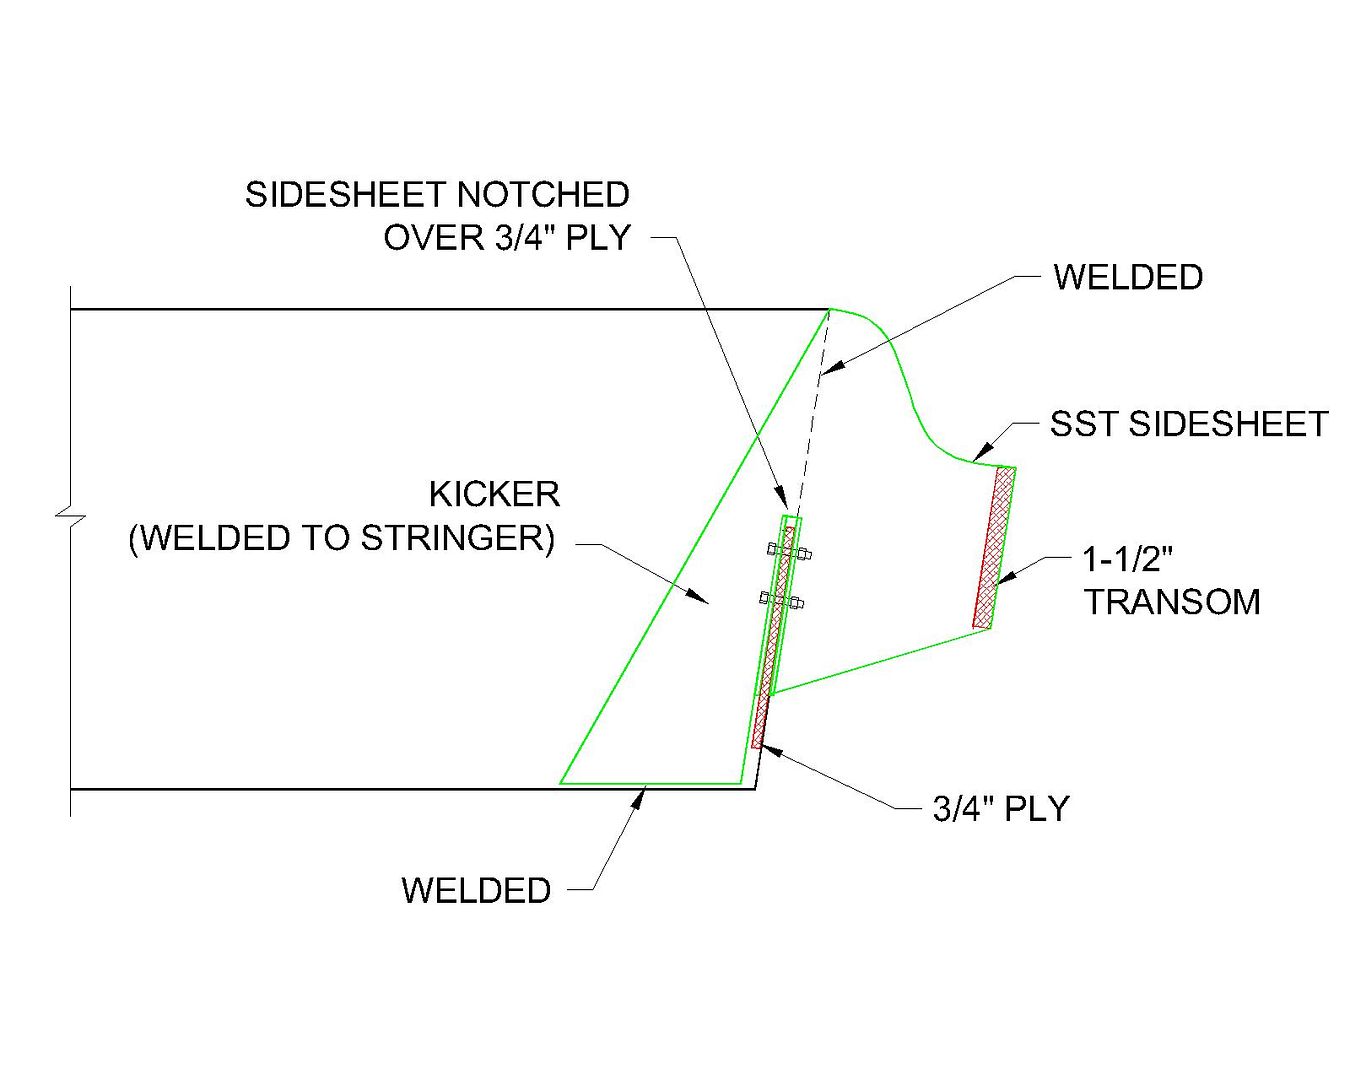
It is not a normal transom. If it was I would agree.
 

crkranz

Petty Officer 2nd Class
Joined
Jun 1, 2010
Messages
139
The OB transom is made from a piece of 3/4" laminated to a piece of 1" (which actually measures closer to 1-1/16) for a total thickness of slightly over 1-3/4".

I poked in all the bolt holes and I haven't found any soft spots. The transom wood seems solid everywhere I check so I am not going to replace it.
 

MarkNY

Seaman Apprentice
Joined
Feb 25, 2010
Messages
47
Thats why i had that slot cut out. starts right where your arrow is and extends to same position on other side. gives you full access to the panel. I have a few stress cracks that i think were caused by the rotten wood. I can picture twisting occurring by not having a solid piece of wood in both the inner and outer transom areas....
 
Status
Not open for further replies.
Top